The narrow, power-packed, carry-heavy game plan that delivered them a 30-15 win in the first Test had come undone slowly in the second, as pivotal pieces to the system were lost and conditions deteriorated.
The same game plan could not be used to the same effect in the third and final decider at Eden Park with so many changes in personnel.
Ngani Laumape, Anton Lienert-Brown and Jordie Barrett each had their own strengths, and it was time to change things up and fight fire with fire against the growing confidence of the Lions’ width attack.
Beauden Barrett had been relatively quiet with ball-in-hand in the series to this point.
His touches at first receiver were almost non-existent in the first test. He had also taken a backseat on set-piece plays as the All Blacks looked to make the gain line with direct carries from power runners like Williams and the loose forwards.
In the second test, he had to drive the side through territorial kicking in the wet. The few valuable possessions in attacking zones were kicked away with no reward.
With the series on the line, it was time to free the reigning World Player of the Year in the biggest test of his starting career. It was designed to be his version of Dan Carter’s ’05 showing against the Lions in the second test.
ADVERTISEMENT
Barrett’s two major strengths, his running game built on burning speed and pinpoint cross kicks, were given every chance to flourish as the All Blacks abandoned the midfielder-led forward-based attack.
From the very first attacking platform, the All Blacks showed a renewed desire to get the ball wide and into the hands of their star playmaker.
After a crash ball from Ngani Laumape flat off Aaron Smith on the first phase following a lineout, they showed a common look from the first two Tests – a pod of two forwards and a midfield latcher on the outside.
ADVERTISEMENT
But this time, at the first opportunity, the ball was released out the back to Beauden Barrett (10) with the intention of playing wide.
The Lions’ midfielders were up to the task, giving Barrett nothing and forcing him back inside to carry.
It was an early sign that the All Blacks would try to get Barrett involved as much as possible, giving him numerous opportunities to make plays.
Moments later, following a quick tap from Aaron Smith, Laumape again sets up a midfield crash for Barrett to play off on the next phase the same way.
Following quick ball, Barrett takes on the line, using the one-on-one matchup with Sean O’Brien (7) to try to beat him on the outside.
With the outside defenders staying off him, Barrett punched through the line slightly with O’Brien tackling low.
Jordie Barrett (15) ran a beautiful line on the outside, working off-the-ball to get around Jonathan Davies to give his brother a support option.
The older Barrett delivered the offload to set the fullback free only for Savea to drop the last pass, leaving the opportunity begging.
In just the opening five minutes, the All Blacks had played with more width and tempo than almost the entire first two Tests.
Barrett’s first two touches were threatening, opening up the Lions on just the second run with an offload in contact.
The narrow attack pattern from the first Test had been altered, sending the midfielders and fullback back to more traditional setups.
Instead of keeping narrow and switching play back and forth every phase, they moved back to working the same way methodically to play with width.
Following a wide shift to the left-hand touchline, we see the All Blacks adjusted pattern for the third test.
Similar to the first carry in a traditional 1-3-3-1 pattern, a pod of three forwards carries off 9 with Barrett in behind on the first phase.
The second phase the same way consisted of a tight two-man pod, this time without a midfielder attached.
In the first two Tests, the two midfielders consistently lined up inside and outside the two-man pod, taking carries or late passes off the forwards.
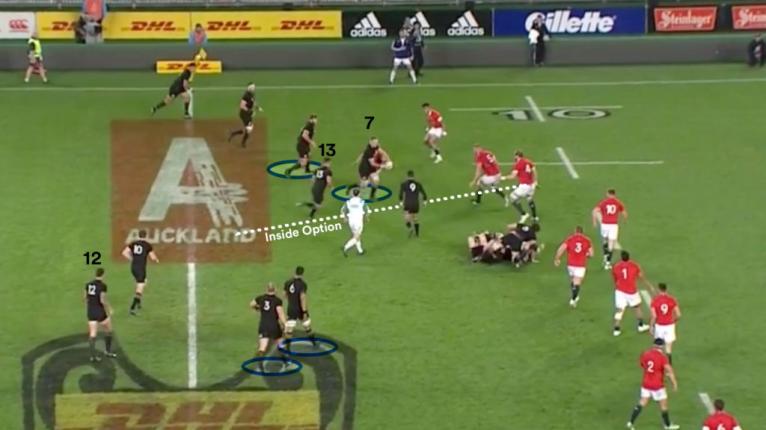
Anton-Lienert Brown (13) is much deeper now, as an option in the backline should the ball come out behind the pod.
With Barrett tucked in behind the two-man pod, it would also provide a decent shield from which to deploy the cross-field kick.
With the All Blacks deep inside the Lions 22, we see this pattern emerge again except Barrett (10) is stuck inside the current ruck, leading to some irregularity with it.
The first pod of three is ready for a carry, with the second two-man pod stationed in the midfield.
The midfielders are deep, ready to organize the pods and fill in as distributors for Barrett, who is stuck in the ruck unable to perform his usual task.
Jordie Barrett (15) senses the cross-kick option is on and calls for a kick very early with his arm raised up.
After the first carry, the two-man forward pod readies for another carry, while Beauden Barrett (10) reloads on the far side.
Anton Lienert-Brown feigns the deep-to-flat inside line that Sonny Bill Williams ran frequently in the first test, staying back once the pass is made from 9.
Jordie Barrett (15) is still calling for the kick with a one-on-one aerial matchup on Elliot Daly present.
By the third phase, Beauden Barrett has heeded his brother’s call, jumping over to the other side of the ruck in order to make the play.
With a bit of protection from Lienert-Brown, Barrett launches the bomb.
Jordie Barrett climbs high above his counterpart and is able to bat the ball back infield into the path of Laumape, who scores the first try in the corner.
It’s a fast start for the All Blacks, up 7-0 and there’s already lots of involvement from Barrett – which was missing early in the first two Tests.
Beauden Barrett is involved in far more capacity in every facet of the game.
In nearly every set-piece play, he is used as the primary playmaker, getting plenty of touches to attack from.
There was no holding back as Barrett plowed into the Lions defence time and time again, looking to find a gap.
All his favourite plays from that period of time were brought out, including one he used to burn Conor Murray eight months earlier.
Using a 4-2 split from a midfield scrum, the All Blacks and the Hurricanes would use Barrett’s speed to skin sliding halfbacks forced to cover the 10.
With most defences covering the threat of the 8-9 the other way, Barrett looked to exploit the 4-on-3 overlap advantage on his side of the scrum with pure speed.
Barrett had beaten Irish halfback Murray on the same play the year earlier in Dublin.
This time Murray was up to the task, with help up top from Jonathan Davies that prevented the offload from getting away to the open Laumape.
Davies quickly learned from the opening minutes not to completely leave his inside man one-on-one with Barrett.
Barrett got the chance to run a ‘heads up’ version of almost the same play shortly after when the All Blacks won a tighthead scrum feed, only for the pass to bounce of his chest.
This was just one of many attacking opportunities that went begging, as spilled ball inside the Lions’ 22 ended the chances of scoring multiple times.
Using their adjusted phase play pattern, but this time from the right-hand touchline, the All Blacks used the two-man pod to release the backs with a smart set play.
If Jamie George (2) could be held where he is, the last two outside men in Jonathan Sexton (10) and Anthony Watson (14) would be up against grave odds to hold off the All Blacks backline.
With both Barrett brothers tucked in behind the two-man forward pod, a slick double ‘screen’ play to release the backs unfolded.
Beauden Barrett (10) got the ball out the backdoor from Retallick on the first screen, setting up a second screen pass between the brothers to seal the edge on Jamie George (2).
Codie Taylor’s (2) ‘unders’ line is meant to hold George, so Jordie Barrett can get on the outside of the English hooker.
George (2) doesn’t take the bait on Taylor (2), making a great read to close in on Jordie Barrett (15) out the back.
Barrett’s pass is rushed to Laumape, and another great read by Sexton dislodges the ball in contact.
Anton Lienert-Brown sensed an opportunity right outside Laumape and is seen charging into the open space off his outside shoulder.
Right on the edge of halftime, he got another chance to do so.
The All Blacks had already run multiple plays with Julian Savea (11) stacked in behind Barrett as a tight option to play a pop pass on either side of the flyhalf.
As they prepared to run another similar scheme, Owen Farrell (12) is hedging his bets, creeping inward in anticipation of tackling the stacked winger Israel Dagg (14) on a pop pass.
He is seen looking and walking inward to give Sexton help.
He loses alignment with Ngani Laumape (12), and Barrett makes him pay with a zinging face ball, putting his Hurricanes’ teammate into the gaping hole that also forces Jonathan Davies to leave his assignment to cover.
Davies closing in frees Lienert-Brown and a superb offload around the corner by Laumape sparks the movement and the All Blacks finally strike to take a 12-6 lead into the half.
The reality was though that they missed many opportunities to close out the game before oranges. The mountain of possession could have yielded 25 points, more than double what they did get.
The level of execution wasn’t quite there, although they completely opened up the playbook and played excellent rugby in spurts, all around Beauden Barrett.
This continued in the second half as the Barrett brothers pulled out another classic play from the Hurricanes’ playbook.
This was a variation of a play the two used during the Super Rugby season for their club, combining out the back to use Jordie Barrett as a playmaker on the edge.
The last pass went forward and another try-scoring opportunity was missed. The All Blacks made more first phase errors on the next two set-piece plays, leading to a momentum swing that the Lions used to draw level.
There were moments of brilliance from both Barretts, but history books will show a 15-all draw.
It won’t be remembered in the same breath as Dan Carter’s 2005 second test performance against the Lions, but if there was 10% better execution, it might have been. The All Blacks went full-Barrett, giving him full reign over the attack and opening up the playbook to run everything that suited him.
No {{resultsType == 0 ? "fixtures" : "results"}} for {{resultName()}}.
{{article.cp.n}}
{{article.t}}
{{article.e.name}}
{{article.c}}
{{article.d}}
No news results for {{resultName()}}.
{{item.n}}
No RPTV results for {{resultName()}}.
Popular
{{comp.n}}
Tournament
{{team.n}}
Team
{{player.n}}
{{player.t}}
Edition & Time Zone
{{current.name}}
Set time zone automatically
{{selectedTimezoneTitle}} (auto)
Choose a different time zone
Editions
{{item.title}}
Change Time Zone
{{item.title}}
[{"tz":"Africa\/Abidjan","location":"Abidjan","code":"CI","country":"Cate d'Ivoire","title":"Abidjan - Cote d'Ivoire"},{"tz":"Africa\/Accra","location":"Accra","code":"GH","country":"Ghana","title":"Accra - Ghana"},{"tz":"Africa\/Addis_Ababa","location":"AddisAbaba","code":"ET","country":"Ethiopia","title":"Addis Ababa - Ethiopia"},{"tz":"Africa\/Algiers","location":"Algiers","code":"DZ","country":"Algeria","title":"Algiers - Algeria"},{"tz":"Africa\/Asmara","location":"Asmara","code":"ER","country":"Eritrea","title":"Asmara - Eritrea"},{"tz":"Africa\/Bamako","location":"Bamako","code":"ML","country":"Mali","title":"Bamako - Mali"},{"tz":"Africa\/Bangui","location":"Bangui","code":"CF","country":"Central African Republic","title":"Bangui - Central African Republic"},{"tz":"Africa\/Banjul","location":"Banjul","code":"GM","country":"Gambia","title":"Banjul - Gambia"},{"tz":"Africa\/Bissau","location":"Bissau","code":"GW","country":"Guinea-Bissau","title":"Bissau - Guinea-Bissau"},{"tz":"Africa\/Blantyre","location":"Blantyre","code":"MW","country":"Malawi","title":"Blantyre - Malawi"},{"tz":"Africa\/Brazzaville","location":"Brazzaville","code":"CG","country":"Congo (Brazzaville)","title":"Brazzaville - The Republic of the Congo"},{"tz":"Africa\/Bujumbura","location":"Bujumbura","code":"BI","country":"Burundi","title":"Bujumbura - Burundi"},{"tz":"Africa\/Cairo","location":"Cairo","code":"EG","country":"Egypt","title":"Cairo - Egypt"},{"tz":"Africa\/Casablanca","location":"Casablanca","code":"MA","country":"Morocco","title":"Casablanca - Morocco"},{"tz":"Africa\/Ceuta","location":"Ceuta","code":"ES","country":"Spain","title":"Ceuta - Spain"},{"tz":"Africa\/Conakry","location":"Conakry","code":"GN","country":"Guinea","title":"Conakry - Guinea"},{"tz":"Africa\/Dakar","location":"Dakar","code":"SN","country":"Senegal","title":"Dakar - Senegal"},{"tz":"Africa\/Dar_es_Salaam","location":"DaresSalaam","code":"TZ","country":"Tanzania","title":"Dar es Salaam - Tanzania"},{"tz":"Africa\/Djibouti","location":"Djibouti","code":"DJ","country":"Djibouti","title":"Djibouti"},{"tz":"Africa\/Douala","location":"Douala","code":"CM","country":"Cameroon","title":"Douala - Cameroon"},{"tz":"Africa\/El_Aaiun","location":"ElAaiun","code":"EH","country":"Western Sahara","title":"El Aaiun - Western Sahara"},{"tz":"Africa\/Freetown","location":"Freetown","code":"SL","country":"Sierra Leone","title":"Freetown - Sierra Leone"},{"tz":"Africa\/Gaborone","location":"Gaborone","code":"BW","country":"Botswana","title":"Gaborone - Botswana"},{"tz":"Africa\/Harare","location":"Harare","code":"ZW","country":"Zimbabwe","title":"Harare - Zimbabwe"},{"tz":"Africa\/Johannesburg","location":"Johannesburg","code":"ZA","country":"South Africa","title":"Johannesburg - South Africa"},{"tz":"Africa\/Juba","location":"Juba","code":"SS","country":"South Sudan","title":"Juba - South Sudan"},{"tz":"Africa\/Kampala","location":"Kampala","code":"UG","country":"Uganda","title":"Kampala - Uganda"},{"tz":"Africa\/Khartoum","location":"Khartoum","code":"SD","country":"Sudan","title":"Khartoum - Sudan"},{"tz":"Africa\/Kigali","location":"Kigali","code":"RW","country":"Rwanda","title":"Kigali - Rwanda"},{"tz":"Africa\/Kinshasa","location":"Kinshasa","code":"CD","country":"Congo (Kinshasa)","title":"Kinshasa - The Democratic Republic of Congo"},{"tz":"Africa\/Lagos","location":"Lagos","code":"NG","country":"Nigeria","title":"Lagos - Nigeria "},{"tz":"Africa\/Libreville","location":"Libreville","code":"GA","country":"Gabon","title":"Libreville - Gabon"},{"tz":"Africa\/Lome","location":"Lome","code":"TG","country":"Togo","title":"Lome - Togo"},{"tz":"Africa\/Luanda","location":"Luanda","code":"AO","country":"Angola","title":"Luanda - Angola"},{"tz":"Africa\/Lubumbashi","location":"Lubumbashi","code":"CD","country":"Congo (Kinshasa)","title":"Lubumbashi - The Democratic Republic of Congo"},{"tz":"Africa\/Lusaka","location":"Lusaka","code":"ZM","country":"Zambia","title":"Lusaka - Zambia"},{"tz":"Africa\/Malabo","location":"Malabo","code":"GQ","country":"Equatorial Guinea","title":"Malabo - Equatorial Guinea"},{"tz":"Africa\/Maputo","location":"Maputo","code":"MZ","country":"Mozambique","title":"Maputo - Mozambique"},{"tz":"Africa\/Maseru","location":"Maseru","code":"LS","country":"Lesotho","title":"Maseru - Lesotho"},{"tz":"Africa\/Mbabane","location":"Mbabane","code":"SZ","country":"Swaziland","title":"Mbabane - Eswatini"},{"tz":"Africa\/Mogadishu","location":"Mogadishu","code":"SO","country":"Somalia","title":"Mogadishu - Somalia"},{"tz":"Africa\/Monrovia","location":"Monrovia","code":"LR","country":"Liberia","title":"Monrovia - Liberia"},{"tz":"Africa\/Nairobi","location":"Nairobi","code":"KE","country":"Kenya","title":"Nairobi - Kenya"},{"tz":"Africa\/Ndjamena","location":"Ndjamena","code":"TD","country":"Chad","title":"Ndjamena - Chad"},{"tz":"Africa\/Niamey","location":"Niamey","code":"NE","country":"Niger","title":"Niamey - Niger"},{"tz":"Africa\/Nouakchott","location":"Nouakchott","code":"MR","country":"Mauritania","title":"Nouakchott - Mauritania"},{"tz":"Africa\/Ouagadougou","location":"Ouagadougou","code":"BF","country":"Burkina Faso","title":"Ouagadougou - Burkina Faso"},{"tz":"Africa\/Porto-Novo","location":"Porto-Novo","code":"BJ","country":"Benin","title":"Porto-Novo - Benin"},{"tz":"Africa\/Sao_Tome","location":"SaoTome","code":"ST","country":"Sao Tome and Principe","title":"Sao Tome and Principe"},{"tz":"Africa\/Tripoli","location":"Tripoli","code":"LY","country":"Libya","title":"Tripoli - Libya"},{"tz":"Africa\/Tunis","location":"Tunis","code":"TN","country":"Tunisia","title":"Tunis - Tunisia"},{"tz":"Africa\/Windhoek","location":"Windhoek","code":"NA","country":"Namibia","title":"Windhoek - Namibia"},{"tz":"America\/Adak","location":"Adak","code":"US","country":"United States of America","title":"Adak - Alaska - United States of America"},{"tz":"America\/Anchorage","location":"Anchorage","code":"US","country":"United States of America","title":"Anchorage - Alaska - United States of America"},{"tz":"America\/Anguilla","location":"Anguilla","code":"AI","country":"Anguilla","title":"Anguilla"},{"tz":"America\/Antigua","location":"Antigua","code":"AG","country":"Antigua and Barbuda","title":"Antigua and Barbuda"},{"tz":"America\/Araguaina","location":"Araguaina","code":"BR","country":"Brazil","title":"Araguaina - Brazil"},{"tz":"America\/Argentina\/Buenos_Aires","location":"America","code":"AR","country":"Argentina","title":"Buenos Aires - Argentina"},{"tz":"America\/Argentina\/Catamarca","location":"America","code":"AR","country":"Argentina","title":"Catamarca - Argentina"},{"tz":"America\/Argentina\/Cordoba","location":"America","code":"AR","country":"Argentina","title":"Cordoba - Argentina"},{"tz":"America\/Argentina\/Jujuy","location":"America","code":"AR","country":"Argentina","title":"Jujuy - Argentina"},{"tz":"America\/Argentina\/La_Rioja","location":"America","code":"AR","country":"Argentina","title":"La Rioja - Argentina"},{"tz":"America\/Argentina\/Mendoza","location":"America","code":"AR","country":"Argentina","title":"Mendoza - Argentina"},{"tz":"America\/Argentina\/Rio_Gallegos","location":"America","code":"AR","country":"Argentina","title":"Rio Gallegos - Argentina"},{"tz":"America\/Argentina\/Salta","location":"America","code":"AR","country":"Argentina","title":"Salta - Argentina"},{"tz":"America\/Argentina\/San_Juan","location":"America","code":"AR","country":"Argentina","title":"San Juan - Argentina"},{"tz":"America\/Argentina\/San_Luis","location":"America","code":"AR","country":"Argentina","title":"San Luis - Argentina"},{"tz":"America\/Argentina\/Tucuman","location":"America","code":"AR","country":"Argentina","title":"Tucuman - Argentina"},{"tz":"America\/Argentina\/Ushuaia","location":"America","code":"AR","country":"Argentina","title":"Ushuaia - Argentina"},{"tz":"America\/Aruba","location":"Aruba","code":"AW","country":"Aruba","title":"Aruba"},{"tz":"America\/Asuncion","location":"Asuncion","code":"PY","country":"Paraguay","title":"Asuncion - Paraguay"},{"tz":"America\/Atikokan","location":"Atikokan","code":"CA","country":"Canada","title":"Atikokan - Canada"},{"tz":"America\/Bahia","location":"Bahia","code":"BR","country":"Brazil","title":"Bahia - Brazil"},{"tz":"America\/Bahia_Banderas","location":"BahiaBanderas","code":"MX","country":"Mexico","title":"Bahia Banderas - Mexico"},{"tz":"America\/Barbados","location":"Barbados","code":"BB","country":"Barbados","title":"Barbados"},{"tz":"America\/Belem","location":"Belem","code":"BR","country":"Brazil","title":"Belem - Brazil"},{"tz":"America\/Belize","location":"Belize","code":"BZ","country":"Belize","title":"Belize"},{"tz":"America\/Blanc-Sablon","location":"Blanc-Sablon","code":"CA","country":"Canada","title":"Blanc-Sablon - Canada"},{"tz":"America\/Boa_Vista","location":"BoaVista","code":"BR","country":"Brazil","title":"Boa Vista - Brazil"},{"tz":"America\/Bogota","location":"Bogota","code":"CO","country":"Colombia","title":"Bogota - Colombia"},{"tz":"America\/Boise","location":"Boise","code":"US","country":"United States of America","title":"Boise - Idaho - United States of America"},{"tz":"America\/Cambridge_Bay","location":"CambridgeBay","code":"CA","country":"Canada","title":"Cambridge Bay - Canada"},{"tz":"America\/Campo_Grande","location":"CampoGrande","code":"BR","country":"Brazil","title":"Campo Grande - Brazil"},{"tz":"America\/Cancun","location":"Cancun","code":"MX","country":"Mexico","title":"Cancun - Mexico"},{"tz":"America\/Caracas","location":"Caracas","code":"VE","country":"Venezuela (Bolivarian Republic)","title":"Caracas - Venezuela"},{"tz":"America\/Cayenne","location":"Cayenne","code":"GF","country":"French Guiana","title":"Cayenne - French Guiana"},{"tz":"America\/Cayman","location":"Cayman","code":"KY","country":"Cayman Islands","title":"Cayman Islands"},{"tz":"America\/Chicago","location":"Chicago","code":"US","country":"United States of America","title":"Chicago - Illinois - United States of America"},{"tz":"America\/Chihuahua","location":"Chihuahua","code":"MX","country":"Mexico","title":"Chihuahua - Mexico"},{"tz":"America\/Ciudad_Juarez","location":"CiudadJuarez","code":"MX","country":"Mexico","title":"Ciudad Juarez - Mexico"},{"tz":"America\/Costa_Rica","location":"CostaRica","code":"CR","country":"Costa Rica","title":"Costa Rica"},{"tz":"America\/Creston","location":"Creston","code":"CA","country":"Canada","title":"Creston - Canada"},{"tz":"America\/Cuiaba","location":"Cuiaba","code":"BR","country":"Brazil","title":"Cuiaba - Brazil"},{"tz":"America\/Curacao","location":"Curacao","code":"CW","country":"","title":"Curacao"},{"tz":"America\/Danmarkshavn","location":"Danmarkshavn","code":"GL","country":"Greenland","title":"Danmarkshavn - Greenland"},{"tz":"America\/Dawson","location":"Dawson","code":"CA","country":"Canada","title":"Dawson - Canada"},{"tz":"America\/Dawson_Creek","location":"DawsonCreek","code":"CA","country":"Canada","title":"Dawson Creek - Canada"},{"tz":"America\/Denver","location":"Denver","code":"US","country":"United States of America","title":"Denver - Colorado - United States of America"},{"tz":"America\/Detroit","location":"Detroit","code":"US","country":"United States of America","title":"Detroit - Michigan - United States of America"},{"tz":"America\/Dominica","location":"Dominica","code":"DM","country":"Dominica","title":"Dominica"},{"tz":"America\/Edmonton","location":"Edmonton","code":"CA","country":"Canada","title":"Edmonton - Canada"},{"tz":"America\/Eirunepe","location":"Eirunepe","code":"BR","country":"Brazil","title":"Eirunepe - Brazil"},{"tz":"America\/El_Salvador","location":"ElSalvador","code":"SV","country":"El Salvador","title":"El Salvador"},{"tz":"America\/Fort_Nelson","location":"FortNelson","code":"CA","country":"Canada","title":"Fort Nelson - Canada"},{"tz":"America\/Fortaleza","location":"Fortaleza","code":"BR","country":"Brazil","title":"Fortaleza - Brazil"},{"tz":"America\/Glace_Bay","location":"GlaceBay","code":"CA","country":"Canada","title":"Glace Bay - Canada"},{"tz":"America\/Goose_Bay","location":"GooseBay","code":"CA","country":"Canada","title":"Goose Bay - Canada"},{"tz":"America\/Grand_Turk","location":"GrandTurk","code":"TC","country":"Turks and Caicos Islands","title":"Grand Turk - Turks and Caicos Islands"},{"tz":"America\/Grenada","location":"Grenada","code":"GD","country":"Grenada","title":"Grenada"},{"tz":"America\/Guadeloupe","location":"Guadeloupe","code":"GP","country":"Guadeloupe","title":"Guadeloupe"},{"tz":"America\/Guatemala","location":"Guatemala","code":"GT","country":"Guatemala","title":"Guatemala"},{"tz":"America\/Guayaquil","location":"Guayaquil","code":"EC","country":"Ecuador","title":"Guayaquil - Ecuador"},{"tz":"America\/Guyana","location":"Guyana","code":"GY","country":"Guyana","title":"Guyana"},{"tz":"America\/Halifax","location":"Halifax","code":"CA","country":"Canada","title":"Halifax - Canada"},{"tz":"America\/Havana","location":"Havana","code":"CU","country":"Cuba","title":"Havana - Cuba"},{"tz":"America\/Hermosillo","location":"Hermosillo","code":"MX","country":"Mexico","title":"Hermosillo - Mexico"},{"tz":"America\/Indiana\/Indianapolis","location":"America","code":"US","country":"United States of America","title":"Indianapolis - Indiana - United States of America"},{"tz":"America\/Indiana\/Knox","location":"America","code":"US","country":"United States of America","title":"Knox - Indiana - United States of America"},{"tz":"America\/Indiana\/Marengo","location":"America","code":"US","country":"United States of America","title":"Marengo - Indiana - United States of America"},{"tz":"America\/Indiana\/Petersburg","location":"America","code":"US","country":"United States of America","title":"Petersburg - Indiana - United States of America"},{"tz":"America\/Indiana\/Tell_City","location":"America","code":"US","country":"United States of America","title":"Tell City - Indiana - United States of America"},{"tz":"America\/Indiana\/Vevay","location":"America","code":"US","country":"United States of America","title":"Vevay - Indiana - United States of America"},{"tz":"America\/Indiana\/Vincennes","location":"America","code":"US","country":"United States of America","title":"Vincennes - Indiana - United States of America"},{"tz":"America\/Indiana\/Winamac","location":"America","code":"US","country":"United States of America","title":"Winamac - Indiana - United States of America"},{"tz":"America\/Inuvik","location":"Inuvik","code":"CA","country":"Canada","title":"Inuvik - Canada"},{"tz":"America\/Iqaluit","location":"Iqaluit","code":"CA","country":"Canada","title":"Iqaluit - Canada"},{"tz":"America\/Jamaica","location":"Jamaica","code":"JM","country":"Jamaica","title":"Jamaica"},{"tz":"America\/Juneau","location":"Juneau","code":"US","country":"United States of America","title":"Juneau - Alaska - United States of America"},{"tz":"America\/Kentucky\/Louisville","location":"America","code":"US","country":"United States of America","title":"Louisville - Kentucky - United States of America"},{"tz":"America\/Kentucky\/Monticello","location":"America","code":"US","country":"United States of America","title":"Monticello - Kentucky - United States of America"},{"tz":"America\/Kralendijk","location":"Kralendijk","code":"BQ","country":"","title":"Kralendijk - Bonaire"},{"tz":"America\/La_Paz","location":"LaPaz","code":"BO","country":"Bolivia","title":"La Paz - Bolivia"},{"tz":"America\/Lima","location":"Lima","code":"PE","country":"Peru","title":"Lima - Peru"},{"tz":"America\/Los_Angeles","location":"LosAngeles","code":"US","country":"United States of America","title":"Los Angeles - California - United States of America"},{"tz":"America\/Lower_Princes","location":"LowerPrinces","code":"SX","country":"","title":"Lower Princes - Sint Maarten"},{"tz":"America\/Maceio","location":"Maceio","code":"BR","country":"Brazil","title":"Maceio - Brazil"},{"tz":"America\/Managua","location":"Managua","code":"NI","country":"Nicaragua","title":"Managua - Nicaragua"},{"tz":"America\/Manaus","location":"Manaus","code":"BR","country":"Brazil","title":"Manaus - Brazil"},{"tz":"America\/Marigot","location":"Marigot","code":"MF","country":"Saint-Martin (French part)","title":"Marigot - Saint-Martin"},{"tz":"America\/Martinique","location":"Martinique","code":"MQ","country":"Martinique","title":"Martinique"},{"tz":"America\/Matamoros","location":"Matamoros","code":"MX","country":"Mexico","title":"Matamoros - Mexico"},{"tz":"America\/Mazatlan","location":"Mazatlan","code":"MX","country":"Mexico","title":"Mazatlan - Mexico"},{"tz":"America\/Menominee","location":"Menominee","code":"US","country":"United States of America","title":"Menominee - Wisconsin - United States of America"},{"tz":"America\/Merida","location":"Merida","code":"MX","country":"Mexico","title":"Merida - Mexico"},{"tz":"America\/Metlakatla","location":"Metlakatla","code":"US","country":"United States of America","title":"Metlakatla - Alaska - United States of America"},{"tz":"America\/Mexico_City","location":"MexicoCity","code":"MX","country":"Mexico","title":"Mexico City - Mexico"},{"tz":"America\/Miquelon","location":"Miquelon","code":"PM","country":"Saint Pierre and Miquelon","title":"Miquelon - Saint Pierre and Miquelon"},{"tz":"America\/Moncton","location":"Moncton","code":"CA","country":"Canada","title":"Moncton - Canada"},{"tz":"America\/Monterrey","location":"Monterrey","code":"MX","country":"Mexico","title":"Monterrey - Mexico"},{"tz":"America\/Montevideo","location":"Montevideo","code":"UY","country":"Uruguay","title":"Montevideo - Uruguay"},{"tz":"America\/Montserrat","location":"Montserrat","code":"MS","country":"Montserrat","title":"Montserrat"},{"tz":"America\/Nassau","location":"Nassau","code":"BS","country":"Bahamas","title":"Nassau - Bahamas"},{"tz":"America\/New_York","location":"NewYork","code":"US","country":"United States of America","title":"New York - United States of America"},{"tz":"America\/Nome","location":"Nome","code":"US","country":"United States of America","title":"Nome - Alaska - United States of America"},{"tz":"America\/Noronha","location":"Noronha","code":"BR","country":"Brazil","title":"Noronha - Brazil"},{"tz":"America\/North_Dakota\/Beulah","location":"America","code":"US","country":"United States of America","title":"Beulah - North Dakota - United States of America"},{"tz":"America\/North_Dakota\/Center","location":"America","code":"US","country":"United States of America","title":"Center - North Dakota - United States of America"},{"tz":"America\/North_Dakota\/New_Salem","location":"America","code":"US","country":"United States of America","title":"New Salem - North Dakota - United States of America"},{"tz":"America\/Nuuk","location":"Nuuk","code":"GL","country":"Greenland","title":"Nuuk - Greenland"},{"tz":"America\/Ojinaga","location":"Ojinaga","code":"MX","country":"Mexico","title":"Ojinaga - Mexico"},{"tz":"America\/Panama","location":"Panama","code":"PA","country":"Panama","title":"Panama"},{"tz":"America\/Paramaribo","location":"Paramaribo","code":"SR","country":"Suriname","title":"Paramaribo - Suriname"},{"tz":"America\/Phoenix","location":"Phoenix","code":"US","country":"United States of America","title":"Phoenix - Arizona - United States of America"},{"tz":"America\/Port-au-Prince","location":"Port-au-Prince","code":"HT","country":"Haiti","title":"Port-au-Prince - Haiti"},{"tz":"America\/Port_of_Spain","location":"PortofSpain","code":"TT","country":"Trinidad and Tobago","title":"Port of Spain - Trinidad and Tobago"},{"tz":"America\/Porto_Velho","location":"PortoVelho","code":"BR","country":"Brazil","title":"Porto Velho - Brazil"},{"tz":"America\/Puerto_Rico","location":"PuertoRico","code":"PR","country":"Puerto Rico","title":"Puerto Rico"},{"tz":"America\/Punta_Arenas","location":"PuntaArenas","code":"CL","country":"Chile","title":"Punta Arenas - Chile"},{"tz":"America\/Rankin_Inlet","location":"RankinInlet","code":"CA","country":"Canada","title":"Rankin Inlet - Canada"},{"tz":"America\/Recife","location":"Recife","code":"BR","country":"Brazil","title":"Recife - Brazil"},{"tz":"America\/Regina","location":"Regina","code":"CA","country":"Canada","title":"Regina - Canada"},{"tz":"America\/Resolute","location":"Resolute","code":"CA","country":"Canada","title":"Resolute - Canada"},{"tz":"America\/Rio_Branco","location":"RioBranco","code":"BR","country":"Brazil","title":"Rio Branco - Brazil"},{"tz":"America\/Santarem","location":"Santarem","code":"BR","country":"Brazil","title":"Santarem - Brazil"},{"tz":"America\/Santiago","location":"Santiago","code":"CL","country":"Chile","title":"Santiago - Chile"},{"tz":"America\/Santo_Domingo","location":"SantoDomingo","code":"DO","country":"Dominican Republic","title":"Santo Domingo - Dominican Republic"},{"tz":"America\/Sao_Paulo","location":"SaoPaulo","code":"BR","country":"Brazil","title":"Sao Paulo - Brazil"},{"tz":"America\/Scoresbysund","location":"Scoresbysund","code":"GL","country":"Greenland","title":"Scoresbysund - Greenland"},{"tz":"America\/Sitka","location":"Sitka","code":"US","country":"United States of America","title":"Sitka - Alaska - United States of America"},{"tz":"America\/St_Barthelemy","location":"StBarthelemy","code":"BL","country":"Saint-Barthelemy","title":"Saint Barthelemy"},{"tz":"America\/St_Johns","location":"StJohns","code":"CA","country":"Canada","title":"St Johns - Canada"},{"tz":"America\/St_Kitts","location":"StKitts","code":"KN","country":"Saint Kitts and Nevis","title":"Saint Kitts and Nevis"},{"tz":"America\/St_Lucia","location":"StLucia","code":"LC","country":"Saint Lucia","title":"Saint Lucia"},{"tz":"America\/St_Thomas","location":"StThomas","code":"VI","country":"Virgin Islands","title":"St Thomas - US Virgin Islands"},{"tz":"America\/St_Vincent","location":"StVincent","code":"VC","country":"Saint Vincent and Grenadines","title":"Saint Vincent and Grenadines"},{"tz":"America\/Swift_Current","location":"SwiftCurrent","code":"CA","country":"Canada","title":"Swift Current - Canada"},{"tz":"America\/Tegucigalpa","location":"Tegucigalpa","code":"HN","country":"Honduras","title":"Tegucigalpa - Honduras"},{"tz":"America\/Thule","location":"Thule","code":"GL","country":"Greenland","title":"Thule - Greenland"},{"tz":"America\/Tijuana","location":"Tijuana","code":"MX","country":"Mexico","title":"Tijuana - Mexico"},{"tz":"America\/Toronto","location":"Toronto","code":"CA","country":"Canada","title":"Toronto - Canada"},{"tz":"America\/Tortola","location":"Tortola","code":"VG","country":"British Virgin Islands","title":"Tortola - British Virgin Islands"},{"tz":"America\/Vancouver","location":"Vancouver","code":"CA","country":"Canada","title":"Vancouver - Canada"},{"tz":"America\/Whitehorse","location":"Whitehorse","code":"CA","country":"Canada","title":"Whitehorse - Canada"},{"tz":"America\/Winnipeg","location":"Winnipeg","code":"CA","country":"Canada","title":"Winnipeg - Canada"},{"tz":"America\/Yakutat","location":"Yakutat","code":"US","country":"United States of America","title":"Yakutat - Alaska - United States of America"},{"tz":"Antarctica\/Casey","location":"Casey","code":"AQ","country":"Antarctica","title":"Casey - Antarctica"},{"tz":"Antarctica\/Davis","location":"Davis","code":"AQ","country":"Antarctica","title":"Davis - Antarctica"},{"tz":"Antarctica\/DumontDUrville","location":"DumontDUrville","code":"AQ","country":"Antarctica","title":"Dumont D'Urville - Antarctica"},{"tz":"Antarctica\/Macquarie","location":"Macquarie","code":"AU","country":"Australia","title":"Macquarie Island - Australia"},{"tz":"Antarctica\/Mawson","location":"Mawson","code":"AQ","country":"Antarctica","title":"Mawson - Antarctica"},{"tz":"Antarctica\/McMurdo","location":"McMurdo","code":"AQ","country":"Antarctica","title":"McMurdo - Antarctica"},{"tz":"Antarctica\/Palmer","location":"Palmer","code":"AQ","country":"Antarctica","title":"Palmer - Antarctica"},{"tz":"Antarctica\/Rothera","location":"Rothera","code":"AQ","country":"Antarctica","title":"Rothera - Antarctica"},{"tz":"Antarctica\/Syowa","location":"Syowa","code":"AQ","country":"Antarctica","title":"Syowa - Antarctica"},{"tz":"Antarctica\/Troll","location":"Troll","code":"AQ","country":"Antarctica","title":"Troll - Antarctica"},{"tz":"Antarctica\/Vostok","location":"Vostok","code":"AQ","country":"Antarctica","title":"Vostok - Antarctica"},{"tz":"Arctic\/Longyearbyen","location":"Longyearbyen","code":"SJ","country":"Svalbard and Jan Mayen Islands","title":"Longyearbyen - Svalbard and Jan Mayen Islands"},{"tz":"Asia\/Aden","location":"Aden","code":"YE","country":"Yemen","title":"Aden - Yemen"},{"tz":"Asia\/Almaty","location":"Almaty","code":"KZ","country":"Kazakhstan","title":"Almaty - Kazakhstan"},{"tz":"Asia\/Amman","location":"Amman","code":"JO","country":"Jordan","title":"Amman - Jordan"},{"tz":"Asia\/Anadyr","location":"Anadyr","code":"RU","country":"Russia","title":"Anadyr - Russia"},{"tz":"Asia\/Aqtau","location":"Aqtau","code":"KZ","country":"Kazakhstan","title":"Aqtau - Kazakhstan"},{"tz":"Asia\/Aqtobe","location":"Aqtobe","code":"KZ","country":"Kazakhstan","title":"Aqtobe - Kazakhstan"},{"tz":"Asia\/Ashgabat","location":"Ashgabat","code":"TM","country":"Turkmenistan","title":"Ashgabat - Turkmenistan"},{"tz":"Asia\/Atyrau","location":"Atyrau","code":"KZ","country":"Kazakhstan","title":"Atyrau - Kazakhstan"},{"tz":"Asia\/Baghdad","location":"Baghdad","code":"IQ","country":"Iraq","title":"Baghdad - Iraq"},{"tz":"Asia\/Bahrain","location":"Bahrain","code":"BH","country":"Bahrain","title":"Bahrain"},{"tz":"Asia\/Baku","location":"Baku","code":"AZ","country":"Azerbaijan","title":"Baku - Azerbaijan"},{"tz":"Asia\/Bangkok","location":"Bangkok","code":"TH","country":"Thailand","title":"Bangkok - Thailand"},{"tz":"Asia\/Barnaul","location":"Barnaul","code":"RU","country":"Russia","title":"Barnaul - Russia"},{"tz":"Asia\/Beirut","location":"Beirut","code":"LB","country":"Lebanon","title":"Beirut - Lebanon"},{"tz":"Asia\/Bishkek","location":"Bishkek","code":"KG","country":"Kyrgyzstan","title":"Bishkek - Kyrgyzstan"},{"tz":"Asia\/Brunei","location":"Brunei","code":"BN","country":"Brunei Darussalam","title":"Brunei Darussalam"},{"tz":"Asia\/Chita","location":"Chita","code":"RU","country":"Russia","title":"Chita - Russia"},{"tz":"Asia\/Choibalsan","location":"Choibalsan","code":"MN","country":"Mongolia","title":"Choibalsan - Mongolia"},{"tz":"Asia\/Colombo","location":"Colombo","code":"LK","country":"Sri Lanka","title":"Colombo - Sri Lanka"},{"tz":"Asia\/Damascus","location":"Damascus","code":"SY","country":"Syrian Arab Republic (Syria)","title":"Damascus - Syria"},{"tz":"Asia\/Dhaka","location":"Dhaka","code":"BD","country":"Bangladesh","title":"Dhaka - Bangladesh"},{"tz":"Asia\/Dili","location":"Dili","code":"TL","country":"Timor-Leste","title":"Dili - Timor-Leste"},{"tz":"Asia\/Dubai","location":"Dubai","code":"AE","country":"United Arab Emirates","title":"Dubai - United Arab Emirates"},{"tz":"Asia\/Dushanbe","location":"Dushanbe","code":"TJ","country":"Tajikistan","title":"Dushanbe - Tajikistan"},{"tz":"Asia\/Famagusta","location":"Famagusta","code":"CY","country":"Cyprus","title":"Famagusta - Cyprus"},{"tz":"Asia\/Gaza","location":"Gaza","code":"PS","country":"Palestinian Territory","title":"Gaza - Palestinian Territory"},{"tz":"Asia\/Hebron","location":"Hebron","code":"PS","country":"Palestinian Territory","title":"Hebron - Palestinian Territory"},{"tz":"Asia\/Ho_Chi_Minh","location":"HoChiMinh","code":"VN","country":"Viet Nam","title":"Ho Chi Minh City - Vietnam"},{"tz":"Asia\/Hong_Kong","location":"HongKong","code":"HK","country":"Hong Kong","title":"Hong Kong China"},{"tz":"Asia\/Hovd","location":"Hovd","code":"MN","country":"Mongolia","title":"Hovd - Mongolia"},{"tz":"Asia\/Irkutsk","location":"Irkutsk","code":"RU","country":"Russia","title":"Irkutsk - Russia"},{"tz":"Asia\/Jakarta","location":"Jakarta","code":"ID","country":"Indonesia","title":"Jakarta - Indonesia"},{"tz":"Asia\/Jayapura","location":"Jayapura","code":"ID","country":"Indonesia","title":"Jayapura - Indonesia"},{"tz":"Asia\/Jerusalem","location":"Jerusalem","code":"IL","country":"Israel","title":"Jerusalem - Israel"},{"tz":"Asia\/Kabul","location":"Kabul","code":"AF","country":"Afghanistan","title":"Kabul - Afghanistan"},{"tz":"Asia\/Kamchatka","location":"Kamchatka","code":"RU","country":"Russia","title":"Kamchatka - Russia"},{"tz":"Asia\/Karachi","location":"Karachi","code":"PK","country":"Pakistan","title":"Karachi - Pakistan"},{"tz":"Asia\/Kathmandu","location":"Kathmandu","code":"NP","country":"Nepal","title":"Kathmandu - Nepal"},{"tz":"Asia\/Khandyga","location":"Khandyga","code":"RU","country":"Russia","title":"Khandyga - Russia"},{"tz":"Asia\/Kolkata","location":"Kolkata","code":"IN","country":"India","title":"Kolkata - India"},{"tz":"Asia\/Krasnoyarsk","location":"Krasnoyarsk","code":"RU","country":"Russia","title":"Krasnoyarsk - Russia"},{"tz":"Asia\/Kuala_Lumpur","location":"KualaLumpur","code":"MY","country":"Malaysia","title":"Kuala Lumpur - Malaysia"},{"tz":"Asia\/Kuching","location":"Kuching","code":"MY","country":"Malaysia","title":"Kuching - Malaysia"},{"tz":"Asia\/Kuwait","location":"Kuwait","code":"KW","country":"Kuwait","title":"Kuwait"},{"tz":"Asia\/Macau","location":"Macau","code":"MO","country":"Macau","title":"Macau"},{"tz":"Asia\/Magadan","location":"Magadan","code":"RU","country":"Russia","title":"Magadan - Russia"},{"tz":"Asia\/Makassar","location":"Makassar","code":"ID","country":"Indonesia","title":"Makassar - Indonesia"},{"tz":"Asia\/Manila","location":"Manila","code":"PH","country":"Philippines","title":"Manila - Philippines"},{"tz":"Asia\/Muscat","location":"Muscat","code":"OM","country":"Oman","title":"Muscat - Oman"},{"tz":"Asia\/Nicosia","location":"Nicosia","code":"CY","country":"Cyprus","title":"Nicosia - Cyprus"},{"tz":"Asia\/Novokuznetsk","location":"Novokuznetsk","code":"RU","country":"Russia","title":"Novokuznetsk - Russia"},{"tz":"Asia\/Novosibirsk","location":"Novosibirsk","code":"RU","country":"Russia","title":"Novosibirsk - Russia"},{"tz":"Asia\/Omsk","location":"Omsk","code":"RU","country":"Russia","title":"Omsk - Russia"},{"tz":"Asia\/Oral","location":"Oral","code":"KZ","country":"Kazakhstan","title":"Oral - Kazakhstan"},{"tz":"Asia\/Phnom_Penh","location":"PhnomPenh","code":"KH","country":"Cambodia","title":"Phnom Penh - Cambodia"},{"tz":"Asia\/Pontianak","location":"Pontianak","code":"ID","country":"Indonesia","title":"Pontianak - Indonesia"},{"tz":"Asia\/Pyongyang","location":"Pyongyang","code":"KP","country":"Korea (North)","title":"Pyongyang - North Korea"},{"tz":"Asia\/Qatar","location":"Qatar","code":"QA","country":"Qatar","title":"Qatar"},{"tz":"Asia\/Qostanay","location":"Qostanay","code":"KZ","country":"Kazakhstan","title":"Qostanay - Kazakhstan"},{"tz":"Asia\/Qyzylorda","location":"Qyzylorda","code":"KZ","country":"Kazakhstan","title":"Qyzylorda - Kazakhstan"},{"tz":"Asia\/Riyadh","location":"Riyadh","code":"SA","country":"Saudi Arabia","title":"Riyadh - Saudi Arabia"},{"tz":"Asia\/Sakhalin","location":"Sakhalin","code":"RU","country":"Russia","title":"Sakhalin - Russia"},{"tz":"Asia\/Samarkand","location":"Samarkand","code":"UZ","country":"Uzbekistan","title":"Samarkand - Uzbekistan"},{"tz":"Asia\/Seoul","location":"Seoul","code":"KR","country":"Korea (South)","title":"Seoul - South Korea"},{"tz":"Asia\/Shanghai","location":"Shanghai","code":"CN","country":"China","title":"Shanghai - China"},{"tz":"Asia\/Singapore","location":"Singapore","code":"SG","country":"Singapore","title":"Singapore"},{"tz":"Asia\/Srednekolymsk","location":"Srednekolymsk","code":"RU","country":"Russia","title":"Srednekolymsk - Russia"},{"tz":"Asia\/Taipei","location":"Taipei","code":"TW","country":"Taiwan","title":"Taipei - Chinese Taipei"},{"tz":"Asia\/Tashkent","location":"Tashkent","code":"UZ","country":"Uzbekistan","title":"Tashkent - Uzbekistan"},{"tz":"Asia\/Tbilisi","location":"Tbilisi","code":"GE","country":"Georgia","title":"Tbilisi - Georgia"},{"tz":"Asia\/Tehran","location":"Tehran","code":"IR","country":"Iran","title":"Tehran - Iran"},{"tz":"Asia\/Thimphu","location":"Thimphu","code":"BT","country":"Bhutan","title":"Thimphu - Bhutan"},{"tz":"Asia\/Tokyo","location":"Tokyo","code":"JP","country":"Japan","title":"Tokyo - Japan"},{"tz":"Asia\/Tomsk","location":"Tomsk","code":"RU","country":"Russia","title":"Tomsk - Russia"},{"tz":"Asia\/Ulaanbaatar","location":"Ulaanbaatar","code":"MN","country":"Mongolia","title":"Ulaanbaatar - Mongolia"},{"tz":"Asia\/Urumqi","location":"Urumqi","code":"CN","country":"China","title":"Urumqi - China"},{"tz":"Asia\/Ust-Nera","location":"Ust-Nera","code":"RU","country":"Russia","title":"Ust-Nera - Russia"},{"tz":"Asia\/Vientiane","location":"Vientiane","code":"LA","country":"Lao PDR","title":"Vientiane - Laos"},{"tz":"Asia\/Vladivostok","location":"Vladivostok","code":"RU","country":"Russia","title":"Vladivostok - Russia"},{"tz":"Asia\/Yakutsk","location":"Yakutsk","code":"RU","country":"Russia","title":"Yakutsk - Russia"},{"tz":"Asia\/Yangon","location":"Yangon","code":"MM","country":"Myanmar","title":"Yangon - Myanmar"},{"tz":"Asia\/Yekaterinburg","location":"Yekaterinburg","code":"RU","country":"Russia","title":"Yekaterinburg - Russia"},{"tz":"Asia\/Yerevan","location":"Yerevan","code":"AM","country":"Armenia","title":"Yerevan - Armenia"},{"tz":"Atlantic\/Azores","location":"Azores","code":"PT","country":"Portugal","title":"Azores - Portugal"},{"tz":"Atlantic\/Bermuda","location":"Bermuda","code":"BM","country":"Bermuda","title":"Bermuda"},{"tz":"Atlantic\/Canary","location":"Canary","code":"ES","country":"Spain","title":"Canary Islands - Spain"},{"tz":"Atlantic\/Cape_Verde","location":"CapeVerde","code":"CV","country":"Cape Verde","title":"Cape Verde"},{"tz":"Atlantic\/Faroe","location":"Faroe","code":"FO","country":"Faroe Islands","title":"Faroe Islands"},{"tz":"Atlantic\/Madeira","location":"Madeira","code":"PT","country":"Portugal","title":"Madeira - Portugal"},{"tz":"Atlantic\/Reykjavik","location":"Reykjavik","code":"IS","country":"Iceland","title":"Reykjavik - Iceland"},{"tz":"Atlantic\/South_Georgia","location":"SouthGeorgia","code":"GS","country":"South Georgia and the South Sandwich Islands","title":"South Georgia and the South Sandwich Islands"},{"tz":"Atlantic\/St_Helena","location":"StHelena","code":"SH","country":"Saint Helena","title":"Saint Helena"},{"tz":"Atlantic\/Stanley","location":"Stanley","code":"FK","country":"Falkland Islands (Malvinas)","title":"Stanley - Falkland Islands"},{"tz":"Australia\/Adelaide","location":"Adelaide","code":"AU","country":"Australia","title":"Adelaide - Australia"},{"tz":"Australia\/Brisbane","location":"Brisbane","code":"AU","country":"Australia","title":"Brisbane - Australia"},{"tz":"Australia\/Broken_Hill","location":"BrokenHill","code":"AU","country":"Australia","title":"Broken Hill - Australia"},{"tz":"Australia\/Darwin","location":"Darwin","code":"AU","country":"Australia","title":"Darwin - Australia"},{"tz":"Australia\/Eucla","location":"Eucla","code":"AU","country":"Australia","title":"Eucla - Australia"},{"tz":"Australia\/Hobart","location":"Hobart","code":"AU","country":"Australia","title":"Hobart - Australia"},{"tz":"Australia\/Lindeman","location":"Lindeman","code":"AU","country":"Australia","title":"Lindeman - Australia"},{"tz":"Australia\/Lord_Howe","location":"LordHowe","code":"AU","country":"Australia","title":"Lord Howe - Australia"},{"tz":"Australia\/Melbourne","location":"Melbourne","code":"AU","country":"Australia","title":"Melbourne - Australia"},{"tz":"Australia\/Perth","location":"Perth","code":"AU","country":"Australia","title":"Perth - Australia"},{"tz":"Australia\/Sydney","location":"Sydney","code":"AU","country":"Australia","title":"Sydney - Australia"},{"tz":"Europe\/Amsterdam","location":"Amsterdam","code":"NL","country":"Netherlands","title":"Amsterdam - Netherlands"},{"tz":"Europe\/Andorra","location":"Andorra","code":"AD","country":"Andorra","title":"Andorra"},{"tz":"Europe\/Astrakhan","location":"Astrakhan","code":"RU","country":"Russia","title":"Astrakhan - Russia"},{"tz":"Europe\/Athens","location":"Athens","code":"GR","country":"Greece","title":"Athens - Greece"},{"tz":"Europe\/Belgrade","location":"Belgrade","code":"RS","country":"Serbia","title":"Belgrade - Serbia"},{"tz":"Europe\/Berlin","location":"Berlin","code":"DE","country":"Germany","title":"Berlin - Germany"},{"tz":"Europe\/Bratislava","location":"Bratislava","code":"SK","country":"Slovakia","title":"Bratislava - Slovakia"},{"tz":"Europe\/Brussels","location":"Brussels","code":"BE","country":"Belgium","title":"Brussels - Belgium"},{"tz":"Europe\/Bucharest","location":"Bucharest","code":"RO","country":"Romania","title":"Bucharest - Romania"},{"tz":"Europe\/Budapest","location":"Budapest","code":"HU","country":"Hungary","title":"Budapest - Hungary"},{"tz":"Europe\/Busingen","location":"Busingen","code":"DE","country":"Germany","title":"Busingen - Germany"},{"tz":"Europe\/Chisinau","location":"Chisinau","code":"MD","country":"Moldova","title":"Chisinau - Moldova"},{"tz":"Europe\/Copenhagen","location":"Copenhagen","code":"DK","country":"Denmark","title":"Copenhagen - Denmark"},{"tz":"Europe\/Dublin","location":"Dublin","code":"IE","country":"Ireland","title":"Dublin - Ireland"},{"tz":"Europe\/Gibraltar","location":"Gibraltar","code":"GI","country":"Gibraltar","title":"Gibraltar"},{"tz":"Europe\/Guernsey","location":"Guernsey","code":"GG","country":"Guernsey","title":"Guernsey"},{"tz":"Europe\/Helsinki","location":"Helsinki","code":"FI","country":"Finland","title":"Helsinki - Finland"},{"tz":"Europe\/Isle_of_Man","location":"IsleofMan","code":"IM","country":"Isle of Man","title":"Isle of Man"},{"tz":"Europe\/Istanbul","location":"Istanbul","code":"TR","country":"Turkey","title":"Istanbul - Turkey"},{"tz":"Europe\/Jersey","location":"Jersey","code":"JE","country":"Jersey","title":"Jersey"},{"tz":"Europe\/Kaliningrad","location":"Kaliningrad","code":"RU","country":"Russia","title":"Kaliningrad - Russia"},{"tz":"Europe\/Kirov","location":"Kirov","code":"RU","country":"Russia","title":"Kirov - Russia"},{"tz":"Europe\/Kyiv","location":"Kyiv","code":"UA","country":"Ukraine","title":"Kyiv - Ukraine"},{"tz":"Europe\/Lisbon","location":"Lisbon","code":"PT","country":"Portugal","title":"Lisbon - Portugal"},{"tz":"Europe\/Ljubljana","location":"Ljubljana","code":"SI","country":"Slovenia","title":"Ljubljana - Slovenia"},{"tz":"Europe\/London","location":"London","code":"GB","country":"United Kingdom","title":"London - United Kingdom"},{"tz":"Europe\/Luxembourg","location":"Luxembourg","code":"LU","country":"Luxembourg","title":"Luxembourg"},{"tz":"Europe\/Madrid","location":"Madrid","code":"ES","country":"Spain","title":"Madrid - Spain"},{"tz":"Europe\/Malta","location":"Malta","code":"MT","country":"Malta","title":"Malta"},{"tz":"Europe\/Mariehamn","location":"Mariehamn","code":"AX","country":"Aland Islands","title":"Mariehamn - Aland Islands"},{"tz":"Europe\/Minsk","location":"Minsk","code":"BY","country":"Belarus","title":"Minsk - Belarus"},{"tz":"Europe\/Monaco","location":"Monaco","code":"MC","country":"Monaco","title":"Monaco"},{"tz":"Europe\/Moscow","location":"Moscow","code":"RU","country":"Russia","title":"Moscow - Russia"},{"tz":"Europe\/Oslo","location":"Oslo","code":"NO","country":"Norway","title":"Oslo - Norway"},{"tz":"Europe\/Paris","location":"Paris","code":"FR","country":"France","title":"Paris - France"},{"tz":"Europe\/Podgorica","location":"Podgorica","code":"ME","country":"Montenegro","title":"Podgorica - Montenegro"},{"tz":"Europe\/Prague","location":"Prague","code":"CZ","country":"Czech Republic","title":"Prague - Czech Republic"},{"tz":"Europe\/Riga","location":"Riga","code":"LV","country":"Latvia","title":"Riga - Latvia"},{"tz":"Europe\/Rome","location":"Rome","code":"IT","country":"Italy","title":"Rome - Italy"},{"tz":"Europe\/Samara","location":"Samara","code":"RU","country":"Russia","title":"Samara - russia"},{"tz":"Europe\/San_Marino","location":"SanMarino","code":"SM","country":"San Marino","title":"San Marino"},{"tz":"Europe\/Sarajevo","location":"Sarajevo","code":"BA","country":"Bosnia and Herzegovina","title":"Sarajevo - Bosnia and Herzergovina"},{"tz":"Europe\/Saratov","location":"Saratov","code":"RU","country":"Russia","title":"Saratov - Russia"},{"tz":"Europe\/Simferopol","location":"Simferopol","code":"UA","country":"Ukraine","title":"Simferopol - Ukraine"},{"tz":"Europe\/Skopje","location":"Skopje","code":"MK","country":"Macedonia","title":"Skopje - Macedonia"},{"tz":"Europe\/Sofia","location":"Sofia","code":"BG","country":"Bulgaria","title":"Sofia - Bulgaria"},{"tz":"Europe\/Stockholm","location":"Stockholm","code":"SE","country":"Sweden","title":"Stockholm - Sweden"},{"tz":"Europe\/Tallinn","location":"Tallinn","code":"EE","country":"Estonia","title":"Tallinn - Estonia"},{"tz":"Europe\/Tirane","location":"Tirane","code":"AL","country":"Albania","title":"Tirana - Albania"},{"tz":"Europe\/Ulyanovsk","location":"Ulyanovsk","code":"RU","country":"Russia","title":"Ulyanovsk - Russia"},{"tz":"Europe\/Vaduz","location":"Vaduz","code":"LI","country":"Liechtenstein","title":"Vaduz - Liechtenstein"},{"tz":"Europe\/Vatican","location":"Vatican","code":"VA","country":"Holy See (Vatican City State)","title":"Vatican City"},{"tz":"Europe\/Vienna","location":"Vienna","code":"AT","country":"Austria","title":"Vienna - Austria"},{"tz":"Europe\/Vilnius","location":"Vilnius","code":"LT","country":"Lithuania","title":"Vilnius - Lithuania"},{"tz":"Europe\/Volgograd","location":"Volgograd","code":"RU","country":"Russia","title":"Volgograd - Russia"},{"tz":"Europe\/Warsaw","location":"Warsaw","code":"PL","country":"Poland","title":"Warsaw - Poland"},{"tz":"Europe\/Zagreb","location":"Zagreb","code":"HR","country":"Croatia","title":"Zagreb - Croatia"},{"tz":"Europe\/Zurich","location":"Zurich","code":"CH","country":"Switzerland","title":"Zurich - Switzerland"},{"tz":"Indian\/Antananarivo","location":"Antananarivo","code":"MG","country":"Madagascar","title":"Antananarivo - Madagascar"},{"tz":"Indian\/Chagos","location":"Chagos","code":"IO","country":"British Indian Ocean Territory","title":"Chagos - British Indian Ocean Territory"},{"tz":"Indian\/Christmas","location":"Christmas","code":"CX","country":"Christmas Island","title":"Christmas Island"},{"tz":"Indian\/Cocos","location":"Cocos","code":"CC","country":"Cocos (Keeling) Islands","title":"Cocos (Keeling) Islands"},{"tz":"Indian\/Comoro","location":"Comoro","code":"KM","country":"Comoros","title":"Comoros"},{"tz":"Indian\/Kerguelen","location":"Kerguelen","code":"TF","country":"French Southern Territories","title":"Kerguelen - French Southern Territories"},{"tz":"Indian\/Mahe","location":"Mahe","code":"SC","country":"Seychelles","title":"Mahe - Seychelles"},{"tz":"Indian\/Maldives","location":"Maldives","code":"MV","country":"Maldives","title":"Maldives"},{"tz":"Indian\/Mauritius","location":"Mauritius","code":"MU","country":"Mauritius","title":"Mauritius"},{"tz":"Indian\/Mayotte","location":"Mayotte","code":"YT","country":"Mayotte","title":"Mayotte"},{"tz":"Indian\/Reunion","location":"Reunion","code":"RE","country":"Reunion","title":"Reunion"},{"tz":"Pacific\/Apia","location":"Apia","code":"WS","country":"Samoa","title":"Apia - Samoa"},{"tz":"Pacific\/Auckland","location":"Auckland","code":"NZ","country":"New Zealand","title":"Auckland - New Zealand"},{"tz":"Pacific\/Bougainville","location":"Bougainville","code":"PG","country":"Papua New Guinea","title":"Bougainville - Papua New Guinea"},{"tz":"Pacific\/Chatham","location":"Chatham","code":"NZ","country":"New Zealand","title":"Chatham Islands - New Zealand"},{"tz":"Pacific\/Chuuk","location":"Chuuk","code":"FM","country":"Micronesia","title":"Chuuk - Micronesia"},{"tz":"Pacific\/Easter","location":"Easter","code":"CL","country":"Chile","title":"Easter Island - Chile"},{"tz":"Pacific\/Efate","location":"Efate","code":"VU","country":"Vanuatu","title":"Efate - Vanuatu"},{"tz":"Pacific\/Fakaofo","location":"Fakaofo","code":"TK","country":"Tokelau","title":"Fakaofo - Tokelau"},{"tz":"Pacific\/Fiji","location":"Fiji","code":"FJ","country":"Fiji","title":"Fiji"},{"tz":"Pacific\/Funafuti","location":"Funafuti","code":"TV","country":"Tuvalu","title":"Funafuti - Tuvalu"},{"tz":"Pacific\/Galapagos","location":"Galapagos","code":"EC","country":"Ecuador","title":"Galapagos Islands - Ecuador"},{"tz":"Pacific\/Gambier","location":"Gambier","code":"PF","country":"French Polynesia","title":"Gambier - French Polynesia"},{"tz":"Pacific\/Guadalcanal","location":"Guadalcanal","code":"SB","country":"Solomon Islands","title":"Guadalcanal - Solomon Islands"},{"tz":"Pacific\/Guam","location":"Guam","code":"GU","country":"Guam","title":"Guam"},{"tz":"Pacific\/Honolulu","location":"Honolulu","code":"US","country":"United States of America","title":"Honolulu - Hawaii - United States of America"},{"tz":"Pacific\/Kanton","location":"Kanton","code":"KI","country":"Kiribati","title":"Kanton - Kiribati"},{"tz":"Pacific\/Kiritimati","location":"Kiritimati","code":"KI","country":"Kiribati","title":"Kiritimati - Kiribati"},{"tz":"Pacific\/Kosrae","location":"Kosrae","code":"FM","country":"Micronesia","title":"Kosrae - Micronesia"},{"tz":"Pacific\/Kwajalein","location":"Kwajalein","code":"MH","country":"Marshall Islands","title":"Kwajalein - Marshall Islands"},{"tz":"Pacific\/Majuro","location":"Majuro","code":"MH","country":"Marshall Islands","title":"Majuro - Marshall Islands"},{"tz":"Pacific\/Marquesas","location":"Marquesas","code":"PF","country":"French Polynesia","title":"Marquesas - French Polynesia"},{"tz":"Pacific\/Midway","location":"Midway","code":"UM","country":"US Minor Outlying Islands","title":"Midway - US Minor Outlying Islands"},{"tz":"Pacific\/Nauru","location":"Nauru","code":"NR","country":"Nauru","title":"Nauru"},{"tz":"Pacific\/Niue","location":"Niue","code":"NU","country":"Niue","title":"Niue"},{"tz":"Pacific\/Norfolk","location":"Norfolk","code":"NF","country":"Norfolk Island","title":"Norfolk Island"},{"tz":"Pacific\/Noumea","location":"Noumea","code":"NC","country":"New Caledonia","title":"Noumea - New Caledonia"},{"tz":"Pacific\/Pago_Pago","location":"PagoPago","code":"AS","country":"American Samoa","title":"Pago Pago - American Samoa"},{"tz":"Pacific\/Palau","location":"Palau","code":"PW","country":"Palau","title":"Palau"},{"tz":"Pacific\/Pitcairn","location":"Pitcairn","code":"PN","country":"Pitcairn","title":"Pitcairn"},{"tz":"Pacific\/Pohnpei","location":"Pohnpei","code":"FM","country":"Micronesia","title":"Pohnpei - Micronesia"},{"tz":"Pacific\/Port_Moresby","location":"PortMoresby","code":"PG","country":"Papua New Guinea","title":"Port Moresby - Papua New Guinea"},{"tz":"Pacific\/Rarotonga","location":"Rarotonga","code":"CK","country":"Cook Islands","title":"Rarotonga - Cook Islands"},{"tz":"Pacific\/Saipan","location":"Saipan","code":"MP","country":"Northern Mariana Islands","title":"Saipan - Northern Marinara Islands"},{"tz":"Pacific\/Tahiti","location":"Tahiti","code":"PF","country":"French Polynesia","title":"Tahiti - French Polynesia"},{"tz":"Pacific\/Tarawa","location":"Tarawa","code":"KI","country":"Kiribati","title":"Tarawa - Kiribati"},{"tz":"Pacific\/Tongatapu","location":"Tongatapu","code":"TO","country":"Tonga","title":"Tongatapu - Tonga"},{"tz":"Pacific\/Wake","location":"Wake","code":"UM","country":"US Minor Outlying Islands","title":"Wake - US Minor Outlying Islands"},{"tz":"Pacific\/Wallis","location":"Wallis","code":"WF","country":"Wallis and Futuna Islands","title":"Wallis and Futuna Islands"},{"tz":"UTC","location":"UTC","code":"UTC","country":"","title":"UTC\/GMT"}]