The Australian attack has enjoyed a resurgence of late
Comment
Share
Regardless of Bledisloe II, on form, the Wallabies on a good day, have a very dangerous attack.
This attack under Berne is a blending of the attacking ethos of his old team, The Melbourne Rebels, with elements of the Rod MacQueen Wallabies team of the late 90’s. The team that Gregan was the lynchpin of.
ADVERTISEMENT
It’s an incredibly flat attack, with a variety of options running close to the ruck, inside balls off 10 and a large emphasis on pick and go’s on go-forward ball. They often have options running to target the fringes at all times, with speed of ball and thought favoured over losing time getting set into structures. It’s this off the ball work, combined with George Gregan coming into camp and the Wallaby scrum halves playing more and more like him, that leads me to believe Australia have looked back in time to find their new inspiration.
I talk about this team a lot, but only because at their peak, they played a brand of rugby that was innovative, relentless, intelligent and at points quite simply unstoppable.
Continue reading below…
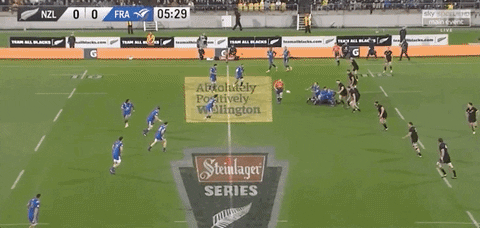
Today we’re going to look at the intricacies of the Wallabies attack compared to the 90’s version, what it involves, and why it was so effective against the All Blacks.
The Similarities between the MacQueen and Berne Attack Off 9 Play
Before Shaun Berne joined up with the Wallabies, Australia did a lot of their attack off 10. When the play “Off 9” was done, it was done with more width and depth than the Berne approach, with very long passes that cut out multiple players, and usually onto static forward pods who would already be on the back foot.
They would often go for the 2nd Pass play, using a pullback pass off these pods to pass to one of the Wallaby 10-12. The Wallaby Pods didn’t run straight or hard enough to keep the defence interested, meaning the 2nd line was often caught well behind the line.
ADVERTISEMENT
Under Berne, the Wallabies have completely changed this. They realise they must get go forward before executing these plays. Therefore, forwards and backs alike will run hard and straight at the fringes, using the scooting play now espoused by the Aussie Scrum halves to take the ball flat and punch onto the ball to achieve gainline. They also run multiple options in these runs, meaning with the variety of passing, and good lines, breaks in this area have come thick and fast.
Flat Passes to Hard Options
Flat play is key to the Wallabies attack. The whole line stand flatter and run onto the ball harder than they did before, allowing the 10 to make his pass selection on the front foot very close to the line. To maintain this level of depth and be effective however, it means that they must get go forward. This is why the Wallabies were so ineffective against South Africa and the Rebels against the SA conference teams in comparison to other teams they’ve faced. These teams fronted up, and it caused problems.
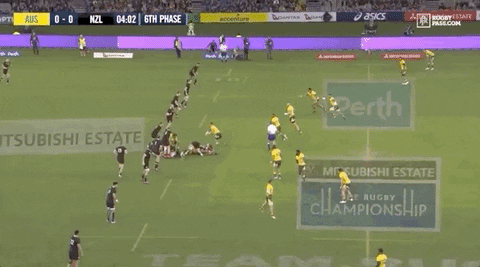
To achieve gainline they run onto the ball, taking it very flat. This gives the defence less time to react and more chance of achieving gainline as can be seen below.
ADVERTISEMENT
The carriers are in the exact same formation in this example, but the structures and play around 9 aren’t as rigid as they were a year ago in the Wallabies. They use 2 Pod’s, 3 Pod’s and lone carriers, but due to the greater passing variation and licence to control the game that the Wallaby Scrum halves now, they seem able to pick their carriers as the play unfurls.
This principle above is seen quite often and is hallmark Rebels play.
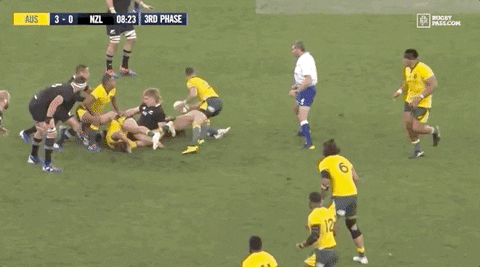
The Wallabies will stock up heavy carriers very short off 9, occupying the 1st,2nd and 3rd Defenders, and turning them inwards to ensure they keep wary of the threat. To ensure this threat is taken seriously, the Wallabies and Rebels run many Out-in, inside passes off 10 and hard one-out carriers at this area, forcing the fringe to be wary at all times. This can turn the 3rd defenders’ vision in, opening the gap between him and the 4th defender, where the fringe defence meets the rest of the defensive line.
The Flat pass allows it to be exploited accordingly.
As we can see, the Wallabies have taken the move above straight from the Rebels, the fringes in both examples are occupied with the 3 carrier’s opposite, a slight run forward from them commits the fringe D, opening the gap for the Out-In line. Tries on both occasions.
Gregan’s Wallabies team at their prime tortured the All Blacks. There has never been a half-back better at terrorising a fringe defence than George Gregan, and the All Blacks do not like being attacked around the fringes of the ruck.
This is due to 2 reasons:
To maintain spread for Counter-Attack ball, their defence is spread across the park, meaning their Pillar Defence can be spread very thin.
Aaron Smith is involved in the Pillar Defence.
Aaron Smith’s place here means he organises the fringe defence, if he’s taken out of the game. There is space to exploit with quick ball.
By scooting, he consistently challenged the inside defenders, meaning heads were turned in and they couldn’t focus on the oncoming carriers taking the ball as we’ve discussed, flat off white. Allowing them yardage. If they did focus on these defenders, he went himself, using the gaps created by this distraction.
White did this constantly, and in doing so was able to hold the push off the line and put his Carriers into weaker shoulders.
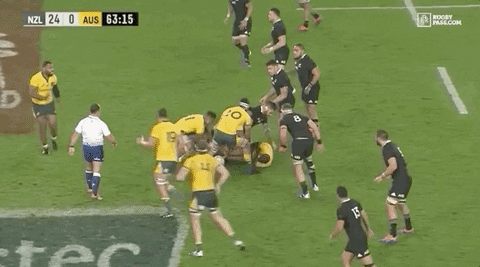
It says a lot that in Bledisloe II White was targeted brutally, but legally. As the All Blacks knew he was the key to the go forward the Wallabies had enjoyed.
He was tackled hard, with the All Blacks on pillar defence staring at him very intently to cut him off. In doing so, he was very successfully “persuaded” not to do what he was doing so much.
Rapid Fire “Up the Guts” Into’em
Sun Tzu had a lot of quotes and sayings over the years during his Campaigns in China, two of them are reflected in this dynamic far more than many others.
“What is of the greatest importance in war is extraordinary speed: one cannot afford to neglect opportunity”
“We can form a single united body, while the enemy must split into fractions. Hence there will be a whole pitted against separate parts of a whole, which means we shall be many to the enemies few, and we are able to use many to strike few at the selected place, those we deal with will be in dire straits”.
Perhaps the most important part of Berne’s’ philosophy is espoused by this dynamic.
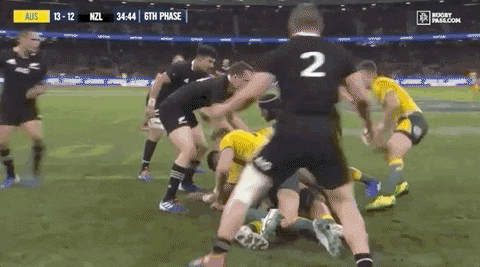
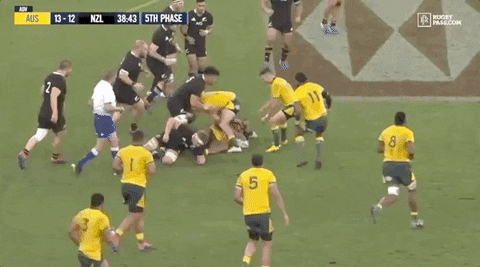
They’re now running hard and straight, and targeting a singular channel with numbers, something they were not doing last year. Combined with the pick and go’s and out to in lines, this can be lethal. When Australia did this in Bledisloe II, they had arguably their best sequence of the match.
Australia don’t want to wait for structure on the front foot anymore. If they have it so be it, but when they’re on the front foot, they have a licence to go quickly themselves in a variety of ways to keep the pressure on the opposition.
Here we see White go quickly against Front row forwards, such is the licence he now has.
Hooper is able to do a pick and go after 2 short passes to carriers running the out-in lines, hitting the fringes.
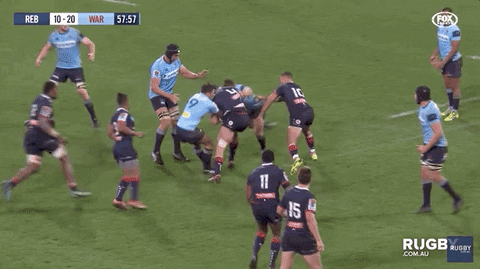
Though with the Rebels, Marika Koroibete does a quick pick and go, with a little shepherding from Cooper helping him out.
He has been allowed to bring this through to the Wallabies, as can be seen here.
This approach was a hallmark of the MacQueen Wallabies. With the Wallabies using subtle obstruction, rapid pick and go’s and under Gregan’s tutelage, Nic White and Will Genia are running the Off-9 Work with their forwards in a very similar vein. By compressing their men and attacking the fringes repeatedly with quick ball, the defence eventually will be drawn in. The Wallabies of the MacQueen era were designed to reattack before the defence was even back onside, and only to get faster and faster as they made more and more breaks. Again, a perfect combo of the two principles of Sun Tzu above.
The third example and the Bledisloe II passage of play earlier, could’ve been identical.
The subtle work on clearing for the lane for the pick and go was also on point, with many of the Wallabies driving beyond the ball, opening the lane for the rapid fire pick and before using the endless array of switches, inside passes and decoy plays to further compress the defence. This was designed to drag numbers out to target back in with numbers and speed, further overwhelming the defence before moving wide.
Continue reading below…
What it relies on?
As has been seen, we see members of the back 3 taking the ball hard around the fringes. We’ve seen Marika Koroibete using rapid fire pick and go’s, coming in as the crash option. Below, we see a very similar structure run in both examples, except a forward is running the fringe line at the first and Dane Haylett-Petty is running the line at second, whilst earlier we saw Beale running the same line against the All Blacks.
Go forward is needed for this gameplan to succeed. The performance against the Springboks is indicative of this. The balance of the Wallaby pack is not yet rich enough in carriers. Hence the Back 3 have come into share the load. The addition of Isa Naisarani is a step in the right direction, but you can bet further ballast will be needed in the pack, and with ‘Pooper” likely to combine again where does it come? Skelton is out, and he could’ve been huge in this department. The back-row balance as well as the back 3 could use a little work, but the selections have indicated its moving in the right direction.
How it all comes together?
Then at the end, we see how it all comes together.
This is the lead up to White’s try. We see everything included, Up the guts work by the forwards with quick pick and go’s, straight lines from Lealifano with inside options before moving it wide with hard straight running. Not to mention, another rapid pick and go from Koroibete, bringing his Rebels inclinations to the Wallabies.
The Wallabies breakdown is intelligent here, we see O’Connor clear out ALB to the left, as to clear the way for Koroibete. Much like Cooper in the Rebels, the clearing for the pick and go is very savvy.
As we can see, they also know when to go wide. The biggest thing that Berne has brought, is the knowledge that they have to do the hard yards first. He had allowed them the mindset to do this with speed, deception, power and a drive to be relentless, attacking before the defence is ready. Once done and the space is there, they can use their ballplayers to move the ball wide.
Regardless of Bledisloe II where inaccuracies and their own lack of focus on these points undone them, you have to say this is coming good at the right time. If they can continue getting go-forward, this could cause trouble for quite a few teams.
Stream Nations Championship 2026 LIVE
Hemispheres collide in the new Nations Championship. Stream live, replays and highlights free on RugbyPass TV.
No {{resultsType == 0 ? "fixtures" : "results"}} for {{resultName()}}.
{{article.cp.n}}
{{article.t}}
{{article.e.name}}
{{article.c}}
{{article.d}}
No news results for {{resultName()}}.
{{item.n}}
No RPTV results for {{resultName()}}.
Popular
{{comp.n}}
Tournament
{{team.n}}
Team
{{player.n}}
{{player.t}}
Edition & Time Zone
{{current.name}}
Set time zone automatically
{{selectedTimezoneTitle}} (auto)
Choose a different time zone
Editions
{{item.title}}
Change Time Zone
{{item.title}}
[{"tz":"Africa\/Abidjan","location":"Abidjan","code":"CI","country":"Cate d'Ivoire","title":"Abidjan - Cote d'Ivoire"},{"tz":"Africa\/Accra","location":"Accra","code":"GH","country":"Ghana","title":"Accra - Ghana"},{"tz":"Africa\/Addis_Ababa","location":"AddisAbaba","code":"ET","country":"Ethiopia","title":"Addis Ababa - Ethiopia"},{"tz":"Africa\/Algiers","location":"Algiers","code":"DZ","country":"Algeria","title":"Algiers - Algeria"},{"tz":"Africa\/Asmara","location":"Asmara","code":"ER","country":"Eritrea","title":"Asmara - Eritrea"},{"tz":"Africa\/Bamako","location":"Bamako","code":"ML","country":"Mali","title":"Bamako - Mali"},{"tz":"Africa\/Bangui","location":"Bangui","code":"CF","country":"Central African Republic","title":"Bangui - Central African Republic"},{"tz":"Africa\/Banjul","location":"Banjul","code":"GM","country":"Gambia","title":"Banjul - Gambia"},{"tz":"Africa\/Bissau","location":"Bissau","code":"GW","country":"Guinea-Bissau","title":"Bissau - Guinea-Bissau"},{"tz":"Africa\/Blantyre","location":"Blantyre","code":"MW","country":"Malawi","title":"Blantyre - Malawi"},{"tz":"Africa\/Brazzaville","location":"Brazzaville","code":"CG","country":"Congo (Brazzaville)","title":"Brazzaville - The Republic of the Congo"},{"tz":"Africa\/Bujumbura","location":"Bujumbura","code":"BI","country":"Burundi","title":"Bujumbura - Burundi"},{"tz":"Africa\/Cairo","location":"Cairo","code":"EG","country":"Egypt","title":"Cairo - Egypt"},{"tz":"Africa\/Casablanca","location":"Casablanca","code":"MA","country":"Morocco","title":"Casablanca - Morocco"},{"tz":"Africa\/Ceuta","location":"Ceuta","code":"ES","country":"Spain","title":"Ceuta - Spain"},{"tz":"Africa\/Conakry","location":"Conakry","code":"GN","country":"Guinea","title":"Conakry - Guinea"},{"tz":"Africa\/Dakar","location":"Dakar","code":"SN","country":"Senegal","title":"Dakar - Senegal"},{"tz":"Africa\/Dar_es_Salaam","location":"DaresSalaam","code":"TZ","country":"Tanzania","title":"Dar es Salaam - Tanzania"},{"tz":"Africa\/Djibouti","location":"Djibouti","code":"DJ","country":"Djibouti","title":"Djibouti"},{"tz":"Africa\/Douala","location":"Douala","code":"CM","country":"Cameroon","title":"Douala - Cameroon"},{"tz":"Africa\/El_Aaiun","location":"ElAaiun","code":"EH","country":"Western Sahara","title":"El Aaiun - Western Sahara"},{"tz":"Africa\/Freetown","location":"Freetown","code":"SL","country":"Sierra Leone","title":"Freetown - Sierra Leone"},{"tz":"Africa\/Gaborone","location":"Gaborone","code":"BW","country":"Botswana","title":"Gaborone - Botswana"},{"tz":"Africa\/Harare","location":"Harare","code":"ZW","country":"Zimbabwe","title":"Harare - Zimbabwe"},{"tz":"Africa\/Johannesburg","location":"Johannesburg","code":"ZA","country":"South Africa","title":"Johannesburg - South Africa"},{"tz":"Africa\/Juba","location":"Juba","code":"SS","country":"South Sudan","title":"Juba - South Sudan"},{"tz":"Africa\/Kampala","location":"Kampala","code":"UG","country":"Uganda","title":"Kampala - Uganda"},{"tz":"Africa\/Khartoum","location":"Khartoum","code":"SD","country":"Sudan","title":"Khartoum - Sudan"},{"tz":"Africa\/Kigali","location":"Kigali","code":"RW","country":"Rwanda","title":"Kigali - Rwanda"},{"tz":"Africa\/Kinshasa","location":"Kinshasa","code":"CD","country":"Congo (Kinshasa)","title":"Kinshasa - The Democratic Republic of Congo"},{"tz":"Africa\/Lagos","location":"Lagos","code":"NG","country":"Nigeria","title":"Lagos - Nigeria "},{"tz":"Africa\/Libreville","location":"Libreville","code":"GA","country":"Gabon","title":"Libreville - Gabon"},{"tz":"Africa\/Lome","location":"Lome","code":"TG","country":"Togo","title":"Lome - Togo"},{"tz":"Africa\/Luanda","location":"Luanda","code":"AO","country":"Angola","title":"Luanda - Angola"},{"tz":"Africa\/Lubumbashi","location":"Lubumbashi","code":"CD","country":"Congo (Kinshasa)","title":"Lubumbashi - The Democratic Republic of Congo"},{"tz":"Africa\/Lusaka","location":"Lusaka","code":"ZM","country":"Zambia","title":"Lusaka - Zambia"},{"tz":"Africa\/Malabo","location":"Malabo","code":"GQ","country":"Equatorial Guinea","title":"Malabo - Equatorial Guinea"},{"tz":"Africa\/Maputo","location":"Maputo","code":"MZ","country":"Mozambique","title":"Maputo - Mozambique"},{"tz":"Africa\/Maseru","location":"Maseru","code":"LS","country":"Lesotho","title":"Maseru - Lesotho"},{"tz":"Africa\/Mbabane","location":"Mbabane","code":"SZ","country":"Swaziland","title":"Mbabane - Eswatini"},{"tz":"Africa\/Mogadishu","location":"Mogadishu","code":"SO","country":"Somalia","title":"Mogadishu - Somalia"},{"tz":"Africa\/Monrovia","location":"Monrovia","code":"LR","country":"Liberia","title":"Monrovia - Liberia"},{"tz":"Africa\/Nairobi","location":"Nairobi","code":"KE","country":"Kenya","title":"Nairobi - Kenya"},{"tz":"Africa\/Ndjamena","location":"Ndjamena","code":"TD","country":"Chad","title":"Ndjamena - Chad"},{"tz":"Africa\/Niamey","location":"Niamey","code":"NE","country":"Niger","title":"Niamey - Niger"},{"tz":"Africa\/Nouakchott","location":"Nouakchott","code":"MR","country":"Mauritania","title":"Nouakchott - Mauritania"},{"tz":"Africa\/Ouagadougou","location":"Ouagadougou","code":"BF","country":"Burkina Faso","title":"Ouagadougou - Burkina Faso"},{"tz":"Africa\/Porto-Novo","location":"Porto-Novo","code":"BJ","country":"Benin","title":"Porto-Novo - Benin"},{"tz":"Africa\/Sao_Tome","location":"SaoTome","code":"ST","country":"Sao Tome and Principe","title":"Sao Tome and Principe"},{"tz":"Africa\/Tripoli","location":"Tripoli","code":"LY","country":"Libya","title":"Tripoli - Libya"},{"tz":"Africa\/Tunis","location":"Tunis","code":"TN","country":"Tunisia","title":"Tunis - Tunisia"},{"tz":"Africa\/Windhoek","location":"Windhoek","code":"NA","country":"Namibia","title":"Windhoek - Namibia"},{"tz":"America\/Adak","location":"Adak","code":"US","country":"United States of America","title":"Adak - Alaska - United States of America"},{"tz":"America\/Anchorage","location":"Anchorage","code":"US","country":"United States of America","title":"Anchorage - Alaska - United States of America"},{"tz":"America\/Anguilla","location":"Anguilla","code":"AI","country":"Anguilla","title":"Anguilla"},{"tz":"America\/Antigua","location":"Antigua","code":"AG","country":"Antigua and Barbuda","title":"Antigua and Barbuda"},{"tz":"America\/Araguaina","location":"Araguaina","code":"BR","country":"Brazil","title":"Araguaina - Brazil"},{"tz":"America\/Argentina\/Buenos_Aires","location":"America","code":"AR","country":"Argentina","title":"Buenos Aires - Argentina"},{"tz":"America\/Argentina\/Catamarca","location":"America","code":"AR","country":"Argentina","title":"Catamarca - Argentina"},{"tz":"America\/Argentina\/Cordoba","location":"America","code":"AR","country":"Argentina","title":"Cordoba - Argentina"},{"tz":"America\/Argentina\/Jujuy","location":"America","code":"AR","country":"Argentina","title":"Jujuy - Argentina"},{"tz":"America\/Argentina\/La_Rioja","location":"America","code":"AR","country":"Argentina","title":"La Rioja - Argentina"},{"tz":"America\/Argentina\/Mendoza","location":"America","code":"AR","country":"Argentina","title":"Mendoza - Argentina"},{"tz":"America\/Argentina\/Rio_Gallegos","location":"America","code":"AR","country":"Argentina","title":"Rio Gallegos - Argentina"},{"tz":"America\/Argentina\/Salta","location":"America","code":"AR","country":"Argentina","title":"Salta - Argentina"},{"tz":"America\/Argentina\/San_Juan","location":"America","code":"AR","country":"Argentina","title":"San Juan - Argentina"},{"tz":"America\/Argentina\/San_Luis","location":"America","code":"AR","country":"Argentina","title":"San Luis - Argentina"},{"tz":"America\/Argentina\/Tucuman","location":"America","code":"AR","country":"Argentina","title":"Tucuman - Argentina"},{"tz":"America\/Argentina\/Ushuaia","location":"America","code":"AR","country":"Argentina","title":"Ushuaia - Argentina"},{"tz":"America\/Aruba","location":"Aruba","code":"AW","country":"Aruba","title":"Aruba"},{"tz":"America\/Asuncion","location":"Asuncion","code":"PY","country":"Paraguay","title":"Asuncion - Paraguay"},{"tz":"America\/Atikokan","location":"Atikokan","code":"CA","country":"Canada","title":"Atikokan - Canada"},{"tz":"America\/Bahia","location":"Bahia","code":"BR","country":"Brazil","title":"Bahia - Brazil"},{"tz":"America\/Bahia_Banderas","location":"BahiaBanderas","code":"MX","country":"Mexico","title":"Bahia Banderas - Mexico"},{"tz":"America\/Barbados","location":"Barbados","code":"BB","country":"Barbados","title":"Barbados"},{"tz":"America\/Belem","location":"Belem","code":"BR","country":"Brazil","title":"Belem - Brazil"},{"tz":"America\/Belize","location":"Belize","code":"BZ","country":"Belize","title":"Belize"},{"tz":"America\/Blanc-Sablon","location":"Blanc-Sablon","code":"CA","country":"Canada","title":"Blanc-Sablon - Canada"},{"tz":"America\/Boa_Vista","location":"BoaVista","code":"BR","country":"Brazil","title":"Boa Vista - Brazil"},{"tz":"America\/Bogota","location":"Bogota","code":"CO","country":"Colombia","title":"Bogota - Colombia"},{"tz":"America\/Boise","location":"Boise","code":"US","country":"United States of America","title":"Boise - Idaho - United States of America"},{"tz":"America\/Cambridge_Bay","location":"CambridgeBay","code":"CA","country":"Canada","title":"Cambridge Bay - Canada"},{"tz":"America\/Campo_Grande","location":"CampoGrande","code":"BR","country":"Brazil","title":"Campo Grande - Brazil"},{"tz":"America\/Cancun","location":"Cancun","code":"MX","country":"Mexico","title":"Cancun - Mexico"},{"tz":"America\/Caracas","location":"Caracas","code":"VE","country":"Venezuela (Bolivarian Republic)","title":"Caracas - Venezuela"},{"tz":"America\/Cayenne","location":"Cayenne","code":"GF","country":"French Guiana","title":"Cayenne - French Guiana"},{"tz":"America\/Cayman","location":"Cayman","code":"KY","country":"Cayman Islands","title":"Cayman Islands"},{"tz":"America\/Chicago","location":"Chicago","code":"US","country":"United States of America","title":"Chicago - Illinois - United States of America"},{"tz":"America\/Chihuahua","location":"Chihuahua","code":"MX","country":"Mexico","title":"Chihuahua - Mexico"},{"tz":"America\/Ciudad_Juarez","location":"CiudadJuarez","code":"MX","country":"Mexico","title":"Ciudad Juarez - Mexico"},{"tz":"America\/Costa_Rica","location":"CostaRica","code":"CR","country":"Costa Rica","title":"Costa Rica"},{"tz":"America\/Creston","location":"Creston","code":"CA","country":"Canada","title":"Creston - Canada"},{"tz":"America\/Cuiaba","location":"Cuiaba","code":"BR","country":"Brazil","title":"Cuiaba - Brazil"},{"tz":"America\/Curacao","location":"Curacao","code":"CW","country":"","title":"Curacao"},{"tz":"America\/Danmarkshavn","location":"Danmarkshavn","code":"GL","country":"Greenland","title":"Danmarkshavn - Greenland"},{"tz":"America\/Dawson","location":"Dawson","code":"CA","country":"Canada","title":"Dawson - Canada"},{"tz":"America\/Dawson_Creek","location":"DawsonCreek","code":"CA","country":"Canada","title":"Dawson Creek - Canada"},{"tz":"America\/Denver","location":"Denver","code":"US","country":"United States of America","title":"Denver - Colorado - United States of America"},{"tz":"America\/Detroit","location":"Detroit","code":"US","country":"United States of America","title":"Detroit - Michigan - United States of America"},{"tz":"America\/Dominica","location":"Dominica","code":"DM","country":"Dominica","title":"Dominica"},{"tz":"America\/Edmonton","location":"Edmonton","code":"CA","country":"Canada","title":"Edmonton - Canada"},{"tz":"America\/Eirunepe","location":"Eirunepe","code":"BR","country":"Brazil","title":"Eirunepe - Brazil"},{"tz":"America\/El_Salvador","location":"ElSalvador","code":"SV","country":"El Salvador","title":"El Salvador"},{"tz":"America\/Fort_Nelson","location":"FortNelson","code":"CA","country":"Canada","title":"Fort Nelson - Canada"},{"tz":"America\/Fortaleza","location":"Fortaleza","code":"BR","country":"Brazil","title":"Fortaleza - Brazil"},{"tz":"America\/Glace_Bay","location":"GlaceBay","code":"CA","country":"Canada","title":"Glace Bay - Canada"},{"tz":"America\/Goose_Bay","location":"GooseBay","code":"CA","country":"Canada","title":"Goose Bay - Canada"},{"tz":"America\/Grand_Turk","location":"GrandTurk","code":"TC","country":"Turks and Caicos Islands","title":"Grand Turk - Turks and Caicos Islands"},{"tz":"America\/Grenada","location":"Grenada","code":"GD","country":"Grenada","title":"Grenada"},{"tz":"America\/Guadeloupe","location":"Guadeloupe","code":"GP","country":"Guadeloupe","title":"Guadeloupe"},{"tz":"America\/Guatemala","location":"Guatemala","code":"GT","country":"Guatemala","title":"Guatemala"},{"tz":"America\/Guayaquil","location":"Guayaquil","code":"EC","country":"Ecuador","title":"Guayaquil - Ecuador"},{"tz":"America\/Guyana","location":"Guyana","code":"GY","country":"Guyana","title":"Guyana"},{"tz":"America\/Halifax","location":"Halifax","code":"CA","country":"Canada","title":"Halifax - Canada"},{"tz":"America\/Havana","location":"Havana","code":"CU","country":"Cuba","title":"Havana - Cuba"},{"tz":"America\/Hermosillo","location":"Hermosillo","code":"MX","country":"Mexico","title":"Hermosillo - Mexico"},{"tz":"America\/Indiana\/Indianapolis","location":"America","code":"US","country":"United States of America","title":"Indianapolis - Indiana - United States of America"},{"tz":"America\/Indiana\/Knox","location":"America","code":"US","country":"United States of America","title":"Knox - Indiana - United States of America"},{"tz":"America\/Indiana\/Marengo","location":"America","code":"US","country":"United States of America","title":"Marengo - Indiana - United States of America"},{"tz":"America\/Indiana\/Petersburg","location":"America","code":"US","country":"United States of America","title":"Petersburg - Indiana - United States of America"},{"tz":"America\/Indiana\/Tell_City","location":"America","code":"US","country":"United States of America","title":"Tell City - Indiana - United States of America"},{"tz":"America\/Indiana\/Vevay","location":"America","code":"US","country":"United States of America","title":"Vevay - Indiana - United States of America"},{"tz":"America\/Indiana\/Vincennes","location":"America","code":"US","country":"United States of America","title":"Vincennes - Indiana - United States of America"},{"tz":"America\/Indiana\/Winamac","location":"America","code":"US","country":"United States of America","title":"Winamac - Indiana - United States of America"},{"tz":"America\/Inuvik","location":"Inuvik","code":"CA","country":"Canada","title":"Inuvik - Canada"},{"tz":"America\/Iqaluit","location":"Iqaluit","code":"CA","country":"Canada","title":"Iqaluit - Canada"},{"tz":"America\/Jamaica","location":"Jamaica","code":"JM","country":"Jamaica","title":"Jamaica"},{"tz":"America\/Juneau","location":"Juneau","code":"US","country":"United States of America","title":"Juneau - Alaska - United States of America"},{"tz":"America\/Kentucky\/Louisville","location":"America","code":"US","country":"United States of America","title":"Louisville - Kentucky - United States of America"},{"tz":"America\/Kentucky\/Monticello","location":"America","code":"US","country":"United States of America","title":"Monticello - Kentucky - United States of America"},{"tz":"America\/Kralendijk","location":"Kralendijk","code":"BQ","country":"","title":"Kralendijk - Bonaire"},{"tz":"America\/La_Paz","location":"LaPaz","code":"BO","country":"Bolivia","title":"La Paz - Bolivia"},{"tz":"America\/Lima","location":"Lima","code":"PE","country":"Peru","title":"Lima - Peru"},{"tz":"America\/Los_Angeles","location":"LosAngeles","code":"US","country":"United States of America","title":"Los Angeles - California - United States of America"},{"tz":"America\/Lower_Princes","location":"LowerPrinces","code":"SX","country":"","title":"Lower Princes - Sint Maarten"},{"tz":"America\/Maceio","location":"Maceio","code":"BR","country":"Brazil","title":"Maceio - Brazil"},{"tz":"America\/Managua","location":"Managua","code":"NI","country":"Nicaragua","title":"Managua - Nicaragua"},{"tz":"America\/Manaus","location":"Manaus","code":"BR","country":"Brazil","title":"Manaus - Brazil"},{"tz":"America\/Marigot","location":"Marigot","code":"MF","country":"Saint-Martin (French part)","title":"Marigot - Saint-Martin"},{"tz":"America\/Martinique","location":"Martinique","code":"MQ","country":"Martinique","title":"Martinique"},{"tz":"America\/Matamoros","location":"Matamoros","code":"MX","country":"Mexico","title":"Matamoros - Mexico"},{"tz":"America\/Mazatlan","location":"Mazatlan","code":"MX","country":"Mexico","title":"Mazatlan - Mexico"},{"tz":"America\/Menominee","location":"Menominee","code":"US","country":"United States of America","title":"Menominee - Wisconsin - United States of America"},{"tz":"America\/Merida","location":"Merida","code":"MX","country":"Mexico","title":"Merida - Mexico"},{"tz":"America\/Metlakatla","location":"Metlakatla","code":"US","country":"United States of America","title":"Metlakatla - Alaska - United States of America"},{"tz":"America\/Mexico_City","location":"MexicoCity","code":"MX","country":"Mexico","title":"Mexico City - Mexico"},{"tz":"America\/Miquelon","location":"Miquelon","code":"PM","country":"Saint Pierre and Miquelon","title":"Miquelon - Saint Pierre and Miquelon"},{"tz":"America\/Moncton","location":"Moncton","code":"CA","country":"Canada","title":"Moncton - Canada"},{"tz":"America\/Monterrey","location":"Monterrey","code":"MX","country":"Mexico","title":"Monterrey - Mexico"},{"tz":"America\/Montevideo","location":"Montevideo","code":"UY","country":"Uruguay","title":"Montevideo - Uruguay"},{"tz":"America\/Montserrat","location":"Montserrat","code":"MS","country":"Montserrat","title":"Montserrat"},{"tz":"America\/Nassau","location":"Nassau","code":"BS","country":"Bahamas","title":"Nassau - Bahamas"},{"tz":"America\/New_York","location":"NewYork","code":"US","country":"United States of America","title":"New York - United States of America"},{"tz":"America\/Nome","location":"Nome","code":"US","country":"United States of America","title":"Nome - Alaska - United States of America"},{"tz":"America\/Noronha","location":"Noronha","code":"BR","country":"Brazil","title":"Noronha - Brazil"},{"tz":"America\/North_Dakota\/Beulah","location":"America","code":"US","country":"United States of America","title":"Beulah - North Dakota - United States of America"},{"tz":"America\/North_Dakota\/Center","location":"America","code":"US","country":"United States of America","title":"Center - North Dakota - United States of America"},{"tz":"America\/North_Dakota\/New_Salem","location":"America","code":"US","country":"United States of America","title":"New Salem - North Dakota - United States of America"},{"tz":"America\/Nuuk","location":"Nuuk","code":"GL","country":"Greenland","title":"Nuuk - Greenland"},{"tz":"America\/Ojinaga","location":"Ojinaga","code":"MX","country":"Mexico","title":"Ojinaga - Mexico"},{"tz":"America\/Panama","location":"Panama","code":"PA","country":"Panama","title":"Panama"},{"tz":"America\/Paramaribo","location":"Paramaribo","code":"SR","country":"Suriname","title":"Paramaribo - Suriname"},{"tz":"America\/Phoenix","location":"Phoenix","code":"US","country":"United States of America","title":"Phoenix - Arizona - United States of America"},{"tz":"America\/Port-au-Prince","location":"Port-au-Prince","code":"HT","country":"Haiti","title":"Port-au-Prince - Haiti"},{"tz":"America\/Port_of_Spain","location":"PortofSpain","code":"TT","country":"Trinidad and Tobago","title":"Port of Spain - Trinidad and Tobago"},{"tz":"America\/Porto_Velho","location":"PortoVelho","code":"BR","country":"Brazil","title":"Porto Velho - Brazil"},{"tz":"America\/Puerto_Rico","location":"PuertoRico","code":"PR","country":"Puerto Rico","title":"Puerto Rico"},{"tz":"America\/Punta_Arenas","location":"PuntaArenas","code":"CL","country":"Chile","title":"Punta Arenas - Chile"},{"tz":"America\/Rankin_Inlet","location":"RankinInlet","code":"CA","country":"Canada","title":"Rankin Inlet - Canada"},{"tz":"America\/Recife","location":"Recife","code":"BR","country":"Brazil","title":"Recife - Brazil"},{"tz":"America\/Regina","location":"Regina","code":"CA","country":"Canada","title":"Regina - Canada"},{"tz":"America\/Resolute","location":"Resolute","code":"CA","country":"Canada","title":"Resolute - Canada"},{"tz":"America\/Rio_Branco","location":"RioBranco","code":"BR","country":"Brazil","title":"Rio Branco - Brazil"},{"tz":"America\/Santarem","location":"Santarem","code":"BR","country":"Brazil","title":"Santarem - Brazil"},{"tz":"America\/Santiago","location":"Santiago","code":"CL","country":"Chile","title":"Santiago - Chile"},{"tz":"America\/Santo_Domingo","location":"SantoDomingo","code":"DO","country":"Dominican Republic","title":"Santo Domingo - Dominican Republic"},{"tz":"America\/Sao_Paulo","location":"SaoPaulo","code":"BR","country":"Brazil","title":"Sao Paulo - Brazil"},{"tz":"America\/Scoresbysund","location":"Scoresbysund","code":"GL","country":"Greenland","title":"Scoresbysund - Greenland"},{"tz":"America\/Sitka","location":"Sitka","code":"US","country":"United States of America","title":"Sitka - Alaska - United States of America"},{"tz":"America\/St_Barthelemy","location":"StBarthelemy","code":"BL","country":"Saint-Barthelemy","title":"Saint Barthelemy"},{"tz":"America\/St_Johns","location":"StJohns","code":"CA","country":"Canada","title":"St Johns - Canada"},{"tz":"America\/St_Kitts","location":"StKitts","code":"KN","country":"Saint Kitts and Nevis","title":"Saint Kitts and Nevis"},{"tz":"America\/St_Lucia","location":"StLucia","code":"LC","country":"Saint Lucia","title":"Saint Lucia"},{"tz":"America\/St_Thomas","location":"StThomas","code":"VI","country":"Virgin Islands","title":"St Thomas - US Virgin Islands"},{"tz":"America\/St_Vincent","location":"StVincent","code":"VC","country":"Saint Vincent and Grenadines","title":"Saint Vincent and Grenadines"},{"tz":"America\/Swift_Current","location":"SwiftCurrent","code":"CA","country":"Canada","title":"Swift Current - Canada"},{"tz":"America\/Tegucigalpa","location":"Tegucigalpa","code":"HN","country":"Honduras","title":"Tegucigalpa - Honduras"},{"tz":"America\/Thule","location":"Thule","code":"GL","country":"Greenland","title":"Thule - Greenland"},{"tz":"America\/Tijuana","location":"Tijuana","code":"MX","country":"Mexico","title":"Tijuana - Mexico"},{"tz":"America\/Toronto","location":"Toronto","code":"CA","country":"Canada","title":"Toronto - Canada"},{"tz":"America\/Tortola","location":"Tortola","code":"VG","country":"British Virgin Islands","title":"Tortola - British Virgin Islands"},{"tz":"America\/Vancouver","location":"Vancouver","code":"CA","country":"Canada","title":"Vancouver - Canada"},{"tz":"America\/Whitehorse","location":"Whitehorse","code":"CA","country":"Canada","title":"Whitehorse - Canada"},{"tz":"America\/Winnipeg","location":"Winnipeg","code":"CA","country":"Canada","title":"Winnipeg - Canada"},{"tz":"America\/Yakutat","location":"Yakutat","code":"US","country":"United States of America","title":"Yakutat - Alaska - United States of America"},{"tz":"Antarctica\/Casey","location":"Casey","code":"AQ","country":"Antarctica","title":"Casey - Antarctica"},{"tz":"Antarctica\/Davis","location":"Davis","code":"AQ","country":"Antarctica","title":"Davis - Antarctica"},{"tz":"Antarctica\/DumontDUrville","location":"DumontDUrville","code":"AQ","country":"Antarctica","title":"Dumont D'Urville - Antarctica"},{"tz":"Antarctica\/Macquarie","location":"Macquarie","code":"AU","country":"Australia","title":"Macquarie Island - Australia"},{"tz":"Antarctica\/Mawson","location":"Mawson","code":"AQ","country":"Antarctica","title":"Mawson - Antarctica"},{"tz":"Antarctica\/McMurdo","location":"McMurdo","code":"AQ","country":"Antarctica","title":"McMurdo - Antarctica"},{"tz":"Antarctica\/Palmer","location":"Palmer","code":"AQ","country":"Antarctica","title":"Palmer - Antarctica"},{"tz":"Antarctica\/Rothera","location":"Rothera","code":"AQ","country":"Antarctica","title":"Rothera - Antarctica"},{"tz":"Antarctica\/Syowa","location":"Syowa","code":"AQ","country":"Antarctica","title":"Syowa - Antarctica"},{"tz":"Antarctica\/Troll","location":"Troll","code":"AQ","country":"Antarctica","title":"Troll - Antarctica"},{"tz":"Antarctica\/Vostok","location":"Vostok","code":"AQ","country":"Antarctica","title":"Vostok - Antarctica"},{"tz":"Arctic\/Longyearbyen","location":"Longyearbyen","code":"SJ","country":"Svalbard and Jan Mayen Islands","title":"Longyearbyen - Svalbard and Jan Mayen Islands"},{"tz":"Asia\/Aden","location":"Aden","code":"YE","country":"Yemen","title":"Aden - Yemen"},{"tz":"Asia\/Almaty","location":"Almaty","code":"KZ","country":"Kazakhstan","title":"Almaty - Kazakhstan"},{"tz":"Asia\/Amman","location":"Amman","code":"JO","country":"Jordan","title":"Amman - Jordan"},{"tz":"Asia\/Anadyr","location":"Anadyr","code":"RU","country":"Russia","title":"Anadyr - Russia"},{"tz":"Asia\/Aqtau","location":"Aqtau","code":"KZ","country":"Kazakhstan","title":"Aqtau - Kazakhstan"},{"tz":"Asia\/Aqtobe","location":"Aqtobe","code":"KZ","country":"Kazakhstan","title":"Aqtobe - Kazakhstan"},{"tz":"Asia\/Ashgabat","location":"Ashgabat","code":"TM","country":"Turkmenistan","title":"Ashgabat - Turkmenistan"},{"tz":"Asia\/Atyrau","location":"Atyrau","code":"KZ","country":"Kazakhstan","title":"Atyrau - Kazakhstan"},{"tz":"Asia\/Baghdad","location":"Baghdad","code":"IQ","country":"Iraq","title":"Baghdad - Iraq"},{"tz":"Asia\/Bahrain","location":"Bahrain","code":"BH","country":"Bahrain","title":"Bahrain"},{"tz":"Asia\/Baku","location":"Baku","code":"AZ","country":"Azerbaijan","title":"Baku - Azerbaijan"},{"tz":"Asia\/Bangkok","location":"Bangkok","code":"TH","country":"Thailand","title":"Bangkok - Thailand"},{"tz":"Asia\/Barnaul","location":"Barnaul","code":"RU","country":"Russia","title":"Barnaul - Russia"},{"tz":"Asia\/Beirut","location":"Beirut","code":"LB","country":"Lebanon","title":"Beirut - Lebanon"},{"tz":"Asia\/Bishkek","location":"Bishkek","code":"KG","country":"Kyrgyzstan","title":"Bishkek - Kyrgyzstan"},{"tz":"Asia\/Brunei","location":"Brunei","code":"BN","country":"Brunei Darussalam","title":"Brunei Darussalam"},{"tz":"Asia\/Chita","location":"Chita","code":"RU","country":"Russia","title":"Chita - Russia"},{"tz":"Asia\/Choibalsan","location":"Choibalsan","code":"MN","country":"Mongolia","title":"Choibalsan - Mongolia"},{"tz":"Asia\/Colombo","location":"Colombo","code":"LK","country":"Sri Lanka","title":"Colombo - Sri Lanka"},{"tz":"Asia\/Damascus","location":"Damascus","code":"SY","country":"Syrian Arab Republic (Syria)","title":"Damascus - Syria"},{"tz":"Asia\/Dhaka","location":"Dhaka","code":"BD","country":"Bangladesh","title":"Dhaka - Bangladesh"},{"tz":"Asia\/Dili","location":"Dili","code":"TL","country":"Timor-Leste","title":"Dili - Timor-Leste"},{"tz":"Asia\/Dubai","location":"Dubai","code":"AE","country":"United Arab Emirates","title":"Dubai - United Arab Emirates"},{"tz":"Asia\/Dushanbe","location":"Dushanbe","code":"TJ","country":"Tajikistan","title":"Dushanbe - Tajikistan"},{"tz":"Asia\/Famagusta","location":"Famagusta","code":"CY","country":"Cyprus","title":"Famagusta - Cyprus"},{"tz":"Asia\/Gaza","location":"Gaza","code":"PS","country":"Palestinian Territory","title":"Gaza - Palestinian Territory"},{"tz":"Asia\/Hebron","location":"Hebron","code":"PS","country":"Palestinian Territory","title":"Hebron - Palestinian Territory"},{"tz":"Asia\/Ho_Chi_Minh","location":"HoChiMinh","code":"VN","country":"Viet Nam","title":"Ho Chi Minh City - Vietnam"},{"tz":"Asia\/Hong_Kong","location":"HongKong","code":"HK","country":"Hong Kong","title":"Hong Kong China"},{"tz":"Asia\/Hovd","location":"Hovd","code":"MN","country":"Mongolia","title":"Hovd - Mongolia"},{"tz":"Asia\/Irkutsk","location":"Irkutsk","code":"RU","country":"Russia","title":"Irkutsk - Russia"},{"tz":"Asia\/Jakarta","location":"Jakarta","code":"ID","country":"Indonesia","title":"Jakarta - Indonesia"},{"tz":"Asia\/Jayapura","location":"Jayapura","code":"ID","country":"Indonesia","title":"Jayapura - Indonesia"},{"tz":"Asia\/Jerusalem","location":"Jerusalem","code":"IL","country":"Israel","title":"Jerusalem - Israel"},{"tz":"Asia\/Kabul","location":"Kabul","code":"AF","country":"Afghanistan","title":"Kabul - Afghanistan"},{"tz":"Asia\/Kamchatka","location":"Kamchatka","code":"RU","country":"Russia","title":"Kamchatka - Russia"},{"tz":"Asia\/Karachi","location":"Karachi","code":"PK","country":"Pakistan","title":"Karachi - Pakistan"},{"tz":"Asia\/Kathmandu","location":"Kathmandu","code":"NP","country":"Nepal","title":"Kathmandu - Nepal"},{"tz":"Asia\/Khandyga","location":"Khandyga","code":"RU","country":"Russia","title":"Khandyga - Russia"},{"tz":"Asia\/Kolkata","location":"Kolkata","code":"IN","country":"India","title":"Kolkata - India"},{"tz":"Asia\/Krasnoyarsk","location":"Krasnoyarsk","code":"RU","country":"Russia","title":"Krasnoyarsk - Russia"},{"tz":"Asia\/Kuala_Lumpur","location":"KualaLumpur","code":"MY","country":"Malaysia","title":"Kuala Lumpur - Malaysia"},{"tz":"Asia\/Kuching","location":"Kuching","code":"MY","country":"Malaysia","title":"Kuching - Malaysia"},{"tz":"Asia\/Kuwait","location":"Kuwait","code":"KW","country":"Kuwait","title":"Kuwait"},{"tz":"Asia\/Macau","location":"Macau","code":"MO","country":"Macau","title":"Macau"},{"tz":"Asia\/Magadan","location":"Magadan","code":"RU","country":"Russia","title":"Magadan - Russia"},{"tz":"Asia\/Makassar","location":"Makassar","code":"ID","country":"Indonesia","title":"Makassar - Indonesia"},{"tz":"Asia\/Manila","location":"Manila","code":"PH","country":"Philippines","title":"Manila - Philippines"},{"tz":"Asia\/Muscat","location":"Muscat","code":"OM","country":"Oman","title":"Muscat - Oman"},{"tz":"Asia\/Nicosia","location":"Nicosia","code":"CY","country":"Cyprus","title":"Nicosia - Cyprus"},{"tz":"Asia\/Novokuznetsk","location":"Novokuznetsk","code":"RU","country":"Russia","title":"Novokuznetsk - Russia"},{"tz":"Asia\/Novosibirsk","location":"Novosibirsk","code":"RU","country":"Russia","title":"Novosibirsk - Russia"},{"tz":"Asia\/Omsk","location":"Omsk","code":"RU","country":"Russia","title":"Omsk - Russia"},{"tz":"Asia\/Oral","location":"Oral","code":"KZ","country":"Kazakhstan","title":"Oral - Kazakhstan"},{"tz":"Asia\/Phnom_Penh","location":"PhnomPenh","code":"KH","country":"Cambodia","title":"Phnom Penh - Cambodia"},{"tz":"Asia\/Pontianak","location":"Pontianak","code":"ID","country":"Indonesia","title":"Pontianak - Indonesia"},{"tz":"Asia\/Pyongyang","location":"Pyongyang","code":"KP","country":"Korea (North)","title":"Pyongyang - North Korea"},{"tz":"Asia\/Qatar","location":"Qatar","code":"QA","country":"Qatar","title":"Qatar"},{"tz":"Asia\/Qostanay","location":"Qostanay","code":"KZ","country":"Kazakhstan","title":"Qostanay - Kazakhstan"},{"tz":"Asia\/Qyzylorda","location":"Qyzylorda","code":"KZ","country":"Kazakhstan","title":"Qyzylorda - Kazakhstan"},{"tz":"Asia\/Riyadh","location":"Riyadh","code":"SA","country":"Saudi Arabia","title":"Riyadh - Saudi Arabia"},{"tz":"Asia\/Sakhalin","location":"Sakhalin","code":"RU","country":"Russia","title":"Sakhalin - Russia"},{"tz":"Asia\/Samarkand","location":"Samarkand","code":"UZ","country":"Uzbekistan","title":"Samarkand - Uzbekistan"},{"tz":"Asia\/Seoul","location":"Seoul","code":"KR","country":"Korea (South)","title":"Seoul - South Korea"},{"tz":"Asia\/Shanghai","location":"Shanghai","code":"CN","country":"China","title":"Shanghai - China"},{"tz":"Asia\/Singapore","location":"Singapore","code":"SG","country":"Singapore","title":"Singapore"},{"tz":"Asia\/Srednekolymsk","location":"Srednekolymsk","code":"RU","country":"Russia","title":"Srednekolymsk - Russia"},{"tz":"Asia\/Taipei","location":"Taipei","code":"TW","country":"Taiwan","title":"Taipei - Chinese Taipei"},{"tz":"Asia\/Tashkent","location":"Tashkent","code":"UZ","country":"Uzbekistan","title":"Tashkent - Uzbekistan"},{"tz":"Asia\/Tbilisi","location":"Tbilisi","code":"GE","country":"Georgia","title":"Tbilisi - Georgia"},{"tz":"Asia\/Tehran","location":"Tehran","code":"IR","country":"Iran","title":"Tehran - Iran"},{"tz":"Asia\/Thimphu","location":"Thimphu","code":"BT","country":"Bhutan","title":"Thimphu - Bhutan"},{"tz":"Asia\/Tokyo","location":"Tokyo","code":"JP","country":"Japan","title":"Tokyo - Japan"},{"tz":"Asia\/Tomsk","location":"Tomsk","code":"RU","country":"Russia","title":"Tomsk - Russia"},{"tz":"Asia\/Ulaanbaatar","location":"Ulaanbaatar","code":"MN","country":"Mongolia","title":"Ulaanbaatar - Mongolia"},{"tz":"Asia\/Urumqi","location":"Urumqi","code":"CN","country":"China","title":"Urumqi - China"},{"tz":"Asia\/Ust-Nera","location":"Ust-Nera","code":"RU","country":"Russia","title":"Ust-Nera - Russia"},{"tz":"Asia\/Vientiane","location":"Vientiane","code":"LA","country":"Lao PDR","title":"Vientiane - Laos"},{"tz":"Asia\/Vladivostok","location":"Vladivostok","code":"RU","country":"Russia","title":"Vladivostok - Russia"},{"tz":"Asia\/Yakutsk","location":"Yakutsk","code":"RU","country":"Russia","title":"Yakutsk - Russia"},{"tz":"Asia\/Yangon","location":"Yangon","code":"MM","country":"Myanmar","title":"Yangon - Myanmar"},{"tz":"Asia\/Yekaterinburg","location":"Yekaterinburg","code":"RU","country":"Russia","title":"Yekaterinburg - Russia"},{"tz":"Asia\/Yerevan","location":"Yerevan","code":"AM","country":"Armenia","title":"Yerevan - Armenia"},{"tz":"Atlantic\/Azores","location":"Azores","code":"PT","country":"Portugal","title":"Azores - Portugal"},{"tz":"Atlantic\/Bermuda","location":"Bermuda","code":"BM","country":"Bermuda","title":"Bermuda"},{"tz":"Atlantic\/Canary","location":"Canary","code":"ES","country":"Spain","title":"Canary Islands - Spain"},{"tz":"Atlantic\/Cape_Verde","location":"CapeVerde","code":"CV","country":"Cape Verde","title":"Cape Verde"},{"tz":"Atlantic\/Faroe","location":"Faroe","code":"FO","country":"Faroe Islands","title":"Faroe Islands"},{"tz":"Atlantic\/Madeira","location":"Madeira","code":"PT","country":"Portugal","title":"Madeira - Portugal"},{"tz":"Atlantic\/Reykjavik","location":"Reykjavik","code":"IS","country":"Iceland","title":"Reykjavik - Iceland"},{"tz":"Atlantic\/South_Georgia","location":"SouthGeorgia","code":"GS","country":"South Georgia and the South Sandwich Islands","title":"South Georgia and the South Sandwich Islands"},{"tz":"Atlantic\/St_Helena","location":"StHelena","code":"SH","country":"Saint Helena","title":"Saint Helena"},{"tz":"Atlantic\/Stanley","location":"Stanley","code":"FK","country":"Falkland Islands (Malvinas)","title":"Stanley - Falkland Islands"},{"tz":"Australia\/Adelaide","location":"Adelaide","code":"AU","country":"Australia","title":"Adelaide - Australia"},{"tz":"Australia\/Brisbane","location":"Brisbane","code":"AU","country":"Australia","title":"Brisbane - Australia"},{"tz":"Australia\/Broken_Hill","location":"BrokenHill","code":"AU","country":"Australia","title":"Broken Hill - Australia"},{"tz":"Australia\/Darwin","location":"Darwin","code":"AU","country":"Australia","title":"Darwin - Australia"},{"tz":"Australia\/Eucla","location":"Eucla","code":"AU","country":"Australia","title":"Eucla - Australia"},{"tz":"Australia\/Hobart","location":"Hobart","code":"AU","country":"Australia","title":"Hobart - Australia"},{"tz":"Australia\/Lindeman","location":"Lindeman","code":"AU","country":"Australia","title":"Lindeman - Australia"},{"tz":"Australia\/Lord_Howe","location":"LordHowe","code":"AU","country":"Australia","title":"Lord Howe - Australia"},{"tz":"Australia\/Melbourne","location":"Melbourne","code":"AU","country":"Australia","title":"Melbourne - Australia"},{"tz":"Australia\/Perth","location":"Perth","code":"AU","country":"Australia","title":"Perth - Australia"},{"tz":"Australia\/Sydney","location":"Sydney","code":"AU","country":"Australia","title":"Sydney - Australia"},{"tz":"Europe\/Amsterdam","location":"Amsterdam","code":"NL","country":"Netherlands","title":"Amsterdam - Netherlands"},{"tz":"Europe\/Andorra","location":"Andorra","code":"AD","country":"Andorra","title":"Andorra"},{"tz":"Europe\/Astrakhan","location":"Astrakhan","code":"RU","country":"Russia","title":"Astrakhan - Russia"},{"tz":"Europe\/Athens","location":"Athens","code":"GR","country":"Greece","title":"Athens - Greece"},{"tz":"Europe\/Belgrade","location":"Belgrade","code":"RS","country":"Serbia","title":"Belgrade - Serbia"},{"tz":"Europe\/Berlin","location":"Berlin","code":"DE","country":"Germany","title":"Berlin - Germany"},{"tz":"Europe\/Bratislava","location":"Bratislava","code":"SK","country":"Slovakia","title":"Bratislava - Slovakia"},{"tz":"Europe\/Brussels","location":"Brussels","code":"BE","country":"Belgium","title":"Brussels - Belgium"},{"tz":"Europe\/Bucharest","location":"Bucharest","code":"RO","country":"Romania","title":"Bucharest - Romania"},{"tz":"Europe\/Budapest","location":"Budapest","code":"HU","country":"Hungary","title":"Budapest - Hungary"},{"tz":"Europe\/Busingen","location":"Busingen","code":"DE","country":"Germany","title":"Busingen - Germany"},{"tz":"Europe\/Chisinau","location":"Chisinau","code":"MD","country":"Moldova","title":"Chisinau - Moldova"},{"tz":"Europe\/Copenhagen","location":"Copenhagen","code":"DK","country":"Denmark","title":"Copenhagen - Denmark"},{"tz":"Europe\/Dublin","location":"Dublin","code":"IE","country":"Ireland","title":"Dublin - Ireland"},{"tz":"Europe\/Gibraltar","location":"Gibraltar","code":"GI","country":"Gibraltar","title":"Gibraltar"},{"tz":"Europe\/Guernsey","location":"Guernsey","code":"GG","country":"Guernsey","title":"Guernsey"},{"tz":"Europe\/Helsinki","location":"Helsinki","code":"FI","country":"Finland","title":"Helsinki - Finland"},{"tz":"Europe\/Isle_of_Man","location":"IsleofMan","code":"IM","country":"Isle of Man","title":"Isle of Man"},{"tz":"Europe\/Istanbul","location":"Istanbul","code":"TR","country":"Turkey","title":"Istanbul - Turkey"},{"tz":"Europe\/Jersey","location":"Jersey","code":"JE","country":"Jersey","title":"Jersey"},{"tz":"Europe\/Kaliningrad","location":"Kaliningrad","code":"RU","country":"Russia","title":"Kaliningrad - Russia"},{"tz":"Europe\/Kirov","location":"Kirov","code":"RU","country":"Russia","title":"Kirov - Russia"},{"tz":"Europe\/Kyiv","location":"Kyiv","code":"UA","country":"Ukraine","title":"Kyiv - Ukraine"},{"tz":"Europe\/Lisbon","location":"Lisbon","code":"PT","country":"Portugal","title":"Lisbon - Portugal"},{"tz":"Europe\/Ljubljana","location":"Ljubljana","code":"SI","country":"Slovenia","title":"Ljubljana - Slovenia"},{"tz":"Europe\/London","location":"London","code":"GB","country":"United Kingdom","title":"London - United Kingdom"},{"tz":"Europe\/Luxembourg","location":"Luxembourg","code":"LU","country":"Luxembourg","title":"Luxembourg"},{"tz":"Europe\/Madrid","location":"Madrid","code":"ES","country":"Spain","title":"Madrid - Spain"},{"tz":"Europe\/Malta","location":"Malta","code":"MT","country":"Malta","title":"Malta"},{"tz":"Europe\/Mariehamn","location":"Mariehamn","code":"AX","country":"Aland Islands","title":"Mariehamn - Aland Islands"},{"tz":"Europe\/Minsk","location":"Minsk","code":"BY","country":"Belarus","title":"Minsk - Belarus"},{"tz":"Europe\/Monaco","location":"Monaco","code":"MC","country":"Monaco","title":"Monaco"},{"tz":"Europe\/Moscow","location":"Moscow","code":"RU","country":"Russia","title":"Moscow - Russia"},{"tz":"Europe\/Oslo","location":"Oslo","code":"NO","country":"Norway","title":"Oslo - Norway"},{"tz":"Europe\/Paris","location":"Paris","code":"FR","country":"France","title":"Paris - France"},{"tz":"Europe\/Podgorica","location":"Podgorica","code":"ME","country":"Montenegro","title":"Podgorica - Montenegro"},{"tz":"Europe\/Prague","location":"Prague","code":"CZ","country":"Czech Republic","title":"Prague - Czech Republic"},{"tz":"Europe\/Riga","location":"Riga","code":"LV","country":"Latvia","title":"Riga - Latvia"},{"tz":"Europe\/Rome","location":"Rome","code":"IT","country":"Italy","title":"Rome - Italy"},{"tz":"Europe\/Samara","location":"Samara","code":"RU","country":"Russia","title":"Samara - russia"},{"tz":"Europe\/San_Marino","location":"SanMarino","code":"SM","country":"San Marino","title":"San Marino"},{"tz":"Europe\/Sarajevo","location":"Sarajevo","code":"BA","country":"Bosnia and Herzegovina","title":"Sarajevo - Bosnia and Herzergovina"},{"tz":"Europe\/Saratov","location":"Saratov","code":"RU","country":"Russia","title":"Saratov - Russia"},{"tz":"Europe\/Simferopol","location":"Simferopol","code":"UA","country":"Ukraine","title":"Simferopol - Ukraine"},{"tz":"Europe\/Skopje","location":"Skopje","code":"MK","country":"Macedonia","title":"Skopje - Macedonia"},{"tz":"Europe\/Sofia","location":"Sofia","code":"BG","country":"Bulgaria","title":"Sofia - Bulgaria"},{"tz":"Europe\/Stockholm","location":"Stockholm","code":"SE","country":"Sweden","title":"Stockholm - Sweden"},{"tz":"Europe\/Tallinn","location":"Tallinn","code":"EE","country":"Estonia","title":"Tallinn - Estonia"},{"tz":"Europe\/Tirane","location":"Tirane","code":"AL","country":"Albania","title":"Tirana - Albania"},{"tz":"Europe\/Ulyanovsk","location":"Ulyanovsk","code":"RU","country":"Russia","title":"Ulyanovsk - Russia"},{"tz":"Europe\/Vaduz","location":"Vaduz","code":"LI","country":"Liechtenstein","title":"Vaduz - Liechtenstein"},{"tz":"Europe\/Vatican","location":"Vatican","code":"VA","country":"Holy See (Vatican City State)","title":"Vatican City"},{"tz":"Europe\/Vienna","location":"Vienna","code":"AT","country":"Austria","title":"Vienna - Austria"},{"tz":"Europe\/Vilnius","location":"Vilnius","code":"LT","country":"Lithuania","title":"Vilnius - Lithuania"},{"tz":"Europe\/Volgograd","location":"Volgograd","code":"RU","country":"Russia","title":"Volgograd - Russia"},{"tz":"Europe\/Warsaw","location":"Warsaw","code":"PL","country":"Poland","title":"Warsaw - Poland"},{"tz":"Europe\/Zagreb","location":"Zagreb","code":"HR","country":"Croatia","title":"Zagreb - Croatia"},{"tz":"Europe\/Zurich","location":"Zurich","code":"CH","country":"Switzerland","title":"Zurich - Switzerland"},{"tz":"Indian\/Antananarivo","location":"Antananarivo","code":"MG","country":"Madagascar","title":"Antananarivo - Madagascar"},{"tz":"Indian\/Chagos","location":"Chagos","code":"IO","country":"British Indian Ocean Territory","title":"Chagos - British Indian Ocean Territory"},{"tz":"Indian\/Christmas","location":"Christmas","code":"CX","country":"Christmas Island","title":"Christmas Island"},{"tz":"Indian\/Cocos","location":"Cocos","code":"CC","country":"Cocos (Keeling) Islands","title":"Cocos (Keeling) Islands"},{"tz":"Indian\/Comoro","location":"Comoro","code":"KM","country":"Comoros","title":"Comoros"},{"tz":"Indian\/Kerguelen","location":"Kerguelen","code":"TF","country":"French Southern Territories","title":"Kerguelen - French Southern Territories"},{"tz":"Indian\/Mahe","location":"Mahe","code":"SC","country":"Seychelles","title":"Mahe - Seychelles"},{"tz":"Indian\/Maldives","location":"Maldives","code":"MV","country":"Maldives","title":"Maldives"},{"tz":"Indian\/Mauritius","location":"Mauritius","code":"MU","country":"Mauritius","title":"Mauritius"},{"tz":"Indian\/Mayotte","location":"Mayotte","code":"YT","country":"Mayotte","title":"Mayotte"},{"tz":"Indian\/Reunion","location":"Reunion","code":"RE","country":"Reunion","title":"Reunion"},{"tz":"Pacific\/Apia","location":"Apia","code":"WS","country":"Samoa","title":"Apia - Samoa"},{"tz":"Pacific\/Auckland","location":"Auckland","code":"NZ","country":"New Zealand","title":"Auckland - New Zealand"},{"tz":"Pacific\/Bougainville","location":"Bougainville","code":"PG","country":"Papua New Guinea","title":"Bougainville - Papua New Guinea"},{"tz":"Pacific\/Chatham","location":"Chatham","code":"NZ","country":"New Zealand","title":"Chatham Islands - New Zealand"},{"tz":"Pacific\/Chuuk","location":"Chuuk","code":"FM","country":"Micronesia","title":"Chuuk - Micronesia"},{"tz":"Pacific\/Easter","location":"Easter","code":"CL","country":"Chile","title":"Easter Island - Chile"},{"tz":"Pacific\/Efate","location":"Efate","code":"VU","country":"Vanuatu","title":"Efate - Vanuatu"},{"tz":"Pacific\/Fakaofo","location":"Fakaofo","code":"TK","country":"Tokelau","title":"Fakaofo - Tokelau"},{"tz":"Pacific\/Fiji","location":"Fiji","code":"FJ","country":"Fiji","title":"Fiji"},{"tz":"Pacific\/Funafuti","location":"Funafuti","code":"TV","country":"Tuvalu","title":"Funafuti - Tuvalu"},{"tz":"Pacific\/Galapagos","location":"Galapagos","code":"EC","country":"Ecuador","title":"Galapagos Islands - Ecuador"},{"tz":"Pacific\/Gambier","location":"Gambier","code":"PF","country":"French Polynesia","title":"Gambier - French Polynesia"},{"tz":"Pacific\/Guadalcanal","location":"Guadalcanal","code":"SB","country":"Solomon Islands","title":"Guadalcanal - Solomon Islands"},{"tz":"Pacific\/Guam","location":"Guam","code":"GU","country":"Guam","title":"Guam"},{"tz":"Pacific\/Honolulu","location":"Honolulu","code":"US","country":"United States of America","title":"Honolulu - Hawaii - United States of America"},{"tz":"Pacific\/Kanton","location":"Kanton","code":"KI","country":"Kiribati","title":"Kanton - Kiribati"},{"tz":"Pacific\/Kiritimati","location":"Kiritimati","code":"KI","country":"Kiribati","title":"Kiritimati - Kiribati"},{"tz":"Pacific\/Kosrae","location":"Kosrae","code":"FM","country":"Micronesia","title":"Kosrae - Micronesia"},{"tz":"Pacific\/Kwajalein","location":"Kwajalein","code":"MH","country":"Marshall Islands","title":"Kwajalein - Marshall Islands"},{"tz":"Pacific\/Majuro","location":"Majuro","code":"MH","country":"Marshall Islands","title":"Majuro - Marshall Islands"},{"tz":"Pacific\/Marquesas","location":"Marquesas","code":"PF","country":"French Polynesia","title":"Marquesas - French Polynesia"},{"tz":"Pacific\/Midway","location":"Midway","code":"UM","country":"US Minor Outlying Islands","title":"Midway - US Minor Outlying Islands"},{"tz":"Pacific\/Nauru","location":"Nauru","code":"NR","country":"Nauru","title":"Nauru"},{"tz":"Pacific\/Niue","location":"Niue","code":"NU","country":"Niue","title":"Niue"},{"tz":"Pacific\/Norfolk","location":"Norfolk","code":"NF","country":"Norfolk Island","title":"Norfolk Island"},{"tz":"Pacific\/Noumea","location":"Noumea","code":"NC","country":"New Caledonia","title":"Noumea - New Caledonia"},{"tz":"Pacific\/Pago_Pago","location":"PagoPago","code":"AS","country":"American Samoa","title":"Pago Pago - American Samoa"},{"tz":"Pacific\/Palau","location":"Palau","code":"PW","country":"Palau","title":"Palau"},{"tz":"Pacific\/Pitcairn","location":"Pitcairn","code":"PN","country":"Pitcairn","title":"Pitcairn"},{"tz":"Pacific\/Pohnpei","location":"Pohnpei","code":"FM","country":"Micronesia","title":"Pohnpei - Micronesia"},{"tz":"Pacific\/Port_Moresby","location":"PortMoresby","code":"PG","country":"Papua New Guinea","title":"Port Moresby - Papua New Guinea"},{"tz":"Pacific\/Rarotonga","location":"Rarotonga","code":"CK","country":"Cook Islands","title":"Rarotonga - Cook Islands"},{"tz":"Pacific\/Saipan","location":"Saipan","code":"MP","country":"Northern Mariana Islands","title":"Saipan - Northern Marinara Islands"},{"tz":"Pacific\/Tahiti","location":"Tahiti","code":"PF","country":"French Polynesia","title":"Tahiti - French Polynesia"},{"tz":"Pacific\/Tarawa","location":"Tarawa","code":"KI","country":"Kiribati","title":"Tarawa - Kiribati"},{"tz":"Pacific\/Tongatapu","location":"Tongatapu","code":"TO","country":"Tonga","title":"Tongatapu - Tonga"},{"tz":"Pacific\/Wake","location":"Wake","code":"UM","country":"US Minor Outlying Islands","title":"Wake - US Minor Outlying Islands"},{"tz":"Pacific\/Wallis","location":"Wallis","code":"WF","country":"Wallis and Futuna Islands","title":"Wallis and Futuna Islands"},{"tz":"UTC","location":"UTC","code":"UTC","country":"","title":"UTC\/GMT"}]
All the Rugby. All the News. All in One Place. Your Inbox.
Sign up now
RugbyPass Newsletter
Get the latest rugby news and analysis with the RugbyPass newsletter