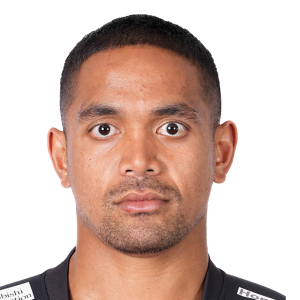
Tony Hunt News

International
Hunter Paisami learns fate after late yellow card against Springboks
Former England full-back Mike Brown headhunted for new coaching role

PREM Rugby
Interview
'Most of the time you are scared witless': Quins' Rob Hunter taken to the extreme
Hunter Paisami’s ‘better we are’ take on Wallabies midfield battle
Latest

Hilux NPC
Interview
'Rugby can be humbling': The rise of breakout Magpies star Hunter Morrison
Saracens alive in Gallagher PREM hunt after win over Harelquins
Callum Hunter-Hill: 'I know I haven't hit the heights I'm capable of yet'
Fissler Confidential: Sharks hunt Embrose Papier, Leinster face losing hooker
Toulouse hunt Bears to European extinction, Glasgow slaughter Bulls
Three conquerors of England missing as Italy hunt for historic win
[{"competition":{"rid":"1002","oid":"421","ovid":"2074","name":"Japan Rugby League One","logo":"https:\/\/eu-cdn.rugbypass.com\/images\/competitions\/logos\/png\/japan-rugby-league-one.png?v=1762927429","logoCircle":"https:\/\/eu-cdn.rugbypass.com\/images\/competitions\/logos\/circle\/japan-rugby-league-one.png?v=1762927428","season":{"season":202401,"years":{"2024":2024,"2025":2025},"label":"2024\/2025","completed":1,"standings":1,"started":1,"months":0,"games":114},"stats":{"success":1,"stats":{"teamId":6343,"penaltyConceded":6,"penaltyDefence":3,"penaltyOffence":3,"foulPlay":2,"offFeetAtRuck":1,"notReleasing":1,"offside":2,"carries":45,"metresMade":97,"passes":15,"offload":3,"defenderBeaten":2,"cleanBreak":1,"totalTurnovers":4,"crossedGainline":20,"failedGainline":22,"neutral":3,"lostBallForced":1,"droppedBallUnforced":2,"lostInRuckOrMaul":1,"handlingError":3,"dominantContact":7,"errors":4,"postContactMetres":43,"carryDistance":208,"metresInContact":43,"tackle":84,"missedTackle":14,"turnoverWon":6,"tackleTurnoverWon":3,"dominantTackleContact":3,"totalAttemptedTackles":110,"totalSuccessfulTackles":84,"totalUnsuccessfulTackles":26,"jackalTurnoverWon":2,"outOfGame":2,"backInGame":6,"percentTackleMade":76.36,"kicksInPlay":3,"territorial":1,"attackingKicks":2,"kickBounced":2,"kickMetres":119,"allKickMetres":119,"attackingCatch":1,"restartCatch":1,"aerialContest":1,"points":0,"appearances":13,"minutesPlayed":518,"minutesPlayedFirstHalf":240,"minutesPlayedSecondHalf":278},"topPlayerStats":{"carries":{"id":135261,"value":270},"metresMade":{"id":163435,"value":754},"passes":{"id":197868,"value":143},"offload":{"id":163435,"value":31},"tryAssist":{"id":213814,"value":8},"defenderBeaten":{"id":163435,"value":64},"cleanBreak":{"id":197868,"value":18},"crossedGainline":{"id":135261,"value":135},"neutral":{"id":120076,"value":72},"dominantContact":{"id":114429,"value":57},"postContactMetres":{"id":114429,"value":277},"carryDistance":{"id":197868,"value":1332},"metresInContact":{"id":114429,"value":277},"restartCatch":{"id":120076,"value":47},"restartCatchSuccess":{"id":120076,"value":42},"points":{"id":197868,"value":55},"appearances":{"id":125619,"value":20},"minutesPlayed":{"id":120076,"value":1545},"minutesPlayedSecondHalf":{"id":214107,"value":760},"tryScored":{"id":197868,"value":11},"minutesPlayedFirstHalf":{"id":125619,"value":800},"penaltyConceded":{"id":120076,"value":24},"penaltyDefence":{"id":120076,"value":15},"foulPlay":{"id":114429,"value":5},"offside":{"id":163435,"value":6},"totalTurnovers":{"id":214107,"value":22},"failedGainline":{"id":135261,"value":133},"lostBallForced":{"id":163435,"value":6},"droppedBallUnforced":{"id":214107,"value":11},"accidentalKnockOn":{"id":197868,"value":2},"handlingError":{"id":214107,"value":18},"errors":{"id":214107,"value":22},"breakAssist":{"id":197868,"value":13},"tackle":{"id":120076,"value":307},"missedTackle":{"id":197868,"value":37},"turnoverWon":{"id":118827,"value":27},"dominantTackleContact":{"id":245177,"value":18},"totalAttemptedTackles":{"id":120076,"value":350},"totalSuccessfulTackles":{"id":120076,"value":307},"totalUnsuccessfulTackles":{"id":226235,"value":60},"jackalPenaltyWon":{"id":173835,"value":13},"jackalTurnoverWon":{"id":118827,"value":11},"outOfGame":{"id":135261,"value":94},"backInGame":{"id":239901,"value":46},"trapped":{"id":135261,"value":38},"percentTackleMade":{"id":226239,"value":100},"lineoutsWonOwnThrow":{"id":154414,"value":61},"lineoutSteals":{"id":197868,"value":5},"penaltyOffence":{"id":120076,"value":9},"offFeetAtRuck":{"id":174775,"value":3},"notReleasing":{"id":120076,"value":5},"counterRuck":{"id":142873,"value":4},"contestedBreakdown":{"id":135261,"value":19},"kicksInPlay":{"id":213814,"value":12},"territorial":{"id":213814,"value":9},"kickBounced":{"id":200003,"value":9},"kickMetres":{"id":213814,"value":419},"allKickMetres":{"id":213814,"value":419},"attackingCatch":{"id":114429,"value":4},"attackingCatchSuccess":{"id":209502,"value":3},"tapBack":{"id":163435,"value":4},"aerialContest":{"id":114429,"value":7},"aerialContestWon":{"id":209502,"value":3},"percentAerialContestWon":{"id":118508,"value":100},"yellowCard":{"id":197868,"value":5},"dissent":{"id":213814,"value":1},"notRollingAway":{"id":245177,"value":4},"obstruction":{"id":213814,"value":1},"wrongSideAtRuck":{"id":255692,"value":2},"sinBinEnd":{"id":197868,"value":5},"forwardPass":{"id":163435,"value":2},"lostInRuckOrMaul":{"id":120076,"value":6},"kickError":{"id":213814,"value":1},"retainedKick":{"id":163435,"value":3},"contestable":{"id":163435,"value":3},"attackingKicks":{"id":200003,"value":8},"interception":{"id":139970,"value":2},"tackleTurnoverWon":{"id":163435,"value":7},"defensiveCatch":{"id":120076,"value":14},"defensiveCatchSuccess":{"id":120076,"value":9},"scrumOffence":{"id":163435,"value":2},"lineoutOffence":{"id":214107,"value":3},"carriedInTouch":{"id":245177,"value":2},"upperBodyTackles":{"id":245177,"value":19},"lowerBodyTackles":{"id":188855,"value":13},"percentLowerBodyTackles":{"id":188855,"value":72.22},"percentUpperBodyTackles":{"id":241002,"value":100},"handsInRuck":{"id":135261,"value":2},"otherOffence":{"id":241618,"value":1},"freeKick":{"id":241618,"value":1},"dissentAdvance":{"id":245177,"value":1},"maulObstruction":{"id":245177,"value":1},"carriedOver":{"id":245177,"value":1},"attemptedInterception":{"id":245177,"value":1},"collapsingMaul":{"id":214107,"value":2},"offsideAtKick":{"id":163435,"value":2},"accidentalOffside":{"id":199566,"value":1},"wrongSideAtMaul":{"id":214107,"value":2},"badPass":{"id":197868,"value":2},"kickChargedDown":{"id":200003,"value":2},"redCard":{"id":254804,"value":1},"deliberateKnockOn":{"id":163435,"value":1},"offsideAtRestart":{"id":163435,"value":1},"otherError":{"id":120076,"value":1},"missedDropGoal":{"id":173835,"value":1},"wonClean":{"id":173835,"value":1},"lineoutThrowsWon":{"id":173835,"value":1},"throwFront":{"id":173835,"value":1},"restartOppCollection":{"id":240625,"value":1},"totalRestarts":{"id":240625,"value":1},"restart22m":{"id":240625,"value":1},"throw15+":{"id":118827,"value":1},"5SecondRule":{"id":200003,"value":1},"lostHandlingError":{"id":219674,"value":1},"lineoutThrowsLost":{"id":219674,"value":1}}},"epoch":1748757900},"main":{"totalMinsPlayed":518,"main":[{"value":0,"title":"Lineout Takes"},{"value":45,"title":"Carries"},{"value":0,"title":"Tries"},{"value":6,"title":"Turnovers Won"},{"value":84,"title":"Tackles Completed"},{"value":3,"title":"Dominant Tackles"},{"value":0,"title":"Try Assists"}],"profile":[{"value":"2%","title":"Lineout Takes","type":1,"key":"lineoutsWonOwnThrow","raw":0,"top":61,"color":"#cf403a"},{"value":"17%","title":"Carries","type":1,"key":"carries","raw":45,"top":270,"color":"#d96636"},{"value":"2%","title":"Tries","type":1,"key":"tryScored","raw":0,"top":11,"color":"#cf403a"},{"value":"22%","title":"Turnovers Won","type":1,"key":"turnoverWon","raw":6,"top":27,"color":"#dd7437"},{"value":"27%","title":"Tackles Completed","type":1,"key":"totalSuccessfulTackles","raw":84,"top":307,"color":"#e18238"},{"value":"17%","title":"Dominant Tackles","type":1,"key":"dominantTackleContact","raw":3,"top":18,"color":"#d96636"},{"value":"2%","title":"Try Assists","type":1,"key":"tryAssist","raw":0,"top":8,"color":"#cf403a"}]},"group":{"groups":[{"title":"Attack","stats":[{"title":"Points","value":{"value":0,"title":"Points"},"overall":{"value":"2%","title":"Points","type":1,"key":"points","raw":0,"top":55,"color":"#cf403a"}},{"title":"Tries","value":{"value":0,"title":"Tries"},"overall":{"value":"2%","title":"Tries","type":1,"key":"tryScored","raw":0,"top":11,"color":"#cf403a"}},{"title":"Line Breaks","value":{"value":1,"title":"Line Breaks"},"overall":{"value":"6%","title":"Line Breaks","type":1,"key":"cleanBreak","raw":1,"top":18,"color":"#d14939"}},{"title":"Carries","value":{"value":45,"title":"Carries"},"overall":{"value":"17%","title":"Carries","type":1,"key":"carries","raw":45,"top":270,"color":"#d96636"}},{"title":"Carries Per Minute","value":{"value":0.09,"title":"Carries Per Minute"},"overall":{"value":"2%","title":"Carries Per Minute","type":1,"key":"carries","raw":0,"top":270,"color":"#cf403a"}},{"title":"Metres Carried","value":{"value":97,"title":"Metres Carried"},"overall":{"value":"13%","title":"Metres Carried","type":1,"key":"metresMade","raw":97,"top":754,"color":"#d75c37"}},{"title":"Turnovers Won","value":{"value":6,"title":"Turnovers Won"},"overall":{"value":"22%","title":"Turnovers Won","type":1,"key":"turnoverWon","raw":6,"top":27,"color":"#dd7437"}},{"title":"Defenders Beaten","value":{"value":2,"title":"Defenders Beaten"},"overall":{"value":"3%","title":"Defenders Beaten","type":1,"key":"defenderBeaten","raw":2,"top":64,"color":"#d0433a"}},{"title":"Post Contact Metres","value":{"value":43,"title":"Post Contact Metres"},"overall":{"value":"16%","title":"Post Contact Metres","type":1,"key":"postContactMetres","raw":43,"top":277,"color":"#d96437"}}]},{"title":"Defence","stats":[{"title":"Tackles Made","value":{"value":110,"title":"Tackles Made"},"overall":{"value":"31%","title":"Tackles Made","type":1,"key":"totalAttemptedTackles","raw":110,"top":350,"color":"#e58e39"}},{"title":"Tackles Completed","value":{"value":84,"title":"Tackles Completed"},"overall":{"value":"27%","title":"Tackles Completed","type":1,"key":"totalSuccessfulTackles","raw":84,"top":307,"color":"#e18238"}},{"title":"Dominant Tackles","value":{"value":3,"title":"Dominant Tackles"},"overall":{"value":"17%","title":"Dominant Tackles","type":1,"key":"dominantTackleContact","raw":3,"top":18,"color":"#d96636"}},{"title":"Tackles Per Minute","value":{"value":0.16,"title":"Tackles Per Minute"},"overall":{"value":"2%","title":"Tackles Per Minute","type":1,"key":"tackle","raw":0,"top":307,"color":"#cf403a"}},{"title":"Turnovers Won","value":{"value":6,"title":"Turnovers Won"},"overall":{"value":"22%","title":"Turnovers Won","type":1,"key":"turnoverWon","raw":6,"top":27,"color":"#dd7437"}}]},{"title":"Passing","stats":[{"title":"Try Assists","value":{"value":0,"title":"Try Assists"},"overall":{"value":"2%","title":"Try Assists","type":1,"key":"tryAssist","raw":0,"top":8,"color":"#cf403a"}},{"title":"Successful Passes","value":{"value":15,"title":"Successful Passes"},"overall":{"value":"10%","title":"Successful Passes","type":1,"key":"passes","raw":15,"top":143,"color":"#d55438"}},{"title":"Bad Passes","value":{"value":0,"title":"Bad Passes"},"overall":{"value":"2%","title":"Bad Passes","type":1,"key":"badPass","raw":0,"top":2,"color":"#cf403a"}},{"title":"Pass Accuracy","value":{"value":"100%","title":"Pass Accuracy"},"overall":{"value":"100%","title":"Pass Accuracy","type":1,"key":"pass_accuracy","raw":"100%","top":0,"color":"#479d6c"}}]},{"title":"Discipline","stats":[{"title":"Penalties Conceded","value":{"value":6,"title":"Penalties Conceded"},"overall":{"value":"25%","title":"Penalties Conceded","type":1,"key":"penaltyConceded","raw":6,"top":24,"color":"#e07d37"}},{"title":"Yellow Cards","value":{"value":0,"title":"Yellow Cards"},"overall":{"value":"2%","title":"Yellow Cards","type":1,"key":"yellowCard","raw":0,"top":5,"color":"#cf403a"}},{"title":"Red Cards","value":{"value":0,"title":"Red Cards"},"overall":{"value":"2%","title":"Red Cards","type":1,"key":"redCard","raw":0,"top":1,"color":"#cf403a"}}]},{"title":"Lineouts","stats":[{"title":"Lineout Takes","value":{"value":0,"title":"Lineout Takes"},"overall":{"value":"2%","title":"Lineout Takes","type":1,"key":"lineout_takes","raw":0,"top":0,"color":"#ce3d3b"}},{"title":"Lineouts Won","value":{"value":0,"title":"Lineouts Won"},"overall":{"value":"2%","title":"Lineouts Won","type":1,"key":"lineoutsWonOwnThrow","raw":0,"top":61,"color":"#cf403a"}},{"title":"Lineouts Stolen","value":{"value":0,"title":"Lineouts Stolen"},"overall":{"value":"2%","title":"Lineouts Stolen","type":1,"key":"lineoutSteals","raw":0,"top":5,"color":"#cf403a"}}]}]}}]
[{"title":"Japan Rugby League One","logo":"Japan Rugby League One","id":"2074","games":[{"title":"Black Rams Tokyo vs Honda Heat","date":"10 May 2025","dateSmall":"10 May","time":1746941400,"compLogo":"https:\/\/eu-cdn.rugbypass.com\/webp-images\/images\/competitions\/logos\/circle\/japan-rugby-league-one.png.webp?maxw=72&v=1762927428","compTitle":"Japan Rugby League One","draw":false,"win":false,"opposition":{"name":"BlackRams Tokyo","id":"1154","logo":"https:\/\/eu-cdn.rugbypass.com\/webp-images\/images\/team-images\/logos\/png\/5208.png.webp?maxw=72&v=1762927735"},"stats":{"mins":66,"tries":0,"yellow_cards":0,"red_cards":0,"conversions":0}},{"title":"Honda Heat vs Toyota Verblitz","date":"3 May 2025","dateSmall":"3 May","time":1746328200,"compLogo":"https:\/\/eu-cdn.rugbypass.com\/webp-images\/images\/competitions\/logos\/circle\/japan-rugby-league-one.png.webp?maxw=72&v=1762927428","compTitle":"Japan Rugby League One","draw":false,"win":false,"opposition":{"name":"Toyota Verblitz","id":"1886","logo":"https:\/\/eu-cdn.rugbypass.com\/webp-images\/images\/team-images\/logos\/png\/5211.png.webp?maxw=72&v=1762927735"},"stats":{"mins":65,"tries":0,"yellow_cards":0,"red_cards":0,"conversions":0}},{"title":"Honda Heat vs Saitama Wild Knights","date":"11 Apr 2025","dateSmall":"11 Apr","time":1744365600,"compLogo":"https:\/\/eu-cdn.rugbypass.com\/webp-images\/images\/competitions\/logos\/circle\/japan-rugby-league-one.png.webp?maxw=72&v=1762927428","compTitle":"Japan Rugby League One","draw":false,"win":false,"opposition":{"name":"Saitama Wild Knights","id":"3459","logo":"https:\/\/eu-cdn.rugbypass.com\/webp-images\/images\/team-images\/logos\/png\/19567.png.webp?maxw=72&v=1762927734"},"stats":{"mins":12,"tries":0,"yellow_cards":0,"red_cards":0,"conversions":0}},{"title":"Toshiba Brave Lupus vs Honda Heat","date":"29 Mar 2025","dateSmall":"29 Mar","time":1743307200,"compLogo":"https:\/\/eu-cdn.rugbypass.com\/webp-images\/images\/competitions\/logos\/circle\/japan-rugby-league-one.png.webp?maxw=72&v=1762927428","compTitle":"Japan Rugby League One","draw":false,"win":false,"opposition":{"name":"Toshiba Brave Lupus Tokyo","id":"3342","logo":"https:\/\/eu-cdn.rugbypass.com\/webp-images\/images\/team-images\/logos\/png\/19702.png.webp?maxw=72&v=1762927734"},"stats":{"mins":14,"tries":0,"yellow_cards":0,"red_cards":0,"conversions":0}},{"title":"Honda Heat vs Urayasu D-Rocks","date":"21 Mar 2025","dateSmall":"21 Mar","time":1742612400,"compLogo":"https:\/\/eu-cdn.rugbypass.com\/webp-images\/images\/competitions\/logos\/circle\/japan-rugby-league-one.png.webp?maxw=72&v=1762927428","compTitle":"Japan Rugby League One","draw":false,"win":false,"opposition":{"name":"Urayasu D-Rocks","id":"4788","logo":"https:\/\/eu-cdn.rugbypass.com\/webp-images\/images\/team-images\/logos\/png\/10005207.png.webp?maxw=72&v=1762927733"},"stats":{"mins":9,"tries":0,"yellow_cards":0,"red_cards":0,"conversions":0}},{"title":"Kobe Kobelco Steelers vs Honda Heat","date":"14 Mar 2025","dateSmall":"14 Mar","time":1742016600,"compLogo":"https:\/\/eu-cdn.rugbypass.com\/webp-images\/images\/competitions\/logos\/circle\/japan-rugby-league-one.png.webp?maxw=72&v=1762927428","compTitle":"Japan Rugby League One","draw":false,"win":false,"opposition":{"name":"Kobelco Kobe Steelers","id":"1314","logo":"https:\/\/eu-cdn.rugbypass.com\/webp-images\/images\/team-images\/logos\/png\/5203.png.webp?maxw=72&v=1762927735"},"stats":{"mins":80,"tries":0,"yellow_cards":0,"red_cards":0,"conversions":0}},{"title":"Shizuoka Blue Revs vs Honda Heat","date":"1 Mar 2025","dateSmall":"1 Mar","time":1740888300,"compLogo":"https:\/\/eu-cdn.rugbypass.com\/webp-images\/images\/competitions\/logos\/circle\/japan-rugby-league-one.png.webp?maxw=72&v=1762927428","compTitle":"Japan Rugby League One","draw":false,"win":false,"opposition":{"name":"Shizuoka BlueRevs","id":"4749","logo":"https:\/\/eu-cdn.rugbypass.com\/webp-images\/images\/team-images\/logos\/png\/5212.png.webp?maxw=72&v=1762927735"},"stats":{"mins":29,"tries":0,"yellow_cards":0,"red_cards":0,"conversions":0}},{"title":"Honda Heat vs Mitsubishi DynaBoars","date":"15 Feb 2025","dateSmall":"15 Feb","time":1739674800,"compLogo":"https:\/\/eu-cdn.rugbypass.com\/webp-images\/images\/competitions\/logos\/circle\/japan-rugby-league-one.png.webp?maxw=72&v=1762927428","compTitle":"Japan Rugby League One","draw":false,"win":true,"opposition":{"name":"Mitsubishi Sagamihara Dynaboars","id":"1652","logo":"https:\/\/eu-cdn.rugbypass.com\/webp-images\/images\/team-images\/logos\/png\/594.png.webp?maxw=72&v=1762927735"},"stats":{"mins":3,"tries":0,"yellow_cards":0,"red_cards":0,"conversions":0}},{"title":"Urayasu D-Rocks vs Honda Heat","date":"7 Feb 2025","dateSmall":"7 Feb","time":1738983900,"compLogo":"https:\/\/eu-cdn.rugbypass.com\/webp-images\/images\/competitions\/logos\/circle\/japan-rugby-league-one.png.webp?maxw=72&v=1762927428","compTitle":"Japan Rugby League One","draw":false,"win":false,"opposition":{"name":"Urayasu D-Rocks","id":"4788","logo":"https:\/\/eu-cdn.rugbypass.com\/webp-images\/images\/team-images\/logos\/png\/10005207.png.webp?maxw=72&v=1762927733"},"stats":{"mins":58,"tries":0,"yellow_cards":0,"red_cards":0,"conversions":0}},{"title":"Honda Heat vs Toshiba Brave Lupus","date":"1 Feb 2025","dateSmall":"1 Feb","time":1738465800,"compLogo":"https:\/\/eu-cdn.rugbypass.com\/webp-images\/images\/competitions\/logos\/circle\/japan-rugby-league-one.png.webp?maxw=72&v=1762927428","compTitle":"Japan Rugby League One","draw":false,"win":false,"opposition":{"name":"Toshiba Brave Lupus Tokyo","id":"3342","logo":"https:\/\/eu-cdn.rugbypass.com\/webp-images\/images\/team-images\/logos\/png\/19702.png.webp?maxw=72&v=1762927734"},"stats":{"mins":80,"tries":0,"yellow_cards":0,"red_cards":0,"conversions":0}},{"title":"Honda Heat vs Tokyo Sungoliath","date":"18 Jan 2025","dateSmall":"18 Jan","time":1737256200,"compLogo":"https:\/\/eu-cdn.rugbypass.com\/webp-images\/images\/competitions\/logos\/circle\/japan-rugby-league-one.png.webp?maxw=72&v=1762927428","compTitle":"Japan Rugby League One","draw":false,"win":false,"opposition":{"name":"Tokyo Sungoliath","id":"3908","logo":"https:\/\/eu-cdn.rugbypass.com\/webp-images\/images\/team-images\/logos\/png\/5209.png.webp?maxw=72&v=1762927735"},"stats":{"mins":67,"tries":0,"yellow_cards":0,"red_cards":0,"conversions":0}},{"title":"Honda Heat vs Kubota Spears","date":"4 Jan 2025","dateSmall":"4 Jan","time":1736046000,"compLogo":"https:\/\/eu-cdn.rugbypass.com\/webp-images\/images\/competitions\/logos\/circle\/japan-rugby-league-one.png.webp?maxw=72&v=1762927428","compTitle":"Japan Rugby League One","draw":false,"win":false,"opposition":{"name":"Kubota Spears","id":"1525","logo":"https:\/\/eu-cdn.rugbypass.com\/webp-images\/images\/team-images\/logos\/png\/5204.png.webp?maxw=72&v=1762927735"},"stats":{"mins":15,"tries":0,"yellow_cards":0,"red_cards":0,"conversions":0}},{"title":"Honda Heat vs Black Rams Tokyo","date":"20 Dec 2024","dateSmall":"20 Dec","time":1734750600,"compLogo":"https:\/\/eu-cdn.rugbypass.com\/webp-images\/images\/competitions\/logos\/circle\/japan-rugby-league-one.png.webp?maxw=72&v=1762927428","compTitle":"Japan Rugby League One","draw":false,"win":true,"opposition":{"name":"BlackRams Tokyo","id":"1154","logo":"https:\/\/eu-cdn.rugbypass.com\/webp-images\/images\/team-images\/logos\/png\/5208.png.webp?maxw=72&v=1762927735"},"stats":{"mins":20,"tries":0,"yellow_cards":0,"red_cards":0,"conversions":0}}]}]
Tony Hunt Stats
Stats compared to other Flankers
![]() {{selectedCompetition.competition.name}} {{selectedCompetition.competition.season.label}}
-
![]() {{item.competition.name}} {{item.competition.season.label}}
{{graphStats[0].value}}
{{graphStats[0].title}}
{{graphStats[1].value}}
{{graphStats[1].title}}
{{graphStats[2].title}}
{{graphStats[2].value}}
{{graphStats[3].title}}
{{graphStats[3].value}}
{{graphStats[4].title}}
{{graphStats[4].value}}
{{graphStats[5].value}}
{{graphStats[5].title}}
Tony Hunt Stats
Stats compared to other Flankers
{{item.title}}
{{item.value}}
Match Stats
![]() {{selectedMatchesComp}}
- All
-
![]() {{item.title}}
10 May 2025
10 May
L
v

BlackRams Tokyo
3 May 2025
3 May
L
v

Toyota Verblitz
11 Apr 2025
11 Apr
L
v

Saitama Wild Knights
29 Mar 2025
29 Mar
L
v

Toshiba Brave Lupus Tokyo
21 Mar 2025
21 Mar
L
v

Urayasu D-Rocks
14 Mar 2025
14 Mar
L
v

Kobelco Kobe Steelers
1 Mar 2025
1 Mar
L
v

Shizuoka BlueRevs
15 Feb 2025
15 Feb
W
v

Mitsubishi Sagamihara Dynaboars
7 Feb 2025
7 Feb
L
v
Urayasu D-Rocks
1 Feb 2025
1 Feb
L
v
Toshiba Brave Lupus Tokyo
{{game.date}}
{{game.dateSmall}}
W L
v
![]()
{{game.stats.mins}}
{{game.stats.tries}}
{{game.stats.conversions}}
{{game.stats.yellow_cards}}
{{game.stats.red_cards}}
Tony Hunt Performance Analysis