Why Scotland's defensive system made Huw Jones look worse than he actually is. (Photos/Gettys Images)
Copied to clipboard
0
0
Two big missed tackles by Scotland’s centre Huw Jones lead to two big tries and a total of 12 points for Wales. With a final scoreline of 21-10, these misses proved pivotal in the end.
ADVERTISEMENT
Scotland’s star midfielder has come under the spotlight following the performance, with question marks surrounding his defensive fortitude. The two slip-ups were costly misses that no doubt Jones himself would like to have back again.
However, structural problems in Scotland’s defensive system made Jones look worse than he actually is, with no fail-safe second-line built in. Any Scottish defender that misses a one-on-one assignment is going to end up looking very ordinary.
Huw Jones’ tackle success rate of 85% for Scotland in 2018 is the best of any international outside centre this year, ahead of Mathieu Bastareud (83%), Anton Lienert Brown (83%), Ryan Crotty (83%), Gary Ringrose (83%), Jack Goodhue (78%), Jesse Kriel (73%), Samu Kerevi (68%) and Henry Slade (57%).
He is in the upper echelon of all midfield defenders but his performance against Wales was a dip below his usual high standards. Even so, two missed tackles doesn’t usually equal 12 points. It is not every day that a player’s only two missed tackles of the match leads directly to two tries.
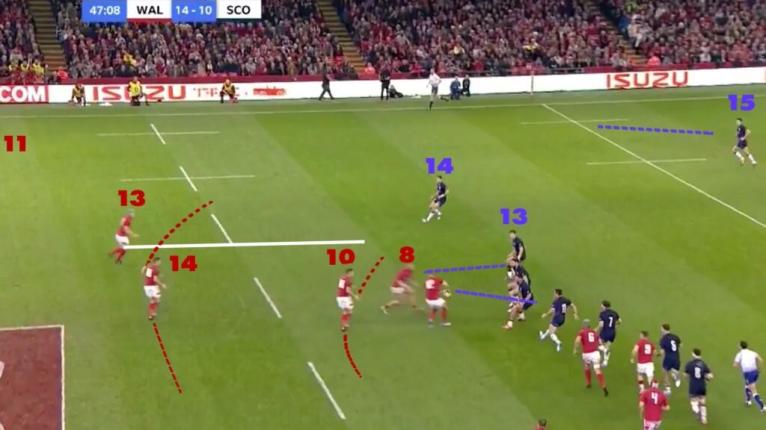
Wales looked to use power winger George North frequently out towards the left-hand side, using set-piece to work that way before working in a play around North on the third or fourth phase.
ADVERTISEMENT
Wales run a screen pass on the left edge with Davies (13) running short and North (14) out the back.
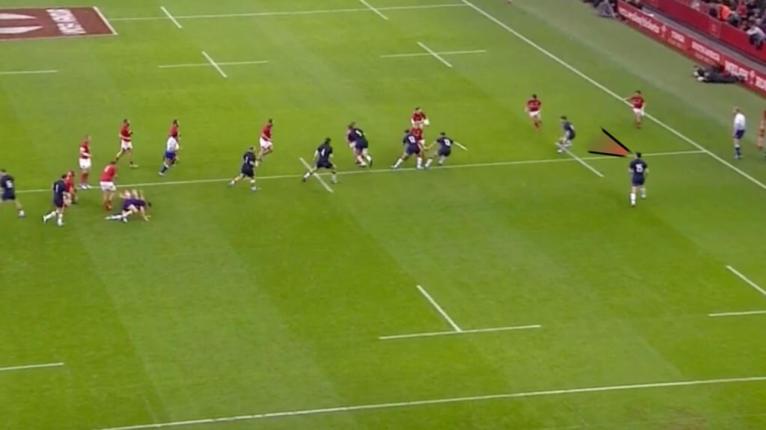
From the high angle camera shot, we see Scotland’s full defensive line. Both wingers are up in the line on the edges, and the halfback is also in the line to the far right.
Scotland plays with just one man in the backfield, the fullback, expecting him to cover the vast space in behind and the last man on both edges. There is no rolling coverage where the opposite wing (11) drops back and across to help, and the halfback doesn’t track the ball in behind the ruck as a sweeper.
The absence of this second-line makes Scotland vulnerable to conceding tries on every line break and also to big plays from a short attacking kicking game, which Wales also tried early on.
ADVERTISEMENT
Anscombe’s decision and timing on the pass is perfect, playing late and picking North out the back after Jones bites in on Davies’ short line.
Jones is still able to recover and attempt a tackle though, but the play has put North on his outside, forcing him to make a side-on tackle rather than front-on.
With North’s power running game, this is all Wales need to achieve to be in with a chance.
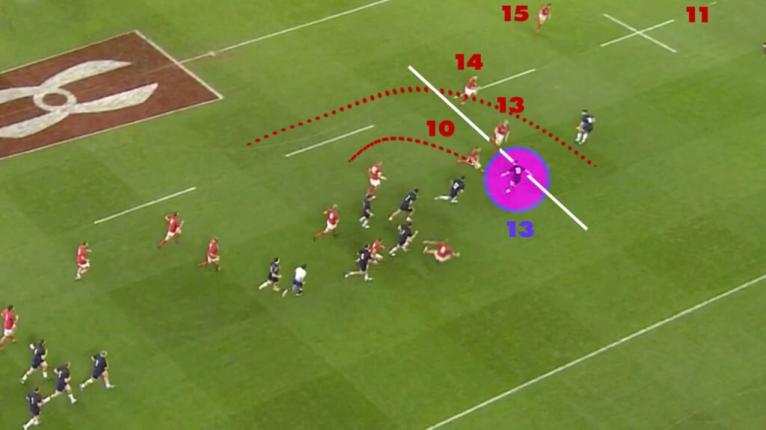
Jones has a high lunging attempt on North, slides off the tackle and North skips through a few dive tackles from Scotland’s trailing defence to score.
Jones’ attempt to hit North with a high point of contact, in an upright position from the side with no base stability makes it easier for North to win the initial collision and continue on.
Jones is aerial at the point of contact and has deleveraged all of his power by leaving his feet early.
He is too vertical to be effective from the side and swings around North’s body, brushed away by North extending out his right arm and breaking the wrap.
But why was it so easy for North to score?
Scotland’s fullback Blair Kinghorn (15) also contributes to this, caught a little bit in no man’s land, neither completely up in the line shutting the last man or hanging back inside to cover a possible break.
In all the stills, he is watching the play unfold but doesn’t anticipate a possible breach. It is a harsh assessment but great defensive fullbacks have this instinct and are able to cover for multiple possible scenarios.
Kinghorn seems to have all his eggs in one basket with Wales wing Luke Morgan. The ‘give’ from North is the tuck of the ball – he is only going to run fromt that point on. As North makes contact with Jones, Kinghorn continues to push down into line and out towards the wing.
As there is no sweeper support from the halfback or opposite wing, North has an open passage to the line, which he takes full advantage of.
What is promising about Huw Jones is he doesn’t make the same mistake again. Wales try to run the same play on the stroke of halftime in the exact same position but he doesn’t bite on Davies.
Jones stays put and reads North out the back, leaving Davies for his inside defence.
Anscombe plays short this time and Scotland defends the play, while Jones has North covered this time.
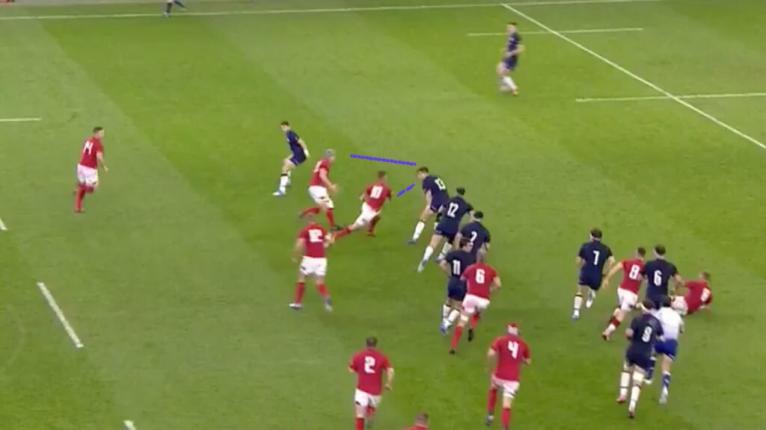
On this set-piece play, Wales do a great job of creating a numbers advantage. A long pass by halfback Gareth Davies puts the wheels in motion to run this overload sweep play.
Anscombe (10) and North (14) run sweep lines in an attempt to overload Scotland’s edge defence. They succeed in getting ball to Anscombe on the outside of Scotland’s inside centre Alex Dunbar.
Huw Jones immediately recognizes he is at a disadvantage and begins to back off, tracking back to buy time for inside support to recover and stay alive as long as possible.
He does a great job of playing off the runners, shadowing both Anscombe and Davies to cover both bases. He gets Anscombe to pass before committing him, giving himself the chance to shut down the play.
But again the same tackle technique fails, getting a well-timed fend from Jonathan Davies and slipping off the runner.
Scotland has no sweep coverage from the blind winger and Davies goes unobstructed 35-metres to score.
A second look at the play reveals that Scotland switches flyhalf Adam Hastings (10) with left-wing Lee Jones (11) in the front line before the play.
Hastings is so far deep and doesn’t react to the sweep line of George North (14), failing to anticipate the need to be on the other side of the field. Again, Ali Price (9) is not performing in any type of sweeper role. Hastings tries to make it across but is not able to lay a finger on Davies.
Huw Jones isn’t solely to blame
Scotland needs to re-think how the back three operate in tandem and the role of the halfback to provide a second-line in defence.
There is more work that those players can do off the ball to strengthen Scotland’s system. It will require them to cover more ground and possess greater anticipatory skills.
As it is, they have limited means to stop any line breaks from becoming five points, as proven from the above examples. They are also at risk of getting opened up by an attacking kicking game, which nearly happened early when Anscombe’s chip bounced into the lap of George North, only a foot into touch in the process of scoring denying them.
After the first miss on George North, Jones showed his ability to adjust during the game and correct his mistakes. When faced with the exact same scenario again he reacted differently, making the correct read a second time around.
On the Davies miss, Jones played the coverage very well and only a lack of execution on the tackle let him down. Jones might look to adjust his approach when faced with a side-on tackle, which was the case in both instances.
Jones defensive game as a whole is one of the best in the world, with the centre able to expertly cover overlaps with a jockey technique, shadow two players at once when necessary, show good patience when required and physicality in front-on tackles.
The two missed tackles are technical misjudgments, where a low, chop tackle around the legs may have served him better. The two players that beat him aren’t too bad either, many others have fallen victim to North and Davies.
If anything, the Wales game showed that there are always improvements to be made, even by the very best, with how he approaches a side-on tackle one of the lessons to take away.
In other news:
ADVERTISEMENT
LIVE
{{item.title}}
Trending on RugbyPass
1
Fissler Confidential: Henry Pollock's big step, Bulls chase lost Bok star
3
2
Leinster rocked as Springbok RG Snyman suffers season-ending injury
6
3
New England Rugby venue in running to host Prem Rugby play-offs
4
Lion to make first Leinster start since October as Cullen swings axe
5
Exeter lose Test stars as Newcastle are boosted by two of their own
2
6
Question mark hangs over Springboks captain Siya Kolisi
34
7
Alex Nankivell: 'Playing for Ireland wasn't my goal - it definitely is now'
9
8
The form All Blacks backline after six rounds of Super Rugby Pacific
No {{resultsType == 0 ? "fixtures" : "results"}} for {{resultName()}}.
{{article.cp.n}}
{{article.t}}
{{article.e.name}}
{{article.c}}
{{article.d}}
No news results for {{resultName()}}.
{{item.n}}
No RPTV results for {{resultName()}}.
Popular
{{comp.n}}
Tournament
{{team.n}}
Team
{{player.n}}
{{player.t}}
Edition & Time Zone
{{current.name}}
Set time zone automatically
{{selectedTimezoneTitle}} (auto)
Choose a different time zone
Editions
{{item.title}}
Change Time Zone
{{item.title}}
[{"tz":"Africa\/Abidjan","location":"Abidjan","code":"CI","country":"Cate d'Ivoire","title":"Abidjan - Cote d'Ivoire"},{"tz":"Africa\/Accra","location":"Accra","code":"GH","country":"Ghana","title":"Accra - Ghana"},{"tz":"Africa\/Addis_Ababa","location":"AddisAbaba","code":"ET","country":"Ethiopia","title":"Addis Ababa - Ethiopia"},{"tz":"Africa\/Algiers","location":"Algiers","code":"DZ","country":"Algeria","title":"Algiers - Algeria"},{"tz":"Africa\/Asmara","location":"Asmara","code":"ER","country":"Eritrea","title":"Asmara - Eritrea"},{"tz":"Africa\/Bamako","location":"Bamako","code":"ML","country":"Mali","title":"Bamako - Mali"},{"tz":"Africa\/Bangui","location":"Bangui","code":"CF","country":"Central African Republic","title":"Bangui - Central African Republic"},{"tz":"Africa\/Banjul","location":"Banjul","code":"GM","country":"Gambia","title":"Banjul - Gambia"},{"tz":"Africa\/Bissau","location":"Bissau","code":"GW","country":"Guinea-Bissau","title":"Bissau - Guinea-Bissau"},{"tz":"Africa\/Blantyre","location":"Blantyre","code":"MW","country":"Malawi","title":"Blantyre - Malawi"},{"tz":"Africa\/Brazzaville","location":"Brazzaville","code":"CG","country":"Congo (Brazzaville)","title":"Brazzaville - The Republic of the Congo"},{"tz":"Africa\/Bujumbura","location":"Bujumbura","code":"BI","country":"Burundi","title":"Bujumbura - Burundi"},{"tz":"Africa\/Cairo","location":"Cairo","code":"EG","country":"Egypt","title":"Cairo - Egypt"},{"tz":"Africa\/Casablanca","location":"Casablanca","code":"MA","country":"Morocco","title":"Casablanca - Morocco"},{"tz":"Africa\/Ceuta","location":"Ceuta","code":"ES","country":"Spain","title":"Ceuta - Spain"},{"tz":"Africa\/Conakry","location":"Conakry","code":"GN","country":"Guinea","title":"Conakry - Guinea"},{"tz":"Africa\/Dakar","location":"Dakar","code":"SN","country":"Senegal","title":"Dakar - Senegal"},{"tz":"Africa\/Dar_es_Salaam","location":"DaresSalaam","code":"TZ","country":"Tanzania","title":"Dar es Salaam - Tanzania"},{"tz":"Africa\/Djibouti","location":"Djibouti","code":"DJ","country":"Djibouti","title":"Djibouti"},{"tz":"Africa\/Douala","location":"Douala","code":"CM","country":"Cameroon","title":"Douala - Cameroon"},{"tz":"Africa\/El_Aaiun","location":"ElAaiun","code":"EH","country":"Western Sahara","title":"El Aaiun - Western Sahara"},{"tz":"Africa\/Freetown","location":"Freetown","code":"SL","country":"Sierra Leone","title":"Freetown - Sierra Leone"},{"tz":"Africa\/Gaborone","location":"Gaborone","code":"BW","country":"Botswana","title":"Gaborone - Botswana"},{"tz":"Africa\/Harare","location":"Harare","code":"ZW","country":"Zimbabwe","title":"Harare - Zimbabwe"},{"tz":"Africa\/Johannesburg","location":"Johannesburg","code":"ZA","country":"South Africa","title":"Johannesburg - South Africa"},{"tz":"Africa\/Juba","location":"Juba","code":"SS","country":"South Sudan","title":"Juba - South Sudan"},{"tz":"Africa\/Kampala","location":"Kampala","code":"UG","country":"Uganda","title":"Kampala - Uganda"},{"tz":"Africa\/Khartoum","location":"Khartoum","code":"SD","country":"Sudan","title":"Khartoum - Sudan"},{"tz":"Africa\/Kigali","location":"Kigali","code":"RW","country":"Rwanda","title":"Kigali - Rwanda"},{"tz":"Africa\/Kinshasa","location":"Kinshasa","code":"CD","country":"Congo (Kinshasa)","title":"Kinshasa - The Democratic Republic of Congo"},{"tz":"Africa\/Lagos","location":"Lagos","code":"NG","country":"Nigeria","title":"Lagos - Nigeria "},{"tz":"Africa\/Libreville","location":"Libreville","code":"GA","country":"Gabon","title":"Libreville - Gabon"},{"tz":"Africa\/Lome","location":"Lome","code":"TG","country":"Togo","title":"Lome - Togo"},{"tz":"Africa\/Luanda","location":"Luanda","code":"AO","country":"Angola","title":"Luanda - Angola"},{"tz":"Africa\/Lubumbashi","location":"Lubumbashi","code":"CD","country":"Congo (Kinshasa)","title":"Lubumbashi - The Democratic Republic of Congo"},{"tz":"Africa\/Lusaka","location":"Lusaka","code":"ZM","country":"Zambia","title":"Lusaka - Zambia"},{"tz":"Africa\/Malabo","location":"Malabo","code":"GQ","country":"Equatorial Guinea","title":"Malabo - Equatorial Guinea"},{"tz":"Africa\/Maputo","location":"Maputo","code":"MZ","country":"Mozambique","title":"Maputo - Mozambique"},{"tz":"Africa\/Maseru","location":"Maseru","code":"LS","country":"Lesotho","title":"Maseru - Lesotho"},{"tz":"Africa\/Mbabane","location":"Mbabane","code":"SZ","country":"Swaziland","title":"Mbabane - Eswatini"},{"tz":"Africa\/Mogadishu","location":"Mogadishu","code":"SO","country":"Somalia","title":"Mogadishu - Somalia"},{"tz":"Africa\/Monrovia","location":"Monrovia","code":"LR","country":"Liberia","title":"Monrovia - Liberia"},{"tz":"Africa\/Nairobi","location":"Nairobi","code":"KE","country":"Kenya","title":"Nairobi - Kenya"},{"tz":"Africa\/Ndjamena","location":"Ndjamena","code":"TD","country":"Chad","title":"Ndjamena - Chad"},{"tz":"Africa\/Niamey","location":"Niamey","code":"NE","country":"Niger","title":"Niamey - Niger"},{"tz":"Africa\/Nouakchott","location":"Nouakchott","code":"MR","country":"Mauritania","title":"Nouakchott - Mauritania"},{"tz":"Africa\/Ouagadougou","location":"Ouagadougou","code":"BF","country":"Burkina Faso","title":"Ouagadougou - Burkina Faso"},{"tz":"Africa\/Porto-Novo","location":"Porto-Novo","code":"BJ","country":"Benin","title":"Porto-Novo - Benin"},{"tz":"Africa\/Sao_Tome","location":"SaoTome","code":"ST","country":"Sao Tome and Principe","title":"Sao Tome and Principe"},{"tz":"Africa\/Tripoli","location":"Tripoli","code":"LY","country":"Libya","title":"Tripoli - Libya"},{"tz":"Africa\/Tunis","location":"Tunis","code":"TN","country":"Tunisia","title":"Tunis - Tunisia"},{"tz":"Africa\/Windhoek","location":"Windhoek","code":"NA","country":"Namibia","title":"Windhoek - Namibia"},{"tz":"America\/Adak","location":"Adak","code":"US","country":"United States of America","title":"Adak - Alaska - United States of America"},{"tz":"America\/Anchorage","location":"Anchorage","code":"US","country":"United States of America","title":"Anchorage - Alaska - United States of America"},{"tz":"America\/Anguilla","location":"Anguilla","code":"AI","country":"Anguilla","title":"Anguilla"},{"tz":"America\/Antigua","location":"Antigua","code":"AG","country":"Antigua and Barbuda","title":"Antigua and Barbuda"},{"tz":"America\/Araguaina","location":"Araguaina","code":"BR","country":"Brazil","title":"Araguaina - Brazil"},{"tz":"America\/Argentina\/Buenos_Aires","location":"America","code":"AR","country":"Argentina","title":"Buenos Aires - Argentina"},{"tz":"America\/Argentina\/Catamarca","location":"America","code":"AR","country":"Argentina","title":"Catamarca - Argentina"},{"tz":"America\/Argentina\/Cordoba","location":"America","code":"AR","country":"Argentina","title":"Cordoba - Argentina"},{"tz":"America\/Argentina\/Jujuy","location":"America","code":"AR","country":"Argentina","title":"Jujuy - Argentina"},{"tz":"America\/Argentina\/La_Rioja","location":"America","code":"AR","country":"Argentina","title":"La Rioja - Argentina"},{"tz":"America\/Argentina\/Mendoza","location":"America","code":"AR","country":"Argentina","title":"Mendoza - Argentina"},{"tz":"America\/Argentina\/Rio_Gallegos","location":"America","code":"AR","country":"Argentina","title":"Rio Gallegos - Argentina"},{"tz":"America\/Argentina\/Salta","location":"America","code":"AR","country":"Argentina","title":"Salta - Argentina"},{"tz":"America\/Argentina\/San_Juan","location":"America","code":"AR","country":"Argentina","title":"San Juan - Argentina"},{"tz":"America\/Argentina\/San_Luis","location":"America","code":"AR","country":"Argentina","title":"San Luis - Argentina"},{"tz":"America\/Argentina\/Tucuman","location":"America","code":"AR","country":"Argentina","title":"Tucuman - Argentina"},{"tz":"America\/Argentina\/Ushuaia","location":"America","code":"AR","country":"Argentina","title":"Ushuaia - Argentina"},{"tz":"America\/Aruba","location":"Aruba","code":"AW","country":"Aruba","title":"Aruba"},{"tz":"America\/Asuncion","location":"Asuncion","code":"PY","country":"Paraguay","title":"Asuncion - Paraguay"},{"tz":"America\/Atikokan","location":"Atikokan","code":"CA","country":"Canada","title":"Atikokan - Canada"},{"tz":"America\/Bahia","location":"Bahia","code":"BR","country":"Brazil","title":"Bahia - Brazil"},{"tz":"America\/Bahia_Banderas","location":"BahiaBanderas","code":"MX","country":"Mexico","title":"Bahia Banderas - Mexico"},{"tz":"America\/Barbados","location":"Barbados","code":"BB","country":"Barbados","title":"Barbados"},{"tz":"America\/Belem","location":"Belem","code":"BR","country":"Brazil","title":"Belem - Brazil"},{"tz":"America\/Belize","location":"Belize","code":"BZ","country":"Belize","title":"Belize"},{"tz":"America\/Blanc-Sablon","location":"Blanc-Sablon","code":"CA","country":"Canada","title":"Blanc-Sablon - Canada"},{"tz":"America\/Boa_Vista","location":"BoaVista","code":"BR","country":"Brazil","title":"Boa Vista - Brazil"},{"tz":"America\/Bogota","location":"Bogota","code":"CO","country":"Colombia","title":"Bogota - Colombia"},{"tz":"America\/Boise","location":"Boise","code":"US","country":"United States of America","title":"Boise - Idaho - United States of America"},{"tz":"America\/Cambridge_Bay","location":"CambridgeBay","code":"CA","country":"Canada","title":"Cambridge Bay - Canada"},{"tz":"America\/Campo_Grande","location":"CampoGrande","code":"BR","country":"Brazil","title":"Campo Grande - Brazil"},{"tz":"America\/Cancun","location":"Cancun","code":"MX","country":"Mexico","title":"Cancun - Mexico"},{"tz":"America\/Caracas","location":"Caracas","code":"VE","country":"Venezuela (Bolivarian Republic)","title":"Caracas - Venezuela"},{"tz":"America\/Cayenne","location":"Cayenne","code":"GF","country":"French Guiana","title":"Cayenne - French Guiana"},{"tz":"America\/Cayman","location":"Cayman","code":"KY","country":"Cayman Islands","title":"Cayman Islands"},{"tz":"America\/Chicago","location":"Chicago","code":"US","country":"United States of America","title":"Chicago - Illinois - United States of America"},{"tz":"America\/Chihuahua","location":"Chihuahua","code":"MX","country":"Mexico","title":"Chihuahua - Mexico"},{"tz":"America\/Ciudad_Juarez","location":"CiudadJuarez","code":"MX","country":"Mexico","title":"Ciudad Juarez - Mexico"},{"tz":"America\/Costa_Rica","location":"CostaRica","code":"CR","country":"Costa Rica","title":"Costa Rica"},{"tz":"America\/Creston","location":"Creston","code":"CA","country":"Canada","title":"Creston - Canada"},{"tz":"America\/Cuiaba","location":"Cuiaba","code":"BR","country":"Brazil","title":"Cuiaba - Brazil"},{"tz":"America\/Curacao","location":"Curacao","code":"CW","country":"","title":"Curacao"},{"tz":"America\/Danmarkshavn","location":"Danmarkshavn","code":"GL","country":"Greenland","title":"Danmarkshavn - Greenland"},{"tz":"America\/Dawson","location":"Dawson","code":"CA","country":"Canada","title":"Dawson - Canada"},{"tz":"America\/Dawson_Creek","location":"DawsonCreek","code":"CA","country":"Canada","title":"Dawson Creek - Canada"},{"tz":"America\/Denver","location":"Denver","code":"US","country":"United States of America","title":"Denver - Colorado - United States of America"},{"tz":"America\/Detroit","location":"Detroit","code":"US","country":"United States of America","title":"Detroit - Michigan - United States of America"},{"tz":"America\/Dominica","location":"Dominica","code":"DM","country":"Dominica","title":"Dominica"},{"tz":"America\/Edmonton","location":"Edmonton","code":"CA","country":"Canada","title":"Edmonton - Canada"},{"tz":"America\/Eirunepe","location":"Eirunepe","code":"BR","country":"Brazil","title":"Eirunepe - Brazil"},{"tz":"America\/El_Salvador","location":"ElSalvador","code":"SV","country":"El Salvador","title":"El Salvador"},{"tz":"America\/Fort_Nelson","location":"FortNelson","code":"CA","country":"Canada","title":"Fort Nelson - Canada"},{"tz":"America\/Fortaleza","location":"Fortaleza","code":"BR","country":"Brazil","title":"Fortaleza - Brazil"},{"tz":"America\/Glace_Bay","location":"GlaceBay","code":"CA","country":"Canada","title":"Glace Bay - Canada"},{"tz":"America\/Goose_Bay","location":"GooseBay","code":"CA","country":"Canada","title":"Goose Bay - Canada"},{"tz":"America\/Grand_Turk","location":"GrandTurk","code":"TC","country":"Turks and Caicos Islands","title":"Grand Turk - Turks and Caicos Islands"},{"tz":"America\/Grenada","location":"Grenada","code":"GD","country":"Grenada","title":"Grenada"},{"tz":"America\/Guadeloupe","location":"Guadeloupe","code":"GP","country":"Guadeloupe","title":"Guadeloupe"},{"tz":"America\/Guatemala","location":"Guatemala","code":"GT","country":"Guatemala","title":"Guatemala"},{"tz":"America\/Guayaquil","location":"Guayaquil","code":"EC","country":"Ecuador","title":"Guayaquil - Ecuador"},{"tz":"America\/Guyana","location":"Guyana","code":"GY","country":"Guyana","title":"Guyana"},{"tz":"America\/Halifax","location":"Halifax","code":"CA","country":"Canada","title":"Halifax - Canada"},{"tz":"America\/Havana","location":"Havana","code":"CU","country":"Cuba","title":"Havana - Cuba"},{"tz":"America\/Hermosillo","location":"Hermosillo","code":"MX","country":"Mexico","title":"Hermosillo - Mexico"},{"tz":"America\/Indiana\/Indianapolis","location":"America","code":"US","country":"United States of America","title":"Indianapolis - Indiana - United States of America"},{"tz":"America\/Indiana\/Knox","location":"America","code":"US","country":"United States of America","title":"Knox - Indiana - United States of America"},{"tz":"America\/Indiana\/Marengo","location":"America","code":"US","country":"United States of America","title":"Marengo - Indiana - United States of America"},{"tz":"America\/Indiana\/Petersburg","location":"America","code":"US","country":"United States of America","title":"Petersburg - Indiana - United States of America"},{"tz":"America\/Indiana\/Tell_City","location":"America","code":"US","country":"United States of America","title":"Tell City - Indiana - United States of America"},{"tz":"America\/Indiana\/Vevay","location":"America","code":"US","country":"United States of America","title":"Vevay - Indiana - United States of America"},{"tz":"America\/Indiana\/Vincennes","location":"America","code":"US","country":"United States of America","title":"Vincennes - Indiana - United States of America"},{"tz":"America\/Indiana\/Winamac","location":"America","code":"US","country":"United States of America","title":"Winamac - Indiana - United States of America"},{"tz":"America\/Inuvik","location":"Inuvik","code":"CA","country":"Canada","title":"Inuvik - Canada"},{"tz":"America\/Iqaluit","location":"Iqaluit","code":"CA","country":"Canada","title":"Iqaluit - Canada"},{"tz":"America\/Jamaica","location":"Jamaica","code":"JM","country":"Jamaica","title":"Jamaica"},{"tz":"America\/Juneau","location":"Juneau","code":"US","country":"United States of America","title":"Juneau - Alaska - United States of America"},{"tz":"America\/Kentucky\/Louisville","location":"America","code":"US","country":"United States of America","title":"Louisville - Kentucky - United States of America"},{"tz":"America\/Kentucky\/Monticello","location":"America","code":"US","country":"United States of America","title":"Monticello - Kentucky - United States of America"},{"tz":"America\/Kralendijk","location":"Kralendijk","code":"BQ","country":"","title":"Kralendijk - Bonaire"},{"tz":"America\/La_Paz","location":"LaPaz","code":"BO","country":"Bolivia","title":"La Paz - Bolivia"},{"tz":"America\/Lima","location":"Lima","code":"PE","country":"Peru","title":"Lima - Peru"},{"tz":"America\/Los_Angeles","location":"LosAngeles","code":"US","country":"United States of America","title":"Los Angeles - California - United States of America"},{"tz":"America\/Lower_Princes","location":"LowerPrinces","code":"SX","country":"","title":"Lower Princes - Sint Maarten"},{"tz":"America\/Maceio","location":"Maceio","code":"BR","country":"Brazil","title":"Maceio - Brazil"},{"tz":"America\/Managua","location":"Managua","code":"NI","country":"Nicaragua","title":"Managua - Nicaragua"},{"tz":"America\/Manaus","location":"Manaus","code":"BR","country":"Brazil","title":"Manaus - Brazil"},{"tz":"America\/Marigot","location":"Marigot","code":"MF","country":"Saint-Martin (French part)","title":"Marigot - Saint-Martin"},{"tz":"America\/Martinique","location":"Martinique","code":"MQ","country":"Martinique","title":"Martinique"},{"tz":"America\/Matamoros","location":"Matamoros","code":"MX","country":"Mexico","title":"Matamoros - Mexico"},{"tz":"America\/Mazatlan","location":"Mazatlan","code":"MX","country":"Mexico","title":"Mazatlan - Mexico"},{"tz":"America\/Menominee","location":"Menominee","code":"US","country":"United States of America","title":"Menominee - Wisconsin - United States of America"},{"tz":"America\/Merida","location":"Merida","code":"MX","country":"Mexico","title":"Merida - Mexico"},{"tz":"America\/Metlakatla","location":"Metlakatla","code":"US","country":"United States of America","title":"Metlakatla - Alaska - United States of America"},{"tz":"America\/Mexico_City","location":"MexicoCity","code":"MX","country":"Mexico","title":"Mexico City - Mexico"},{"tz":"America\/Miquelon","location":"Miquelon","code":"PM","country":"Saint Pierre and Miquelon","title":"Miquelon - Saint Pierre and Miquelon"},{"tz":"America\/Moncton","location":"Moncton","code":"CA","country":"Canada","title":"Moncton - Canada"},{"tz":"America\/Monterrey","location":"Monterrey","code":"MX","country":"Mexico","title":"Monterrey - Mexico"},{"tz":"America\/Montevideo","location":"Montevideo","code":"UY","country":"Uruguay","title":"Montevideo - Uruguay"},{"tz":"America\/Montserrat","location":"Montserrat","code":"MS","country":"Montserrat","title":"Montserrat"},{"tz":"America\/Nassau","location":"Nassau","code":"BS","country":"Bahamas","title":"Nassau - Bahamas"},{"tz":"America\/New_York","location":"NewYork","code":"US","country":"United States of America","title":"New York - United States of America"},{"tz":"America\/Nome","location":"Nome","code":"US","country":"United States of America","title":"Nome - Alaska - United States of America"},{"tz":"America\/Noronha","location":"Noronha","code":"BR","country":"Brazil","title":"Noronha - Brazil"},{"tz":"America\/North_Dakota\/Beulah","location":"America","code":"US","country":"United States of America","title":"Beulah - North Dakota - United States of America"},{"tz":"America\/North_Dakota\/Center","location":"America","code":"US","country":"United States of America","title":"Center - North Dakota - United States of America"},{"tz":"America\/North_Dakota\/New_Salem","location":"America","code":"US","country":"United States of America","title":"New Salem - North Dakota - United States of America"},{"tz":"America\/Nuuk","location":"Nuuk","code":"GL","country":"Greenland","title":"Nuuk - Greenland"},{"tz":"America\/Ojinaga","location":"Ojinaga","code":"MX","country":"Mexico","title":"Ojinaga - Mexico"},{"tz":"America\/Panama","location":"Panama","code":"PA","country":"Panama","title":"Panama"},{"tz":"America\/Paramaribo","location":"Paramaribo","code":"SR","country":"Suriname","title":"Paramaribo - Suriname"},{"tz":"America\/Phoenix","location":"Phoenix","code":"US","country":"United States of America","title":"Phoenix - Arizona - United States of America"},{"tz":"America\/Port-au-Prince","location":"Port-au-Prince","code":"HT","country":"Haiti","title":"Port-au-Prince - Haiti"},{"tz":"America\/Port_of_Spain","location":"PortofSpain","code":"TT","country":"Trinidad and Tobago","title":"Port of Spain - Trinidad and Tobago"},{"tz":"America\/Porto_Velho","location":"PortoVelho","code":"BR","country":"Brazil","title":"Porto Velho - Brazil"},{"tz":"America\/Puerto_Rico","location":"PuertoRico","code":"PR","country":"Puerto Rico","title":"Puerto Rico"},{"tz":"America\/Punta_Arenas","location":"PuntaArenas","code":"CL","country":"Chile","title":"Punta Arenas - Chile"},{"tz":"America\/Rankin_Inlet","location":"RankinInlet","code":"CA","country":"Canada","title":"Rankin Inlet - Canada"},{"tz":"America\/Recife","location":"Recife","code":"BR","country":"Brazil","title":"Recife - Brazil"},{"tz":"America\/Regina","location":"Regina","code":"CA","country":"Canada","title":"Regina - Canada"},{"tz":"America\/Resolute","location":"Resolute","code":"CA","country":"Canada","title":"Resolute - Canada"},{"tz":"America\/Rio_Branco","location":"RioBranco","code":"BR","country":"Brazil","title":"Rio Branco - Brazil"},{"tz":"America\/Santarem","location":"Santarem","code":"BR","country":"Brazil","title":"Santarem - Brazil"},{"tz":"America\/Santiago","location":"Santiago","code":"CL","country":"Chile","title":"Santiago - Chile"},{"tz":"America\/Santo_Domingo","location":"SantoDomingo","code":"DO","country":"Dominican Republic","title":"Santo Domingo - Dominican Republic"},{"tz":"America\/Sao_Paulo","location":"SaoPaulo","code":"BR","country":"Brazil","title":"Sao Paulo - Brazil"},{"tz":"America\/Scoresbysund","location":"Scoresbysund","code":"GL","country":"Greenland","title":"Scoresbysund - Greenland"},{"tz":"America\/Sitka","location":"Sitka","code":"US","country":"United States of America","title":"Sitka - Alaska - United States of America"},{"tz":"America\/St_Barthelemy","location":"StBarthelemy","code":"BL","country":"Saint-Barthelemy","title":"Saint Barthelemy"},{"tz":"America\/St_Johns","location":"StJohns","code":"CA","country":"Canada","title":"St Johns - Canada"},{"tz":"America\/St_Kitts","location":"StKitts","code":"KN","country":"Saint Kitts and Nevis","title":"Saint Kitts and Nevis"},{"tz":"America\/St_Lucia","location":"StLucia","code":"LC","country":"Saint Lucia","title":"Saint Lucia"},{"tz":"America\/St_Thomas","location":"StThomas","code":"VI","country":"Virgin Islands","title":"St Thomas - US Virgin Islands"},{"tz":"America\/St_Vincent","location":"StVincent","code":"VC","country":"Saint Vincent and Grenadines","title":"Saint Vincent and Grenadines"},{"tz":"America\/Swift_Current","location":"SwiftCurrent","code":"CA","country":"Canada","title":"Swift Current - Canada"},{"tz":"America\/Tegucigalpa","location":"Tegucigalpa","code":"HN","country":"Honduras","title":"Tegucigalpa - Honduras"},{"tz":"America\/Thule","location":"Thule","code":"GL","country":"Greenland","title":"Thule - Greenland"},{"tz":"America\/Tijuana","location":"Tijuana","code":"MX","country":"Mexico","title":"Tijuana - Mexico"},{"tz":"America\/Toronto","location":"Toronto","code":"CA","country":"Canada","title":"Toronto - Canada"},{"tz":"America\/Tortola","location":"Tortola","code":"VG","country":"British Virgin Islands","title":"Tortola - British Virgin Islands"},{"tz":"America\/Vancouver","location":"Vancouver","code":"CA","country":"Canada","title":"Vancouver - Canada"},{"tz":"America\/Whitehorse","location":"Whitehorse","code":"CA","country":"Canada","title":"Whitehorse - Canada"},{"tz":"America\/Winnipeg","location":"Winnipeg","code":"CA","country":"Canada","title":"Winnipeg - Canada"},{"tz":"America\/Yakutat","location":"Yakutat","code":"US","country":"United States of America","title":"Yakutat - Alaska - United States of America"},{"tz":"Antarctica\/Casey","location":"Casey","code":"AQ","country":"Antarctica","title":"Casey - Antarctica"},{"tz":"Antarctica\/Davis","location":"Davis","code":"AQ","country":"Antarctica","title":"Davis - Antarctica"},{"tz":"Antarctica\/DumontDUrville","location":"DumontDUrville","code":"AQ","country":"Antarctica","title":"Dumont D'Urville - Antarctica"},{"tz":"Antarctica\/Macquarie","location":"Macquarie","code":"AU","country":"Australia","title":"Macquarie Island - Australia"},{"tz":"Antarctica\/Mawson","location":"Mawson","code":"AQ","country":"Antarctica","title":"Mawson - Antarctica"},{"tz":"Antarctica\/McMurdo","location":"McMurdo","code":"AQ","country":"Antarctica","title":"McMurdo - Antarctica"},{"tz":"Antarctica\/Palmer","location":"Palmer","code":"AQ","country":"Antarctica","title":"Palmer - Antarctica"},{"tz":"Antarctica\/Rothera","location":"Rothera","code":"AQ","country":"Antarctica","title":"Rothera - Antarctica"},{"tz":"Antarctica\/Syowa","location":"Syowa","code":"AQ","country":"Antarctica","title":"Syowa - Antarctica"},{"tz":"Antarctica\/Troll","location":"Troll","code":"AQ","country":"Antarctica","title":"Troll - Antarctica"},{"tz":"Antarctica\/Vostok","location":"Vostok","code":"AQ","country":"Antarctica","title":"Vostok - Antarctica"},{"tz":"Arctic\/Longyearbyen","location":"Longyearbyen","code":"SJ","country":"Svalbard and Jan Mayen Islands","title":"Longyearbyen - Svalbard and Jan Mayen Islands"},{"tz":"Asia\/Aden","location":"Aden","code":"YE","country":"Yemen","title":"Aden - Yemen"},{"tz":"Asia\/Almaty","location":"Almaty","code":"KZ","country":"Kazakhstan","title":"Almaty - Kazakhstan"},{"tz":"Asia\/Amman","location":"Amman","code":"JO","country":"Jordan","title":"Amman - Jordan"},{"tz":"Asia\/Anadyr","location":"Anadyr","code":"RU","country":"Russia","title":"Anadyr - Russia"},{"tz":"Asia\/Aqtau","location":"Aqtau","code":"KZ","country":"Kazakhstan","title":"Aqtau - Kazakhstan"},{"tz":"Asia\/Aqtobe","location":"Aqtobe","code":"KZ","country":"Kazakhstan","title":"Aqtobe - Kazakhstan"},{"tz":"Asia\/Ashgabat","location":"Ashgabat","code":"TM","country":"Turkmenistan","title":"Ashgabat - Turkmenistan"},{"tz":"Asia\/Atyrau","location":"Atyrau","code":"KZ","country":"Kazakhstan","title":"Atyrau - Kazakhstan"},{"tz":"Asia\/Baghdad","location":"Baghdad","code":"IQ","country":"Iraq","title":"Baghdad - Iraq"},{"tz":"Asia\/Bahrain","location":"Bahrain","code":"BH","country":"Bahrain","title":"Bahrain"},{"tz":"Asia\/Baku","location":"Baku","code":"AZ","country":"Azerbaijan","title":"Baku - Azerbaijan"},{"tz":"Asia\/Bangkok","location":"Bangkok","code":"TH","country":"Thailand","title":"Bangkok - Thailand"},{"tz":"Asia\/Barnaul","location":"Barnaul","code":"RU","country":"Russia","title":"Barnaul - Russia"},{"tz":"Asia\/Beirut","location":"Beirut","code":"LB","country":"Lebanon","title":"Beirut - Lebanon"},{"tz":"Asia\/Bishkek","location":"Bishkek","code":"KG","country":"Kyrgyzstan","title":"Bishkek - Kyrgyzstan"},{"tz":"Asia\/Brunei","location":"Brunei","code":"BN","country":"Brunei Darussalam","title":"Brunei Darussalam"},{"tz":"Asia\/Chita","location":"Chita","code":"RU","country":"Russia","title":"Chita - Russia"},{"tz":"Asia\/Choibalsan","location":"Choibalsan","code":"MN","country":"Mongolia","title":"Choibalsan - Mongolia"},{"tz":"Asia\/Colombo","location":"Colombo","code":"LK","country":"Sri Lanka","title":"Colombo - Sri Lanka"},{"tz":"Asia\/Damascus","location":"Damascus","code":"SY","country":"Syrian Arab Republic (Syria)","title":"Damascus - Syria"},{"tz":"Asia\/Dhaka","location":"Dhaka","code":"BD","country":"Bangladesh","title":"Dhaka - Bangladesh"},{"tz":"Asia\/Dili","location":"Dili","code":"TL","country":"Timor-Leste","title":"Dili - Timor-Leste"},{"tz":"Asia\/Dubai","location":"Dubai","code":"AE","country":"United Arab Emirates","title":"Dubai - United Arab Emirates"},{"tz":"Asia\/Dushanbe","location":"Dushanbe","code":"TJ","country":"Tajikistan","title":"Dushanbe - Tajikistan"},{"tz":"Asia\/Famagusta","location":"Famagusta","code":"CY","country":"Cyprus","title":"Famagusta - Cyprus"},{"tz":"Asia\/Gaza","location":"Gaza","code":"PS","country":"Palestinian Territory","title":"Gaza - Palestinian Territory"},{"tz":"Asia\/Hebron","location":"Hebron","code":"PS","country":"Palestinian Territory","title":"Hebron - Palestinian Territory"},{"tz":"Asia\/Ho_Chi_Minh","location":"HoChiMinh","code":"VN","country":"Viet Nam","title":"Ho Chi Minh City - Vietnam"},{"tz":"Asia\/Hong_Kong","location":"HongKong","code":"HK","country":"Hong Kong","title":"Hong Kong China"},{"tz":"Asia\/Hovd","location":"Hovd","code":"MN","country":"Mongolia","title":"Hovd - Mongolia"},{"tz":"Asia\/Irkutsk","location":"Irkutsk","code":"RU","country":"Russia","title":"Irkutsk - Russia"},{"tz":"Asia\/Jakarta","location":"Jakarta","code":"ID","country":"Indonesia","title":"Jakarta - Indonesia"},{"tz":"Asia\/Jayapura","location":"Jayapura","code":"ID","country":"Indonesia","title":"Jayapura - Indonesia"},{"tz":"Asia\/Jerusalem","location":"Jerusalem","code":"IL","country":"Israel","title":"Jerusalem - Israel"},{"tz":"Asia\/Kabul","location":"Kabul","code":"AF","country":"Afghanistan","title":"Kabul - Afghanistan"},{"tz":"Asia\/Kamchatka","location":"Kamchatka","code":"RU","country":"Russia","title":"Kamchatka - Russia"},{"tz":"Asia\/Karachi","location":"Karachi","code":"PK","country":"Pakistan","title":"Karachi - Pakistan"},{"tz":"Asia\/Kathmandu","location":"Kathmandu","code":"NP","country":"Nepal","title":"Kathmandu - Nepal"},{"tz":"Asia\/Khandyga","location":"Khandyga","code":"RU","country":"Russia","title":"Khandyga - Russia"},{"tz":"Asia\/Kolkata","location":"Kolkata","code":"IN","country":"India","title":"Kolkata - India"},{"tz":"Asia\/Krasnoyarsk","location":"Krasnoyarsk","code":"RU","country":"Russia","title":"Krasnoyarsk - Russia"},{"tz":"Asia\/Kuala_Lumpur","location":"KualaLumpur","code":"MY","country":"Malaysia","title":"Kuala Lumpur - Malaysia"},{"tz":"Asia\/Kuching","location":"Kuching","code":"MY","country":"Malaysia","title":"Kuching - Malaysia"},{"tz":"Asia\/Kuwait","location":"Kuwait","code":"KW","country":"Kuwait","title":"Kuwait"},{"tz":"Asia\/Macau","location":"Macau","code":"MO","country":"Macau","title":"Macau"},{"tz":"Asia\/Magadan","location":"Magadan","code":"RU","country":"Russia","title":"Magadan - Russia"},{"tz":"Asia\/Makassar","location":"Makassar","code":"ID","country":"Indonesia","title":"Makassar - Indonesia"},{"tz":"Asia\/Manila","location":"Manila","code":"PH","country":"Philippines","title":"Manila - Philippines"},{"tz":"Asia\/Muscat","location":"Muscat","code":"OM","country":"Oman","title":"Muscat - Oman"},{"tz":"Asia\/Nicosia","location":"Nicosia","code":"CY","country":"Cyprus","title":"Nicosia - Cyprus"},{"tz":"Asia\/Novokuznetsk","location":"Novokuznetsk","code":"RU","country":"Russia","title":"Novokuznetsk - Russia"},{"tz":"Asia\/Novosibirsk","location":"Novosibirsk","code":"RU","country":"Russia","title":"Novosibirsk - Russia"},{"tz":"Asia\/Omsk","location":"Omsk","code":"RU","country":"Russia","title":"Omsk - Russia"},{"tz":"Asia\/Oral","location":"Oral","code":"KZ","country":"Kazakhstan","title":"Oral - Kazakhstan"},{"tz":"Asia\/Phnom_Penh","location":"PhnomPenh","code":"KH","country":"Cambodia","title":"Phnom Penh - Cambodia"},{"tz":"Asia\/Pontianak","location":"Pontianak","code":"ID","country":"Indonesia","title":"Pontianak - Indonesia"},{"tz":"Asia\/Pyongyang","location":"Pyongyang","code":"KP","country":"Korea (North)","title":"Pyongyang - North Korea"},{"tz":"Asia\/Qatar","location":"Qatar","code":"QA","country":"Qatar","title":"Qatar"},{"tz":"Asia\/Qostanay","location":"Qostanay","code":"KZ","country":"Kazakhstan","title":"Qostanay - Kazakhstan"},{"tz":"Asia\/Qyzylorda","location":"Qyzylorda","code":"KZ","country":"Kazakhstan","title":"Qyzylorda - Kazakhstan"},{"tz":"Asia\/Riyadh","location":"Riyadh","code":"SA","country":"Saudi Arabia","title":"Riyadh - Saudi Arabia"},{"tz":"Asia\/Sakhalin","location":"Sakhalin","code":"RU","country":"Russia","title":"Sakhalin - Russia"},{"tz":"Asia\/Samarkand","location":"Samarkand","code":"UZ","country":"Uzbekistan","title":"Samarkand - Uzbekistan"},{"tz":"Asia\/Seoul","location":"Seoul","code":"KR","country":"Korea (South)","title":"Seoul - South Korea"},{"tz":"Asia\/Shanghai","location":"Shanghai","code":"CN","country":"China","title":"Shanghai - China"},{"tz":"Asia\/Singapore","location":"Singapore","code":"SG","country":"Singapore","title":"Singapore"},{"tz":"Asia\/Srednekolymsk","location":"Srednekolymsk","code":"RU","country":"Russia","title":"Srednekolymsk - Russia"},{"tz":"Asia\/Taipei","location":"Taipei","code":"TW","country":"Taiwan","title":"Taipei - Chinese Taipei"},{"tz":"Asia\/Tashkent","location":"Tashkent","code":"UZ","country":"Uzbekistan","title":"Tashkent - Uzbekistan"},{"tz":"Asia\/Tbilisi","location":"Tbilisi","code":"GE","country":"Georgia","title":"Tbilisi - Georgia"},{"tz":"Asia\/Tehran","location":"Tehran","code":"IR","country":"Iran","title":"Tehran - Iran"},{"tz":"Asia\/Thimphu","location":"Thimphu","code":"BT","country":"Bhutan","title":"Thimphu - Bhutan"},{"tz":"Asia\/Tokyo","location":"Tokyo","code":"JP","country":"Japan","title":"Tokyo - Japan"},{"tz":"Asia\/Tomsk","location":"Tomsk","code":"RU","country":"Russia","title":"Tomsk - Russia"},{"tz":"Asia\/Ulaanbaatar","location":"Ulaanbaatar","code":"MN","country":"Mongolia","title":"Ulaanbaatar - Mongolia"},{"tz":"Asia\/Urumqi","location":"Urumqi","code":"CN","country":"China","title":"Urumqi - China"},{"tz":"Asia\/Ust-Nera","location":"Ust-Nera","code":"RU","country":"Russia","title":"Ust-Nera - Russia"},{"tz":"Asia\/Vientiane","location":"Vientiane","code":"LA","country":"Lao PDR","title":"Vientiane - Laos"},{"tz":"Asia\/Vladivostok","location":"Vladivostok","code":"RU","country":"Russia","title":"Vladivostok - Russia"},{"tz":"Asia\/Yakutsk","location":"Yakutsk","code":"RU","country":"Russia","title":"Yakutsk - Russia"},{"tz":"Asia\/Yangon","location":"Yangon","code":"MM","country":"Myanmar","title":"Yangon - Myanmar"},{"tz":"Asia\/Yekaterinburg","location":"Yekaterinburg","code":"RU","country":"Russia","title":"Yekaterinburg - Russia"},{"tz":"Asia\/Yerevan","location":"Yerevan","code":"AM","country":"Armenia","title":"Yerevan - Armenia"},{"tz":"Atlantic\/Azores","location":"Azores","code":"PT","country":"Portugal","title":"Azores - Portugal"},{"tz":"Atlantic\/Bermuda","location":"Bermuda","code":"BM","country":"Bermuda","title":"Bermuda"},{"tz":"Atlantic\/Canary","location":"Canary","code":"ES","country":"Spain","title":"Canary Islands - Spain"},{"tz":"Atlantic\/Cape_Verde","location":"CapeVerde","code":"CV","country":"Cape Verde","title":"Cape Verde"},{"tz":"Atlantic\/Faroe","location":"Faroe","code":"FO","country":"Faroe Islands","title":"Faroe Islands"},{"tz":"Atlantic\/Madeira","location":"Madeira","code":"PT","country":"Portugal","title":"Madeira - Portugal"},{"tz":"Atlantic\/Reykjavik","location":"Reykjavik","code":"IS","country":"Iceland","title":"Reykjavik - Iceland"},{"tz":"Atlantic\/South_Georgia","location":"SouthGeorgia","code":"GS","country":"South Georgia and the South Sandwich Islands","title":"South Georgia and the South Sandwich Islands"},{"tz":"Atlantic\/St_Helena","location":"StHelena","code":"SH","country":"Saint Helena","title":"Saint Helena"},{"tz":"Atlantic\/Stanley","location":"Stanley","code":"FK","country":"Falkland Islands (Malvinas)","title":"Stanley - Falkland Islands"},{"tz":"Australia\/Adelaide","location":"Adelaide","code":"AU","country":"Australia","title":"Adelaide - Australia"},{"tz":"Australia\/Brisbane","location":"Brisbane","code":"AU","country":"Australia","title":"Brisbane - Australia"},{"tz":"Australia\/Broken_Hill","location":"BrokenHill","code":"AU","country":"Australia","title":"Broken Hill - Australia"},{"tz":"Australia\/Darwin","location":"Darwin","code":"AU","country":"Australia","title":"Darwin - Australia"},{"tz":"Australia\/Eucla","location":"Eucla","code":"AU","country":"Australia","title":"Eucla - Australia"},{"tz":"Australia\/Hobart","location":"Hobart","code":"AU","country":"Australia","title":"Hobart - Australia"},{"tz":"Australia\/Lindeman","location":"Lindeman","code":"AU","country":"Australia","title":"Lindeman - Australia"},{"tz":"Australia\/Lord_Howe","location":"LordHowe","code":"AU","country":"Australia","title":"Lord Howe - Australia"},{"tz":"Australia\/Melbourne","location":"Melbourne","code":"AU","country":"Australia","title":"Melbourne - Australia"},{"tz":"Australia\/Perth","location":"Perth","code":"AU","country":"Australia","title":"Perth - Australia"},{"tz":"Australia\/Sydney","location":"Sydney","code":"AU","country":"Australia","title":"Sydney - Australia"},{"tz":"Europe\/Amsterdam","location":"Amsterdam","code":"NL","country":"Netherlands","title":"Amsterdam - Netherlands"},{"tz":"Europe\/Andorra","location":"Andorra","code":"AD","country":"Andorra","title":"Andorra"},{"tz":"Europe\/Astrakhan","location":"Astrakhan","code":"RU","country":"Russia","title":"Astrakhan - Russia"},{"tz":"Europe\/Athens","location":"Athens","code":"GR","country":"Greece","title":"Athens - Greece"},{"tz":"Europe\/Belgrade","location":"Belgrade","code":"RS","country":"Serbia","title":"Belgrade - Serbia"},{"tz":"Europe\/Berlin","location":"Berlin","code":"DE","country":"Germany","title":"Berlin - Germany"},{"tz":"Europe\/Bratislava","location":"Bratislava","code":"SK","country":"Slovakia","title":"Bratislava - Slovakia"},{"tz":"Europe\/Brussels","location":"Brussels","code":"BE","country":"Belgium","title":"Brussels - Belgium"},{"tz":"Europe\/Bucharest","location":"Bucharest","code":"RO","country":"Romania","title":"Bucharest - Romania"},{"tz":"Europe\/Budapest","location":"Budapest","code":"HU","country":"Hungary","title":"Budapest - Hungary"},{"tz":"Europe\/Busingen","location":"Busingen","code":"DE","country":"Germany","title":"Busingen - Germany"},{"tz":"Europe\/Chisinau","location":"Chisinau","code":"MD","country":"Moldova","title":"Chisinau - Moldova"},{"tz":"Europe\/Copenhagen","location":"Copenhagen","code":"DK","country":"Denmark","title":"Copenhagen - Denmark"},{"tz":"Europe\/Dublin","location":"Dublin","code":"IE","country":"Ireland","title":"Dublin - Ireland"},{"tz":"Europe\/Gibraltar","location":"Gibraltar","code":"GI","country":"Gibraltar","title":"Gibraltar"},{"tz":"Europe\/Guernsey","location":"Guernsey","code":"GG","country":"Guernsey","title":"Guernsey"},{"tz":"Europe\/Helsinki","location":"Helsinki","code":"FI","country":"Finland","title":"Helsinki - Finland"},{"tz":"Europe\/Isle_of_Man","location":"IsleofMan","code":"IM","country":"Isle of Man","title":"Isle of Man"},{"tz":"Europe\/Istanbul","location":"Istanbul","code":"TR","country":"Turkey","title":"Istanbul - Turkey"},{"tz":"Europe\/Jersey","location":"Jersey","code":"JE","country":"Jersey","title":"Jersey"},{"tz":"Europe\/Kaliningrad","location":"Kaliningrad","code":"RU","country":"Russia","title":"Kaliningrad - Russia"},{"tz":"Europe\/Kirov","location":"Kirov","code":"RU","country":"Russia","title":"Kirov - Russia"},{"tz":"Europe\/Kyiv","location":"Kyiv","code":"UA","country":"Ukraine","title":"Kyiv - Ukraine"},{"tz":"Europe\/Lisbon","location":"Lisbon","code":"PT","country":"Portugal","title":"Lisbon - Portugal"},{"tz":"Europe\/Ljubljana","location":"Ljubljana","code":"SI","country":"Slovenia","title":"Ljubljana - Slovenia"},{"tz":"Europe\/London","location":"London","code":"GB","country":"United Kingdom","title":"London - United Kingdom"},{"tz":"Europe\/Luxembourg","location":"Luxembourg","code":"LU","country":"Luxembourg","title":"Luxembourg"},{"tz":"Europe\/Madrid","location":"Madrid","code":"ES","country":"Spain","title":"Madrid - Spain"},{"tz":"Europe\/Malta","location":"Malta","code":"MT","country":"Malta","title":"Malta"},{"tz":"Europe\/Mariehamn","location":"Mariehamn","code":"AX","country":"Aland Islands","title":"Mariehamn - Aland Islands"},{"tz":"Europe\/Minsk","location":"Minsk","code":"BY","country":"Belarus","title":"Minsk - Belarus"},{"tz":"Europe\/Monaco","location":"Monaco","code":"MC","country":"Monaco","title":"Monaco"},{"tz":"Europe\/Moscow","location":"Moscow","code":"RU","country":"Russia","title":"Moscow - Russia"},{"tz":"Europe\/Oslo","location":"Oslo","code":"NO","country":"Norway","title":"Oslo - Norway"},{"tz":"Europe\/Paris","location":"Paris","code":"FR","country":"France","title":"Paris - France"},{"tz":"Europe\/Podgorica","location":"Podgorica","code":"ME","country":"Montenegro","title":"Podgorica - Montenegro"},{"tz":"Europe\/Prague","location":"Prague","code":"CZ","country":"Czech Republic","title":"Prague - Czech Republic"},{"tz":"Europe\/Riga","location":"Riga","code":"LV","country":"Latvia","title":"Riga - Latvia"},{"tz":"Europe\/Rome","location":"Rome","code":"IT","country":"Italy","title":"Rome - Italy"},{"tz":"Europe\/Samara","location":"Samara","code":"RU","country":"Russia","title":"Samara - russia"},{"tz":"Europe\/San_Marino","location":"SanMarino","code":"SM","country":"San Marino","title":"San Marino"},{"tz":"Europe\/Sarajevo","location":"Sarajevo","code":"BA","country":"Bosnia and Herzegovina","title":"Sarajevo - Bosnia and Herzergovina"},{"tz":"Europe\/Saratov","location":"Saratov","code":"RU","country":"Russia","title":"Saratov - Russia"},{"tz":"Europe\/Simferopol","location":"Simferopol","code":"UA","country":"Ukraine","title":"Simferopol - Ukraine"},{"tz":"Europe\/Skopje","location":"Skopje","code":"MK","country":"Macedonia","title":"Skopje - Macedonia"},{"tz":"Europe\/Sofia","location":"Sofia","code":"BG","country":"Bulgaria","title":"Sofia - Bulgaria"},{"tz":"Europe\/Stockholm","location":"Stockholm","code":"SE","country":"Sweden","title":"Stockholm - Sweden"},{"tz":"Europe\/Tallinn","location":"Tallinn","code":"EE","country":"Estonia","title":"Tallinn - Estonia"},{"tz":"Europe\/Tirane","location":"Tirane","code":"AL","country":"Albania","title":"Tirana - Albania"},{"tz":"Europe\/Ulyanovsk","location":"Ulyanovsk","code":"RU","country":"Russia","title":"Ulyanovsk - Russia"},{"tz":"Europe\/Vaduz","location":"Vaduz","code":"LI","country":"Liechtenstein","title":"Vaduz - Liechtenstein"},{"tz":"Europe\/Vatican","location":"Vatican","code":"VA","country":"Holy See (Vatican City State)","title":"Vatican City"},{"tz":"Europe\/Vienna","location":"Vienna","code":"AT","country":"Austria","title":"Vienna - Austria"},{"tz":"Europe\/Vilnius","location":"Vilnius","code":"LT","country":"Lithuania","title":"Vilnius - Lithuania"},{"tz":"Europe\/Volgograd","location":"Volgograd","code":"RU","country":"Russia","title":"Volgograd - Russia"},{"tz":"Europe\/Warsaw","location":"Warsaw","code":"PL","country":"Poland","title":"Warsaw - Poland"},{"tz":"Europe\/Zagreb","location":"Zagreb","code":"HR","country":"Croatia","title":"Zagreb - Croatia"},{"tz":"Europe\/Zurich","location":"Zurich","code":"CH","country":"Switzerland","title":"Zurich - Switzerland"},{"tz":"Indian\/Antananarivo","location":"Antananarivo","code":"MG","country":"Madagascar","title":"Antananarivo - Madagascar"},{"tz":"Indian\/Chagos","location":"Chagos","code":"IO","country":"British Indian Ocean Territory","title":"Chagos - British Indian Ocean Territory"},{"tz":"Indian\/Christmas","location":"Christmas","code":"CX","country":"Christmas Island","title":"Christmas Island"},{"tz":"Indian\/Cocos","location":"Cocos","code":"CC","country":"Cocos (Keeling) Islands","title":"Cocos (Keeling) Islands"},{"tz":"Indian\/Comoro","location":"Comoro","code":"KM","country":"Comoros","title":"Comoros"},{"tz":"Indian\/Kerguelen","location":"Kerguelen","code":"TF","country":"French Southern Territories","title":"Kerguelen - French Southern Territories"},{"tz":"Indian\/Mahe","location":"Mahe","code":"SC","country":"Seychelles","title":"Mahe - Seychelles"},{"tz":"Indian\/Maldives","location":"Maldives","code":"MV","country":"Maldives","title":"Maldives"},{"tz":"Indian\/Mauritius","location":"Mauritius","code":"MU","country":"Mauritius","title":"Mauritius"},{"tz":"Indian\/Mayotte","location":"Mayotte","code":"YT","country":"Mayotte","title":"Mayotte"},{"tz":"Indian\/Reunion","location":"Reunion","code":"RE","country":"Reunion","title":"Reunion"},{"tz":"Pacific\/Apia","location":"Apia","code":"WS","country":"Samoa","title":"Apia - Samoa"},{"tz":"Pacific\/Auckland","location":"Auckland","code":"NZ","country":"New Zealand","title":"Auckland - New Zealand"},{"tz":"Pacific\/Bougainville","location":"Bougainville","code":"PG","country":"Papua New Guinea","title":"Bougainville - Papua New Guinea"},{"tz":"Pacific\/Chatham","location":"Chatham","code":"NZ","country":"New Zealand","title":"Chatham Islands - New Zealand"},{"tz":"Pacific\/Chuuk","location":"Chuuk","code":"FM","country":"Micronesia","title":"Chuuk - Micronesia"},{"tz":"Pacific\/Easter","location":"Easter","code":"CL","country":"Chile","title":"Easter Island - Chile"},{"tz":"Pacific\/Efate","location":"Efate","code":"VU","country":"Vanuatu","title":"Efate - Vanuatu"},{"tz":"Pacific\/Fakaofo","location":"Fakaofo","code":"TK","country":"Tokelau","title":"Fakaofo - Tokelau"},{"tz":"Pacific\/Fiji","location":"Fiji","code":"FJ","country":"Fiji","title":"Fiji"},{"tz":"Pacific\/Funafuti","location":"Funafuti","code":"TV","country":"Tuvalu","title":"Funafuti - Tuvalu"},{"tz":"Pacific\/Galapagos","location":"Galapagos","code":"EC","country":"Ecuador","title":"Galapagos Islands - Ecuador"},{"tz":"Pacific\/Gambier","location":"Gambier","code":"PF","country":"French Polynesia","title":"Gambier - French Polynesia"},{"tz":"Pacific\/Guadalcanal","location":"Guadalcanal","code":"SB","country":"Solomon Islands","title":"Guadalcanal - Solomon Islands"},{"tz":"Pacific\/Guam","location":"Guam","code":"GU","country":"Guam","title":"Guam"},{"tz":"Pacific\/Honolulu","location":"Honolulu","code":"US","country":"United States of America","title":"Honolulu - Hawaii - United States of America"},{"tz":"Pacific\/Kanton","location":"Kanton","code":"KI","country":"Kiribati","title":"Kanton - Kiribati"},{"tz":"Pacific\/Kiritimati","location":"Kiritimati","code":"KI","country":"Kiribati","title":"Kiritimati - Kiribati"},{"tz":"Pacific\/Kosrae","location":"Kosrae","code":"FM","country":"Micronesia","title":"Kosrae - Micronesia"},{"tz":"Pacific\/Kwajalein","location":"Kwajalein","code":"MH","country":"Marshall Islands","title":"Kwajalein - Marshall Islands"},{"tz":"Pacific\/Majuro","location":"Majuro","code":"MH","country":"Marshall Islands","title":"Majuro - Marshall Islands"},{"tz":"Pacific\/Marquesas","location":"Marquesas","code":"PF","country":"French Polynesia","title":"Marquesas - French Polynesia"},{"tz":"Pacific\/Midway","location":"Midway","code":"UM","country":"US Minor Outlying Islands","title":"Midway - US Minor Outlying Islands"},{"tz":"Pacific\/Nauru","location":"Nauru","code":"NR","country":"Nauru","title":"Nauru"},{"tz":"Pacific\/Niue","location":"Niue","code":"NU","country":"Niue","title":"Niue"},{"tz":"Pacific\/Norfolk","location":"Norfolk","code":"NF","country":"Norfolk Island","title":"Norfolk Island"},{"tz":"Pacific\/Noumea","location":"Noumea","code":"NC","country":"New Caledonia","title":"Noumea - New Caledonia"},{"tz":"Pacific\/Pago_Pago","location":"PagoPago","code":"AS","country":"American Samoa","title":"Pago Pago - American Samoa"},{"tz":"Pacific\/Palau","location":"Palau","code":"PW","country":"Palau","title":"Palau"},{"tz":"Pacific\/Pitcairn","location":"Pitcairn","code":"PN","country":"Pitcairn","title":"Pitcairn"},{"tz":"Pacific\/Pohnpei","location":"Pohnpei","code":"FM","country":"Micronesia","title":"Pohnpei - Micronesia"},{"tz":"Pacific\/Port_Moresby","location":"PortMoresby","code":"PG","country":"Papua New Guinea","title":"Port Moresby - Papua New Guinea"},{"tz":"Pacific\/Rarotonga","location":"Rarotonga","code":"CK","country":"Cook Islands","title":"Rarotonga - Cook Islands"},{"tz":"Pacific\/Saipan","location":"Saipan","code":"MP","country":"Northern Mariana Islands","title":"Saipan - Northern Marinara Islands"},{"tz":"Pacific\/Tahiti","location":"Tahiti","code":"PF","country":"French Polynesia","title":"Tahiti - French Polynesia"},{"tz":"Pacific\/Tarawa","location":"Tarawa","code":"KI","country":"Kiribati","title":"Tarawa - Kiribati"},{"tz":"Pacific\/Tongatapu","location":"Tongatapu","code":"TO","country":"Tonga","title":"Tongatapu - Tonga"},{"tz":"Pacific\/Wake","location":"Wake","code":"UM","country":"US Minor Outlying Islands","title":"Wake - US Minor Outlying Islands"},{"tz":"Pacific\/Wallis","location":"Wallis","code":"WF","country":"Wallis and Futuna Islands","title":"Wallis and Futuna Islands"},{"tz":"UTC","location":"UTC","code":"UTC","country":"","title":"UTC\/GMT"}]
ADVERTISEMENT
All the Rugby. All the News. All in One Place. Your Inbox.
Sign up now
RugbyPass Newsletter
Get the latest rugby news and analysis with the RugbyPass newsletter


 Jones has a high lunging attempt on North, slides off the tackle and North skips through a few dive tackles from Scotland’s trailing defence to score.