The All Blacks responded to their 16-all draw by changing their entire attacking system, with a renewed focus on power over scheme in order to pull away and charge to a 27-7 win in Auckland in the second Bledisloe test.
Stream Nations Championship 2026 LIVE
Hemispheres collide in the new Nations Championship. Stream live, replays and highlights free on RugbyPass TV.
They abandoned the ‘flush’ pod pattern that has been used since they played Argentina in Buenos Aires last year, using forward carries off 9 in a brutal fashion to pound the Wallabies defence into submission. They adopted many concepts from the Crusaders to aid one of the best performances in the black jersey Richie Mo’unga has delivered in his fledgling international career.
The result was 31 missed tackles by Australia and many more ineffective ones. A black wave rolled over the Wallabies, the home side seemed to be unstoppable in spurts. The All Blacks found gain line success on 58 percent of carries, compared to just 39 percent in Wellington, a marked increase in efficiency.
In a sign of just how disengaged the pack was in Wellington, reserve loose forward Hoskins Sotutu ended as the All Blacks equal top forward ball carrier with six carries, despite only playing the last 17 minutes.
The All Blacks had come as far as they could have with a pattern that just didn’t work, so a new operating system was in order. It was time to unleash the pack that just has not had the opportunity to influence the game in the way that they are built for and give the platform Mo’unga is used to at the Crusaders.
The starters earnt their keep at Eden Park as Ardie Savea finished with 10 carries, Sam Cane with nine, Patrick Tuipulotu with eight and Tupou Vaa’i with seven.
Complimenting the big men up front was young winger Caleb Clarke with eight carries of his own, a power athlete in his own right, which supercharged an All Blacks attack with gain line winners.
To get the team working with front-foot ball, the All Blacks altered their set-piece play philosophy to suit the forward-carry game. This adjustment was critical to bending the Wallabies line, creating fold pressure, and rolling the likes of Tuipulotu and Savea around the corner on consecutive carries to bash the Australians backward through shear will.
In Wellington, the All Blacks often tried to manipulate James O’Connor and Matt To’omua to create separation in the 10-12 channel through scheme and complexity, in search of a home run strike play.
There were decoy lines forcing the duo to progress through multiple reads which questioned their decision-making. O’Connor and To’omua proved they were sound defensively and made great reads.
This time around, they just ran at O’Connor continuously, testing his physicality and technique, not his defensive smarts. By using the power of Goodhue, Lienert-Brown and Clarke they found a strength mismatch they could exploit.
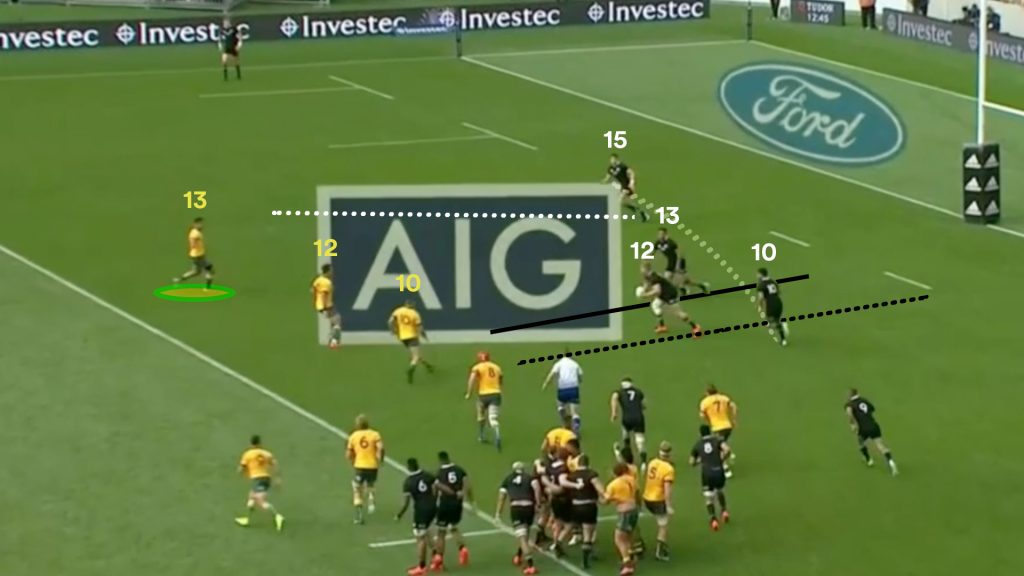
The All Blacks brought back the ‘arrowhead’ attack used during the Lions series and continued through much of 2018, centred around hard carries from 12 and a support line from 13. This put Jack Goodhue squarely in O’Connor’s sights for most of the afternoon.
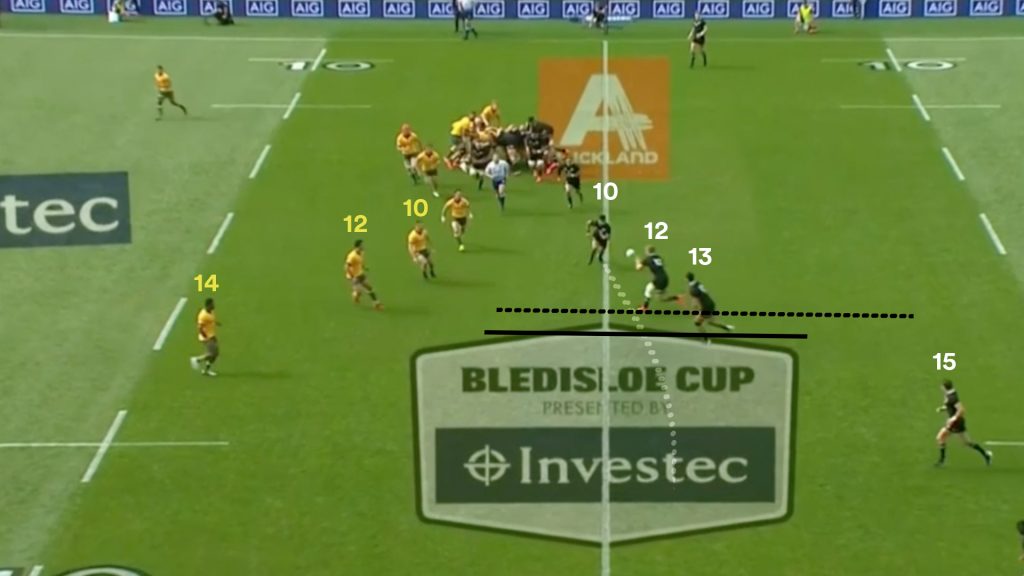
On the first All Blacks scrum of the game, we saw early ball provided to Jack Goodhue (12) from Richie Mo’unga (10) with Anton Lienert-Brown (13) running tight along side him in the arrowhead formation.
After serving Goodhue the pass, Mo’unga wraps around the back as a loop option.
Goodhue decided on this early play to test the Wallabies drift defence by throwing a cutout pass to Beauden Barrett (15) but the fullback wasn’t anticipating it, which lead to a turfed pass and knock-on by Caleb Clarke outside him.
However, the formation used by the All Blacks on this play would continue throughout the first half, and they took the direct approach down main street from then on.
There was a clear directive to smash James O’Connor’s channel through the All Black midfield any time they entered the Wallabies’ half, either through Goodhue himself or by using the centre Lienert-Brown on a hard angle in the arrowhead attack.
The next time it’s used, the play is covered by To’omua when Goodhue tried to play Lienert-Brown late at the line.
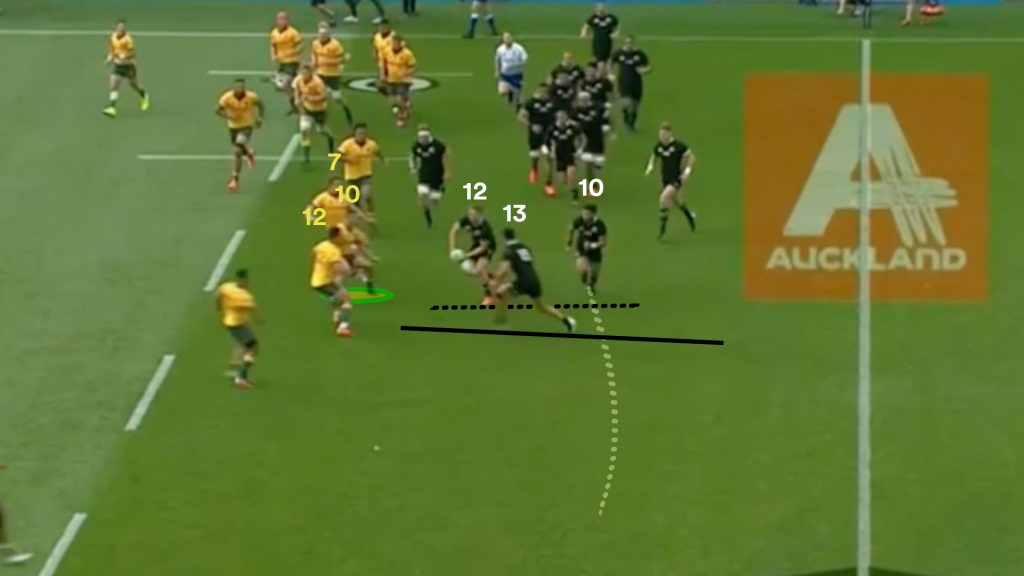
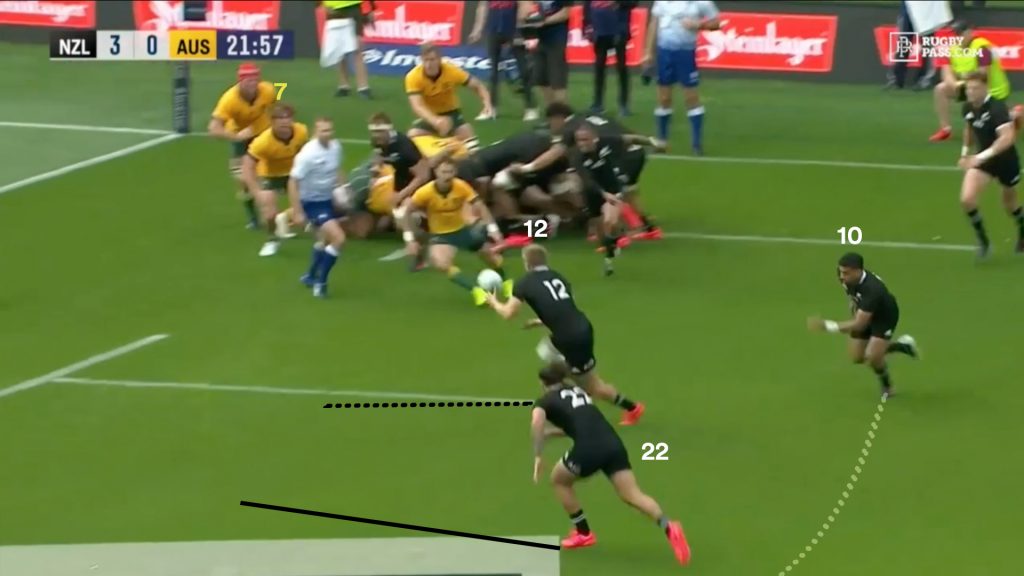
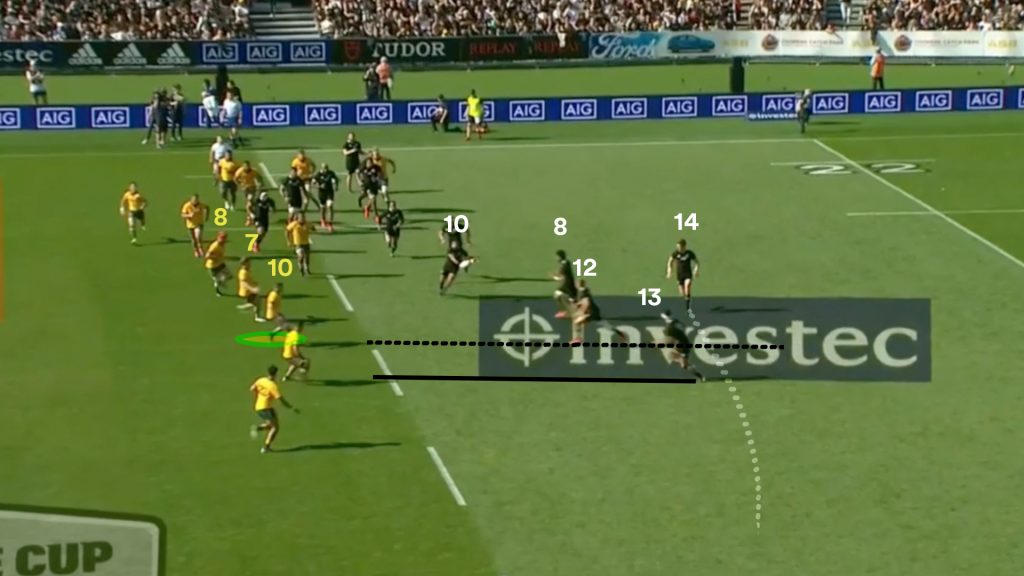
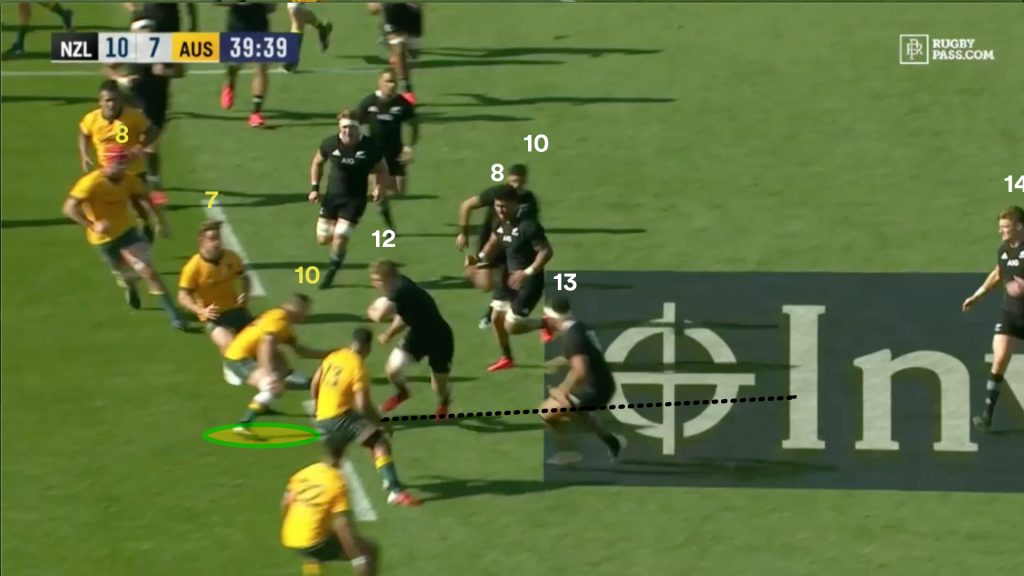
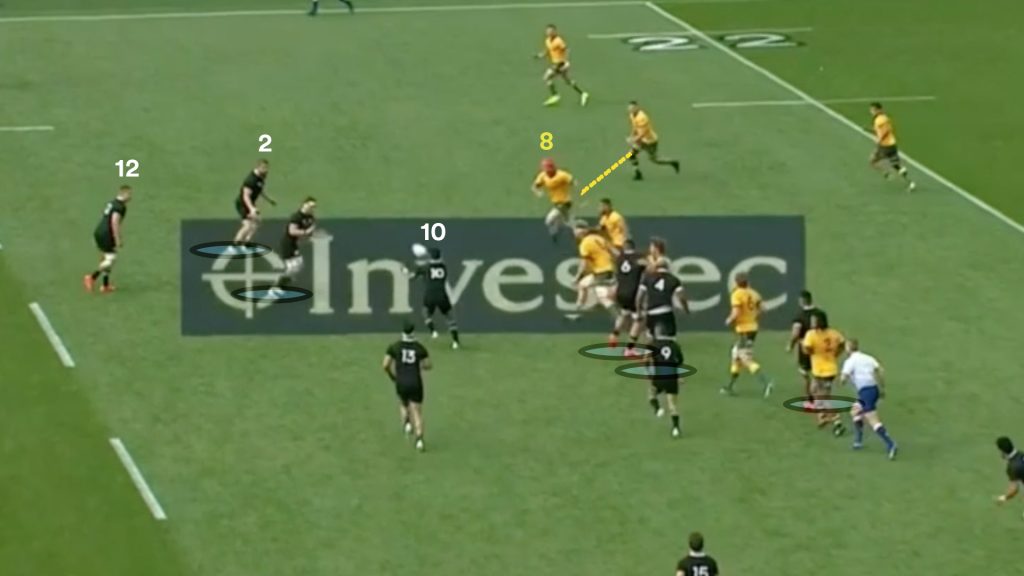
On the first set-piece opportunity inside the Wallabies’ 22, the All Blacks run the arrowhead play direct off 9 and again the target is James O’Connor.
A slight bounce to the left by Goodhue lined him up with O’Connor’s outside shoulder. The Crusader powered through, leaving the Reds flyhalf in his wake and forcing Matt To’omua to make the tackle.
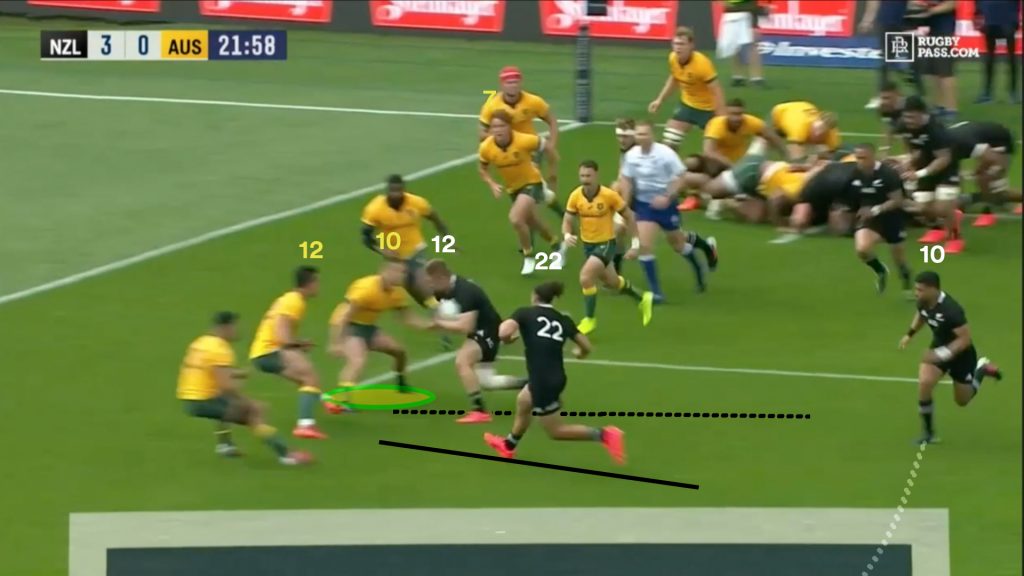
Because Matt To’omua had to cover for O’Connor’s miss, Hunter Paisami also had to collapse in to cover the threat of substitute Peter Umaga-Jensen (22) running the tight support option.
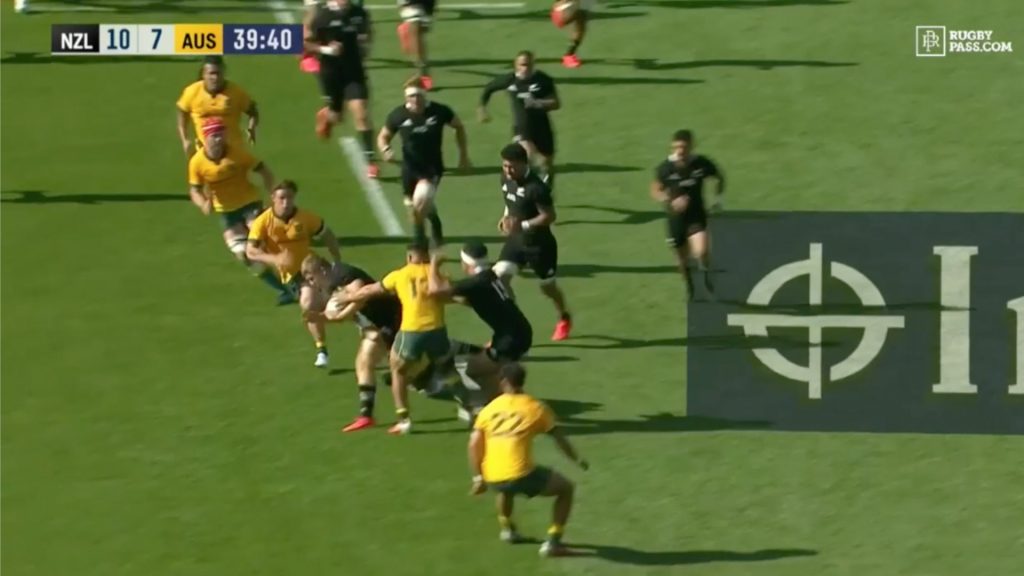
The Wallabies were stuck in the worst of both worlds, with no midfielders on the open side, leaving them exposed that way, and the loose forward unit having to backtrack around the ruck to fold, delaying the defence from getting reinforcements around there.
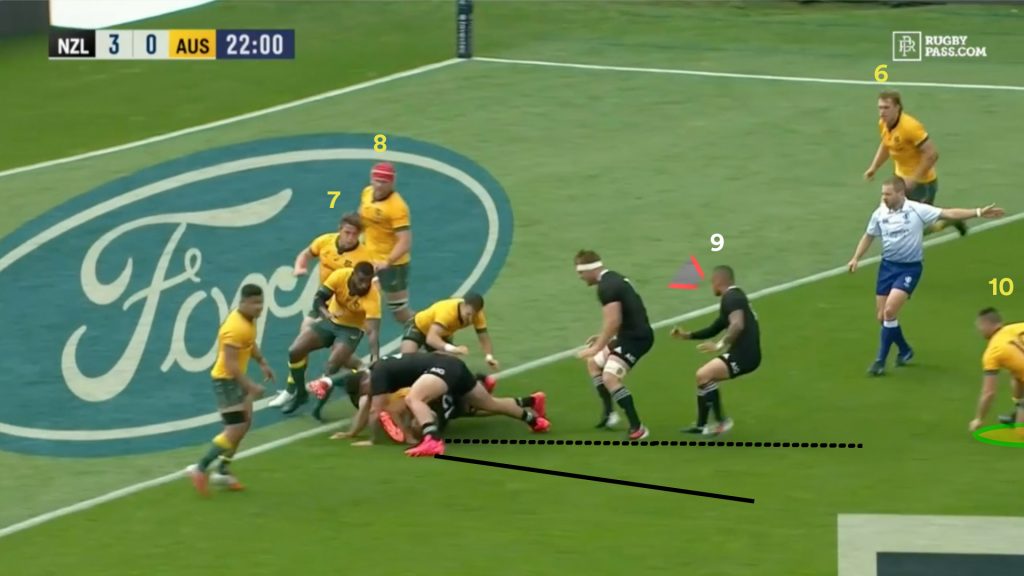
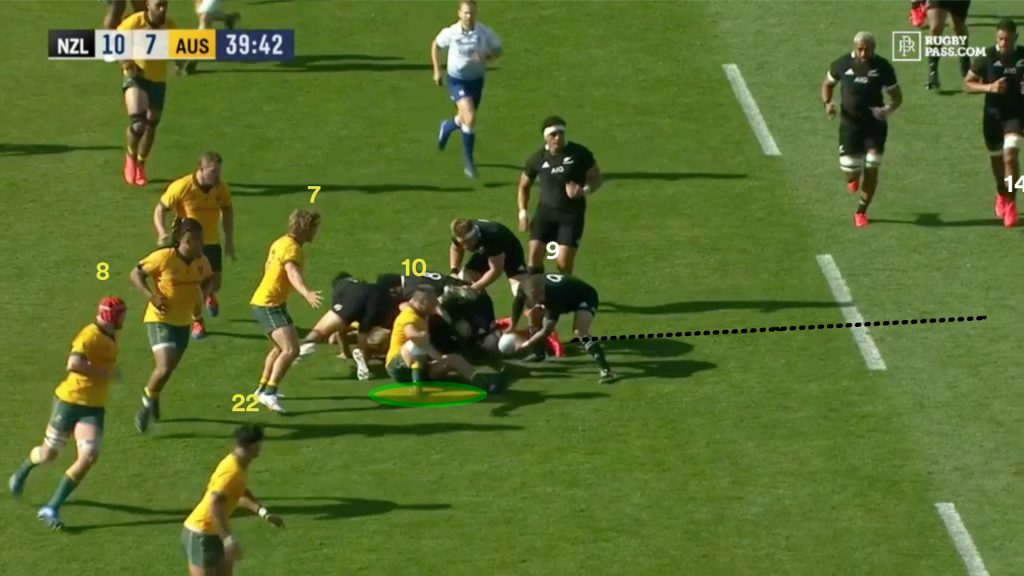
Aaron Smith (9) spied the massive disconnect between Harry Wilson (8) and Ned Hanigan (6) in the process of folding, and decided to dive over from short range scoring the first try of the day.
The dominant carry by Goodhue is essentially a try assist for Aaron Smith, creating the try by catapulting into the Wallabies inside backs with the gravitational pull of a black hole. If they ball had gone left after the carry, the All Blacks likely score as well, such is the capitulation of the Wallabies inside defence at the focal point stationed by O’Connor.
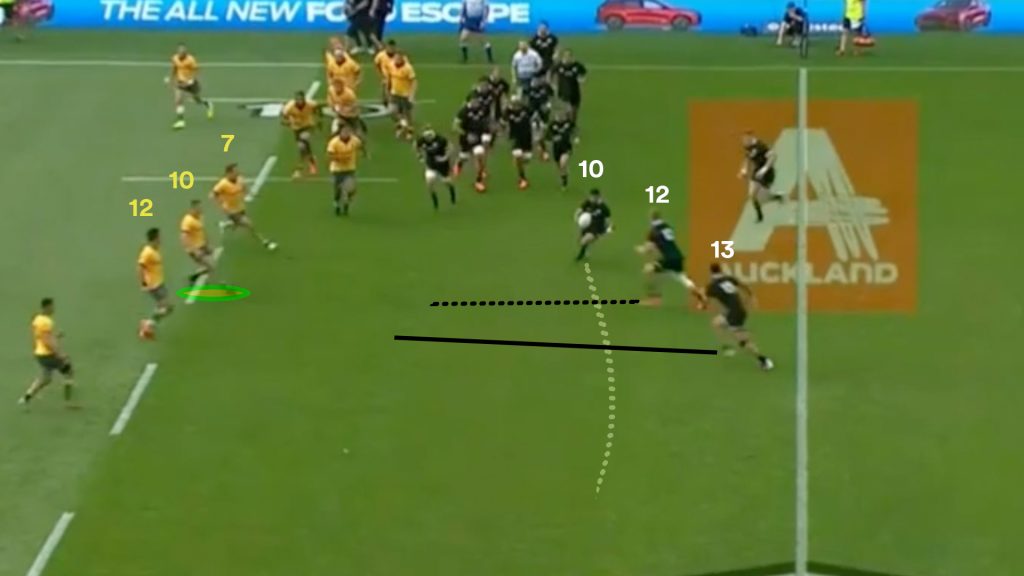
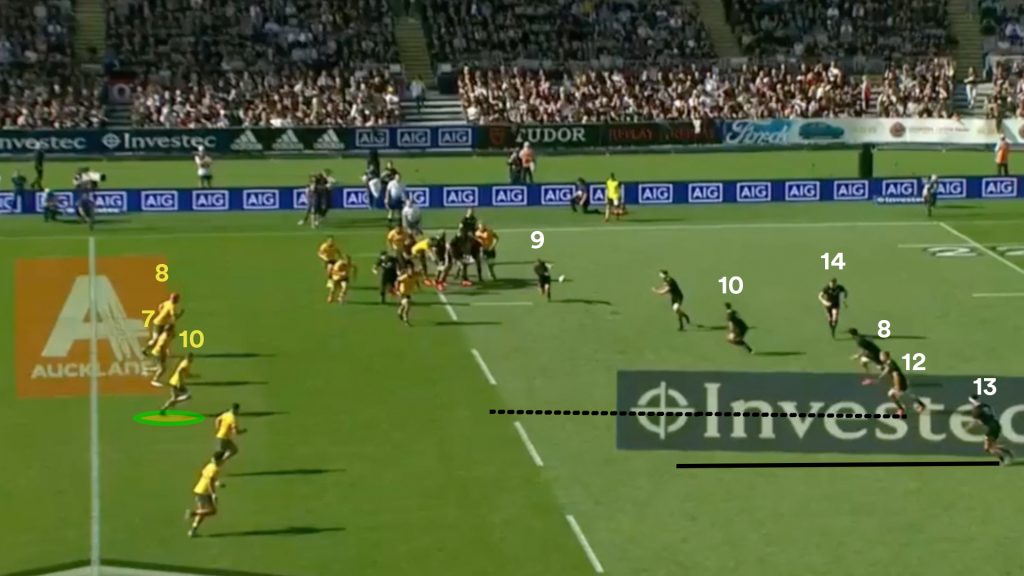
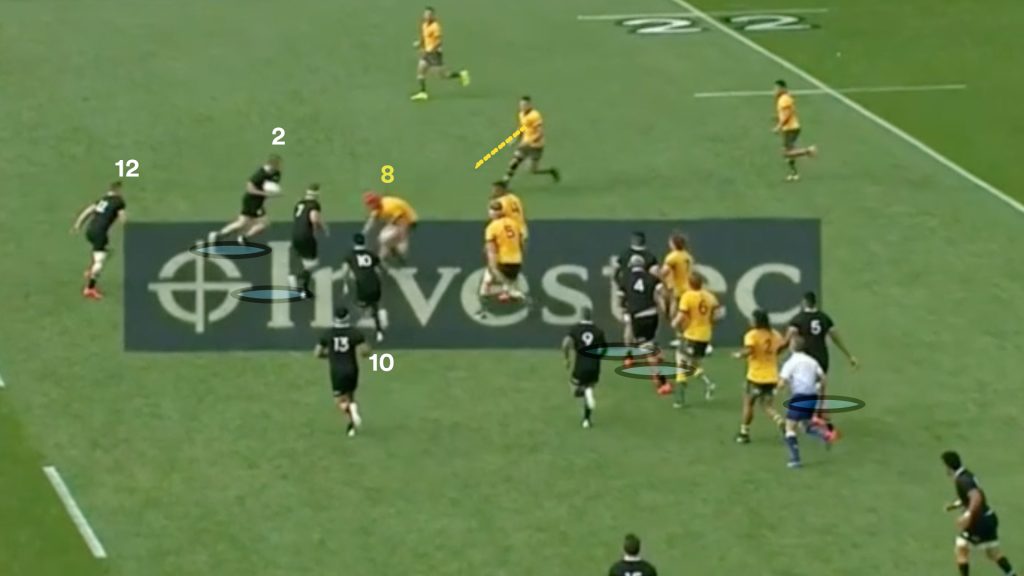
The All Blacks were simply relentless with sending traffic at James O’Connor, looking to puncture the Wallabies defence where ever he was. From a short line out, the All Blacks use an expanded version of the arrowhead play.
Although they have loose forward options scattered throughout the formation to provide some doubt for the defence, Mo’unga immediately pivots and finds Goodhue on the charge again with Liernert-Brown (13) in support.
The All Blacks play away from the stronger defenders in the inside channel, Harry Wilson (8) and Michael Hooper (7), and run directly at the third man out O’Connor.
Again Goodhue attacked the outside shoulder, in order to bait the outside man Paisami to help O’Connor out.
O’Connor and Paisami are left at the bottom of that ruck, giving the remaining All Black backs a numbers advantage and a soft defensive line. As Aaron Smith (9) wound up his pass, the Wallaby forwards are still getting around the corner and not in a position to generate decent line speed.
Goodhue fulfilled this role at inside centre extremely well, carrying strong and using deft footwork to find and attack the space. These plays have usually been centred around the likes of Sonny Bill Williams and Ngani Laumape who are natural power runners with silky offloading skills.
Goodhue was just as effective as any of the power 12s the All Blacks have had in the past, but with the added ability to distribute to the wider channels having honed his passing game at outside centre at the Crusaders.
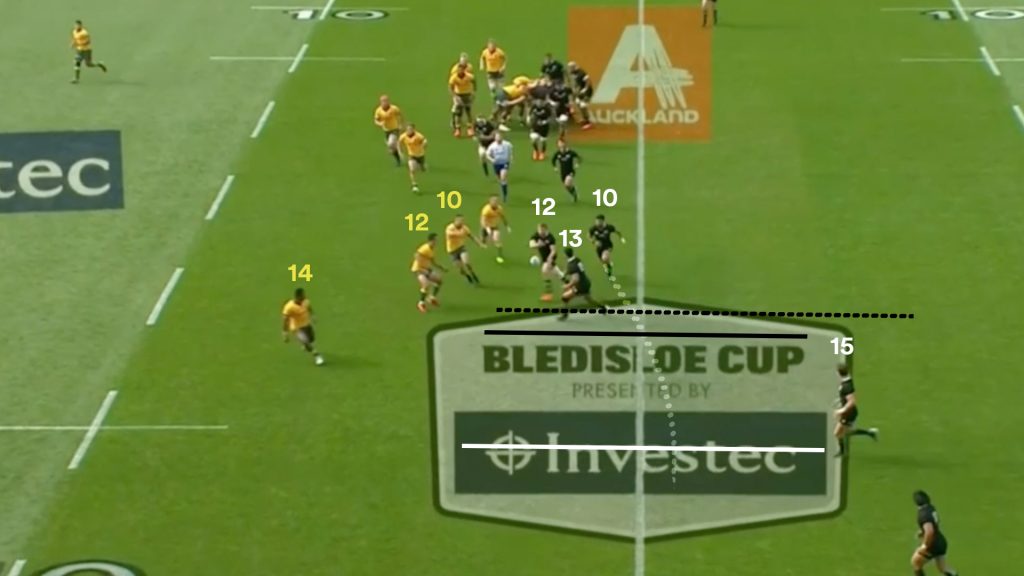
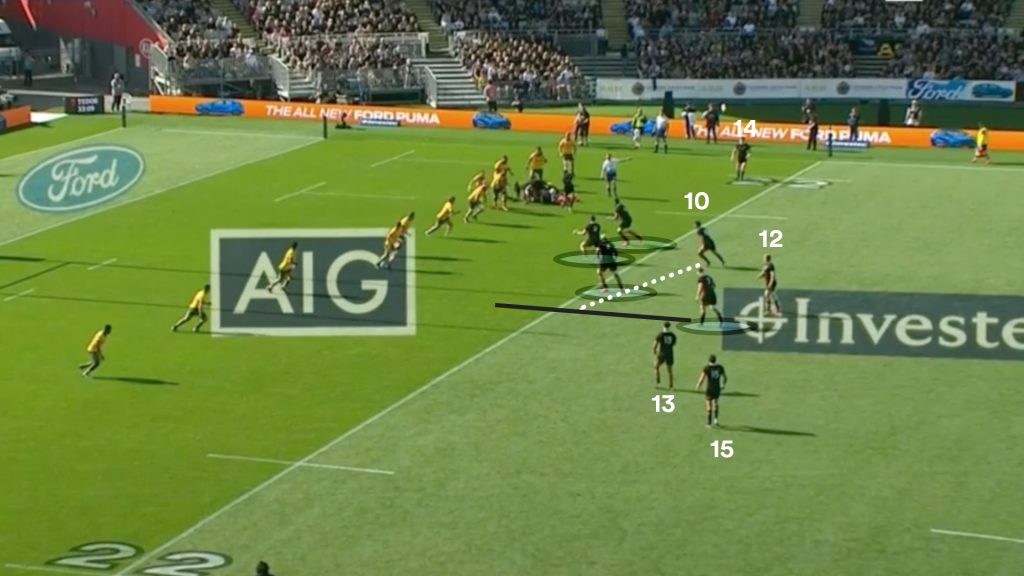
On this exit play, the All Blacks again use the 12-15 skip pass, that failed the first time round, out of the arrowhead formation to free up Beauden Barrett on the outside while the Wallabies are set up to cover a kick.
If Goodhue can continue to generate dominant carries that force two-man tackles, the All Blacks will be able to use his rounded skillset to attack from at the inside centre position like this. They can just as easily hit width with his long pass or bully inside backs with his carry, freeing up flyhalf Mo’unga to get involved on later phases.
The biggest beneficiary of the strategic change was perhaps Mo’unga, who could sit back and wait for his opportunities to get involved when the defence was already battered.
A common Crusader shape with a 3-man pod off 9 and 1 foward outside 10.
Mo’unga lined up behind three-man pods consistently, watching his pack take on the Wallaby line while he waited for the opportunity to run off the backdoor screens.
Below is a typical Crusader open side setup, often used between their own 22-metre and 40-metre line during exit situations as an escape option. When Mo’unga recieves the pass out the back of the pod, he can use the detached forward as a flat option or as a decoy, hitting Jack Goodhue (12) behind him starting a release to the outside backs.
It was a similar picture for Mo’unga when he sent Patrick Tuipolutu through a gaping hole in the second half in the lead up to Sam Cane’s try.
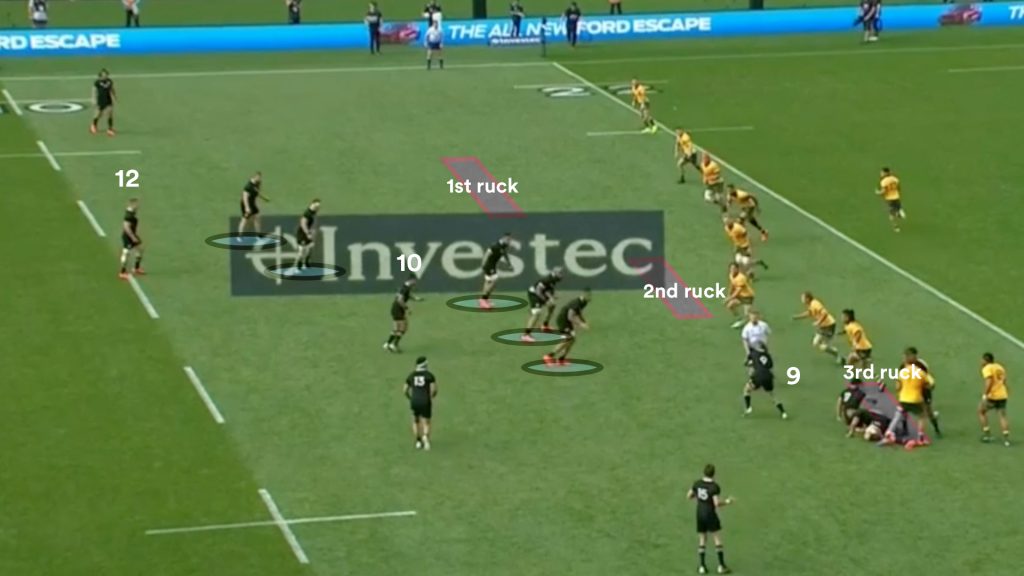
On launch plays, it was often Goodhue on first phase followed by more carries on second and third leaving Mo’unga to get involved later in the phase cuont.
A power launch early in the second half allowed Mo’unga to do what he usually does with the Crusaders, which is pick apart defences. After sending a rampaging Caleb Clarke through James O’Connor and Michael Hooper from the top of the line out, the All Blacks use Tuipulotu and Savea to carry on second and third phase to set up this shape switching back to the left on the fourth.
Caleb Clarke charges through Michael Hooper and James O’Connor to generate momentum on the first phase.
After three phase going right from the line out (mapped out above), the All Blacks fall into a common shape with Mo’unga in behind a pod of three and Goodhue patrolling a pod of two outside him.
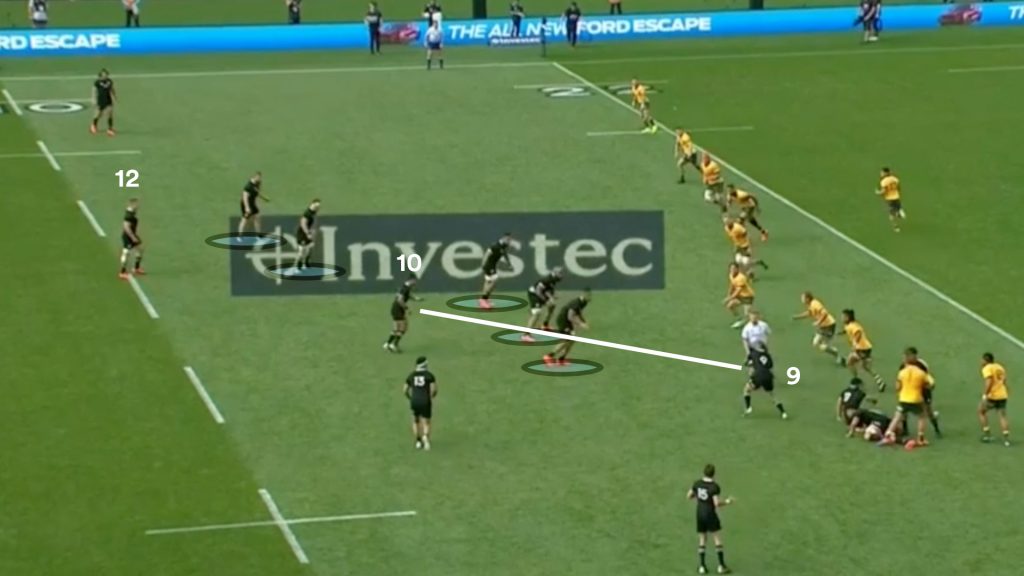
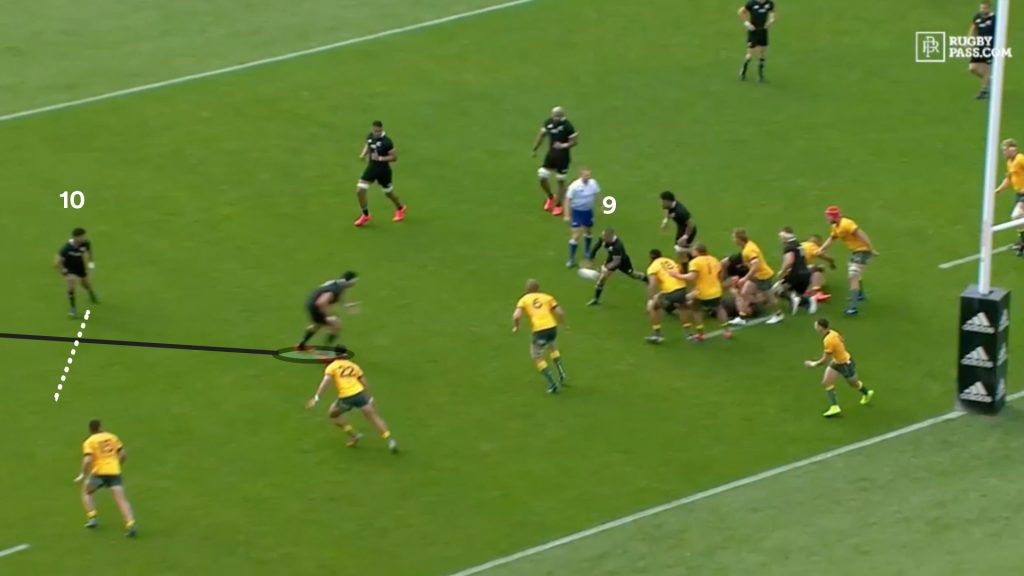
Aaron Smith (9) connected direct with Mo’unga in order to accelerate the movement toward the left edge.
Mo’unga sensed the oncoming rush from Harry Wilson, who had picked out early Sam Cane as his target, and fires across his face to Dane Coles.
The Wallaby Number 8 has a habit of man-watching, locking on early to an assignment and disregarding the ball. On Aaron Smith’s try last week on the line out play, Wilson defending at first reciever failed to look at either Codie Taylor or George Bridge on his inside channel, resulting in Bridge getting an easy line break.
Again on this occasion Wilson’s defensive preference failed him. The All Black hooker takes the gap to breach Australia’s 22 and put the All Blacks deep on attack on the back of Mo’unga’s perfectly placed ball.
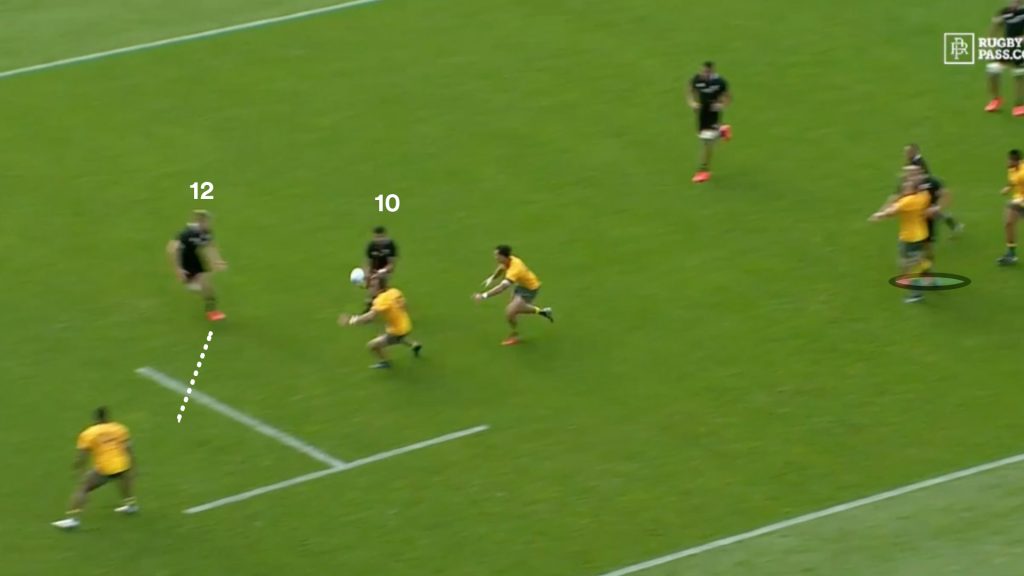
Mo’unga gets a second touch on the next phase, keeping the ball in play with a basketball pass back inside to Caleb Clarke. After five straight forward carries to the right, Mo’unga is in place to put the finishing touch on the power play that started way back with Clarke’s strong initial carry.
The finish is quintessential Crusaders, playing flat, with Mo’unga flirting with the defence and Goodhue offloading in contact as he so often does in Super Rugby.
The All Blacks found a winning formula, but it was far from a clinical performance. Although they were dominant over the gain line, a slew of handling errors in the first half coughed up possession in attacking zones and kept the score close at 10-7.
It took a 10-minute period early in the second half to jumpstart the side, first through the try to Jordie Barrett above through a well executed set and then through an electric kick return to Caleb Clarke that was finished by Ardie Savea to blow the lead out to 20-7.
There is a lot of room for improvement on the execution side, which bodes well for the All Blacks who have found a way to beat the Wallabies by bullying them through power. If they execute, it will be a bloodbath. Dave Rennie’s side must find a renewed resolve in defence to combat this style of play as the All Blacks new philosophy of running over the opposition is going to continue.
They must protect James O’Connor by perhaps switching him out to centre where he played last year, to lower his load in defence on first phase. It is hard to see the All Blacks stopping from sending men down his channel when it proved so profitable.
With adoption of Crusader systems, Mo’unga’s comfort level as the All Black 10 will continue to grow which the Wallabies will need to find an answer for. The problem is, no one at Super Rugby level has yet.
Heading back to Australia for the final two tests, the Wallabies will need to not only adapt but lift up a notch just as the All Blacks did after a lacklustre draw.
If you’ve enjoyed this article, please share it with friends or on social media. We rely solely on new subscribers to fund high-quality journalism and appreciate you sharing this so we can continue to grow, produce more quality content and support our writers.
No {{resultsType == 0 ? "fixtures" : "results"}} for {{resultName()}}.
{{article.cp.n}}
{{article.t}}
{{article.e.name}}
{{article.c}}
{{article.d}}
No news results for {{resultName()}}.
{{item.n}}
No RPTV results for {{resultName()}}.
Popular
{{comp.n}}
Tournament
{{team.n}}
Team
{{player.n}}
{{player.t}}
Edition & Time Zone
{{current.name}}
Set time zone automatically
{{selectedTimezoneTitle}} (auto)
Choose a different time zone
Editions
{{item.title}}
Change Time Zone
{{item.title}}
[{"tz":"Africa\/Abidjan","location":"Abidjan","code":"CI","country":"Cate d'Ivoire","title":"Abidjan - Cote d'Ivoire"},{"tz":"Africa\/Accra","location":"Accra","code":"GH","country":"Ghana","title":"Accra - Ghana"},{"tz":"Africa\/Addis_Ababa","location":"AddisAbaba","code":"ET","country":"Ethiopia","title":"Addis Ababa - Ethiopia"},{"tz":"Africa\/Algiers","location":"Algiers","code":"DZ","country":"Algeria","title":"Algiers - Algeria"},{"tz":"Africa\/Asmara","location":"Asmara","code":"ER","country":"Eritrea","title":"Asmara - Eritrea"},{"tz":"Africa\/Bamako","location":"Bamako","code":"ML","country":"Mali","title":"Bamako - Mali"},{"tz":"Africa\/Bangui","location":"Bangui","code":"CF","country":"Central African Republic","title":"Bangui - Central African Republic"},{"tz":"Africa\/Banjul","location":"Banjul","code":"GM","country":"Gambia","title":"Banjul - Gambia"},{"tz":"Africa\/Bissau","location":"Bissau","code":"GW","country":"Guinea-Bissau","title":"Bissau - Guinea-Bissau"},{"tz":"Africa\/Blantyre","location":"Blantyre","code":"MW","country":"Malawi","title":"Blantyre - Malawi"},{"tz":"Africa\/Brazzaville","location":"Brazzaville","code":"CG","country":"Congo (Brazzaville)","title":"Brazzaville - The Republic of the Congo"},{"tz":"Africa\/Bujumbura","location":"Bujumbura","code":"BI","country":"Burundi","title":"Bujumbura - Burundi"},{"tz":"Africa\/Cairo","location":"Cairo","code":"EG","country":"Egypt","title":"Cairo - Egypt"},{"tz":"Africa\/Casablanca","location":"Casablanca","code":"MA","country":"Morocco","title":"Casablanca - Morocco"},{"tz":"Africa\/Ceuta","location":"Ceuta","code":"ES","country":"Spain","title":"Ceuta - Spain"},{"tz":"Africa\/Conakry","location":"Conakry","code":"GN","country":"Guinea","title":"Conakry - Guinea"},{"tz":"Africa\/Dakar","location":"Dakar","code":"SN","country":"Senegal","title":"Dakar - Senegal"},{"tz":"Africa\/Dar_es_Salaam","location":"DaresSalaam","code":"TZ","country":"Tanzania","title":"Dar es Salaam - Tanzania"},{"tz":"Africa\/Djibouti","location":"Djibouti","code":"DJ","country":"Djibouti","title":"Djibouti"},{"tz":"Africa\/Douala","location":"Douala","code":"CM","country":"Cameroon","title":"Douala - Cameroon"},{"tz":"Africa\/El_Aaiun","location":"ElAaiun","code":"EH","country":"Western Sahara","title":"El Aaiun - Western Sahara"},{"tz":"Africa\/Freetown","location":"Freetown","code":"SL","country":"Sierra Leone","title":"Freetown - Sierra Leone"},{"tz":"Africa\/Gaborone","location":"Gaborone","code":"BW","country":"Botswana","title":"Gaborone - Botswana"},{"tz":"Africa\/Harare","location":"Harare","code":"ZW","country":"Zimbabwe","title":"Harare - Zimbabwe"},{"tz":"Africa\/Johannesburg","location":"Johannesburg","code":"ZA","country":"South Africa","title":"Johannesburg - South Africa"},{"tz":"Africa\/Juba","location":"Juba","code":"SS","country":"South Sudan","title":"Juba - South Sudan"},{"tz":"Africa\/Kampala","location":"Kampala","code":"UG","country":"Uganda","title":"Kampala - Uganda"},{"tz":"Africa\/Khartoum","location":"Khartoum","code":"SD","country":"Sudan","title":"Khartoum - Sudan"},{"tz":"Africa\/Kigali","location":"Kigali","code":"RW","country":"Rwanda","title":"Kigali - Rwanda"},{"tz":"Africa\/Kinshasa","location":"Kinshasa","code":"CD","country":"Congo (Kinshasa)","title":"Kinshasa - The Democratic Republic of Congo"},{"tz":"Africa\/Lagos","location":"Lagos","code":"NG","country":"Nigeria","title":"Lagos - Nigeria "},{"tz":"Africa\/Libreville","location":"Libreville","code":"GA","country":"Gabon","title":"Libreville - Gabon"},{"tz":"Africa\/Lome","location":"Lome","code":"TG","country":"Togo","title":"Lome - Togo"},{"tz":"Africa\/Luanda","location":"Luanda","code":"AO","country":"Angola","title":"Luanda - Angola"},{"tz":"Africa\/Lubumbashi","location":"Lubumbashi","code":"CD","country":"Congo (Kinshasa)","title":"Lubumbashi - The Democratic Republic of Congo"},{"tz":"Africa\/Lusaka","location":"Lusaka","code":"ZM","country":"Zambia","title":"Lusaka - Zambia"},{"tz":"Africa\/Malabo","location":"Malabo","code":"GQ","country":"Equatorial Guinea","title":"Malabo - Equatorial Guinea"},{"tz":"Africa\/Maputo","location":"Maputo","code":"MZ","country":"Mozambique","title":"Maputo - Mozambique"},{"tz":"Africa\/Maseru","location":"Maseru","code":"LS","country":"Lesotho","title":"Maseru - Lesotho"},{"tz":"Africa\/Mbabane","location":"Mbabane","code":"SZ","country":"Swaziland","title":"Mbabane - Eswatini"},{"tz":"Africa\/Mogadishu","location":"Mogadishu","code":"SO","country":"Somalia","title":"Mogadishu - Somalia"},{"tz":"Africa\/Monrovia","location":"Monrovia","code":"LR","country":"Liberia","title":"Monrovia - Liberia"},{"tz":"Africa\/Nairobi","location":"Nairobi","code":"KE","country":"Kenya","title":"Nairobi - Kenya"},{"tz":"Africa\/Ndjamena","location":"Ndjamena","code":"TD","country":"Chad","title":"Ndjamena - Chad"},{"tz":"Africa\/Niamey","location":"Niamey","code":"NE","country":"Niger","title":"Niamey - Niger"},{"tz":"Africa\/Nouakchott","location":"Nouakchott","code":"MR","country":"Mauritania","title":"Nouakchott - Mauritania"},{"tz":"Africa\/Ouagadougou","location":"Ouagadougou","code":"BF","country":"Burkina Faso","title":"Ouagadougou - Burkina Faso"},{"tz":"Africa\/Porto-Novo","location":"Porto-Novo","code":"BJ","country":"Benin","title":"Porto-Novo - Benin"},{"tz":"Africa\/Sao_Tome","location":"SaoTome","code":"ST","country":"Sao Tome and Principe","title":"Sao Tome and Principe"},{"tz":"Africa\/Tripoli","location":"Tripoli","code":"LY","country":"Libya","title":"Tripoli - Libya"},{"tz":"Africa\/Tunis","location":"Tunis","code":"TN","country":"Tunisia","title":"Tunis - Tunisia"},{"tz":"Africa\/Windhoek","location":"Windhoek","code":"NA","country":"Namibia","title":"Windhoek - Namibia"},{"tz":"America\/Adak","location":"Adak","code":"US","country":"United States of America","title":"Adak - Alaska - United States of America"},{"tz":"America\/Anchorage","location":"Anchorage","code":"US","country":"United States of America","title":"Anchorage - Alaska - United States of America"},{"tz":"America\/Anguilla","location":"Anguilla","code":"AI","country":"Anguilla","title":"Anguilla"},{"tz":"America\/Antigua","location":"Antigua","code":"AG","country":"Antigua and Barbuda","title":"Antigua and Barbuda"},{"tz":"America\/Araguaina","location":"Araguaina","code":"BR","country":"Brazil","title":"Araguaina - Brazil"},{"tz":"America\/Argentina\/Buenos_Aires","location":"America","code":"AR","country":"Argentina","title":"Buenos Aires - Argentina"},{"tz":"America\/Argentina\/Catamarca","location":"America","code":"AR","country":"Argentina","title":"Catamarca - Argentina"},{"tz":"America\/Argentina\/Cordoba","location":"America","code":"AR","country":"Argentina","title":"Cordoba - Argentina"},{"tz":"America\/Argentina\/Jujuy","location":"America","code":"AR","country":"Argentina","title":"Jujuy - Argentina"},{"tz":"America\/Argentina\/La_Rioja","location":"America","code":"AR","country":"Argentina","title":"La Rioja - Argentina"},{"tz":"America\/Argentina\/Mendoza","location":"America","code":"AR","country":"Argentina","title":"Mendoza - Argentina"},{"tz":"America\/Argentina\/Rio_Gallegos","location":"America","code":"AR","country":"Argentina","title":"Rio Gallegos - Argentina"},{"tz":"America\/Argentina\/Salta","location":"America","code":"AR","country":"Argentina","title":"Salta - Argentina"},{"tz":"America\/Argentina\/San_Juan","location":"America","code":"AR","country":"Argentina","title":"San Juan - Argentina"},{"tz":"America\/Argentina\/San_Luis","location":"America","code":"AR","country":"Argentina","title":"San Luis - Argentina"},{"tz":"America\/Argentina\/Tucuman","location":"America","code":"AR","country":"Argentina","title":"Tucuman - Argentina"},{"tz":"America\/Argentina\/Ushuaia","location":"America","code":"AR","country":"Argentina","title":"Ushuaia - Argentina"},{"tz":"America\/Aruba","location":"Aruba","code":"AW","country":"Aruba","title":"Aruba"},{"tz":"America\/Asuncion","location":"Asuncion","code":"PY","country":"Paraguay","title":"Asuncion - Paraguay"},{"tz":"America\/Atikokan","location":"Atikokan","code":"CA","country":"Canada","title":"Atikokan - Canada"},{"tz":"America\/Bahia","location":"Bahia","code":"BR","country":"Brazil","title":"Bahia - Brazil"},{"tz":"America\/Bahia_Banderas","location":"BahiaBanderas","code":"MX","country":"Mexico","title":"Bahia Banderas - Mexico"},{"tz":"America\/Barbados","location":"Barbados","code":"BB","country":"Barbados","title":"Barbados"},{"tz":"America\/Belem","location":"Belem","code":"BR","country":"Brazil","title":"Belem - Brazil"},{"tz":"America\/Belize","location":"Belize","code":"BZ","country":"Belize","title":"Belize"},{"tz":"America\/Blanc-Sablon","location":"Blanc-Sablon","code":"CA","country":"Canada","title":"Blanc-Sablon - Canada"},{"tz":"America\/Boa_Vista","location":"BoaVista","code":"BR","country":"Brazil","title":"Boa Vista - Brazil"},{"tz":"America\/Bogota","location":"Bogota","code":"CO","country":"Colombia","title":"Bogota - Colombia"},{"tz":"America\/Boise","location":"Boise","code":"US","country":"United States of America","title":"Boise - Idaho - United States of America"},{"tz":"America\/Cambridge_Bay","location":"CambridgeBay","code":"CA","country":"Canada","title":"Cambridge Bay - Canada"},{"tz":"America\/Campo_Grande","location":"CampoGrande","code":"BR","country":"Brazil","title":"Campo Grande - Brazil"},{"tz":"America\/Cancun","location":"Cancun","code":"MX","country":"Mexico","title":"Cancun - Mexico"},{"tz":"America\/Caracas","location":"Caracas","code":"VE","country":"Venezuela (Bolivarian Republic)","title":"Caracas - Venezuela"},{"tz":"America\/Cayenne","location":"Cayenne","code":"GF","country":"French Guiana","title":"Cayenne - French Guiana"},{"tz":"America\/Cayman","location":"Cayman","code":"KY","country":"Cayman Islands","title":"Cayman Islands"},{"tz":"America\/Chicago","location":"Chicago","code":"US","country":"United States of America","title":"Chicago - Illinois - United States of America"},{"tz":"America\/Chihuahua","location":"Chihuahua","code":"MX","country":"Mexico","title":"Chihuahua - Mexico"},{"tz":"America\/Ciudad_Juarez","location":"CiudadJuarez","code":"MX","country":"Mexico","title":"Ciudad Juarez - Mexico"},{"tz":"America\/Costa_Rica","location":"CostaRica","code":"CR","country":"Costa Rica","title":"Costa Rica"},{"tz":"America\/Creston","location":"Creston","code":"CA","country":"Canada","title":"Creston - Canada"},{"tz":"America\/Cuiaba","location":"Cuiaba","code":"BR","country":"Brazil","title":"Cuiaba - Brazil"},{"tz":"America\/Curacao","location":"Curacao","code":"CW","country":"","title":"Curacao"},{"tz":"America\/Danmarkshavn","location":"Danmarkshavn","code":"GL","country":"Greenland","title":"Danmarkshavn - Greenland"},{"tz":"America\/Dawson","location":"Dawson","code":"CA","country":"Canada","title":"Dawson - Canada"},{"tz":"America\/Dawson_Creek","location":"DawsonCreek","code":"CA","country":"Canada","title":"Dawson Creek - Canada"},{"tz":"America\/Denver","location":"Denver","code":"US","country":"United States of America","title":"Denver - Colorado - United States of America"},{"tz":"America\/Detroit","location":"Detroit","code":"US","country":"United States of America","title":"Detroit - Michigan - United States of America"},{"tz":"America\/Dominica","location":"Dominica","code":"DM","country":"Dominica","title":"Dominica"},{"tz":"America\/Edmonton","location":"Edmonton","code":"CA","country":"Canada","title":"Edmonton - Canada"},{"tz":"America\/Eirunepe","location":"Eirunepe","code":"BR","country":"Brazil","title":"Eirunepe - Brazil"},{"tz":"America\/El_Salvador","location":"ElSalvador","code":"SV","country":"El Salvador","title":"El Salvador"},{"tz":"America\/Fort_Nelson","location":"FortNelson","code":"CA","country":"Canada","title":"Fort Nelson - Canada"},{"tz":"America\/Fortaleza","location":"Fortaleza","code":"BR","country":"Brazil","title":"Fortaleza - Brazil"},{"tz":"America\/Glace_Bay","location":"GlaceBay","code":"CA","country":"Canada","title":"Glace Bay - Canada"},{"tz":"America\/Goose_Bay","location":"GooseBay","code":"CA","country":"Canada","title":"Goose Bay - Canada"},{"tz":"America\/Grand_Turk","location":"GrandTurk","code":"TC","country":"Turks and Caicos Islands","title":"Grand Turk - Turks and Caicos Islands"},{"tz":"America\/Grenada","location":"Grenada","code":"GD","country":"Grenada","title":"Grenada"},{"tz":"America\/Guadeloupe","location":"Guadeloupe","code":"GP","country":"Guadeloupe","title":"Guadeloupe"},{"tz":"America\/Guatemala","location":"Guatemala","code":"GT","country":"Guatemala","title":"Guatemala"},{"tz":"America\/Guayaquil","location":"Guayaquil","code":"EC","country":"Ecuador","title":"Guayaquil - Ecuador"},{"tz":"America\/Guyana","location":"Guyana","code":"GY","country":"Guyana","title":"Guyana"},{"tz":"America\/Halifax","location":"Halifax","code":"CA","country":"Canada","title":"Halifax - Canada"},{"tz":"America\/Havana","location":"Havana","code":"CU","country":"Cuba","title":"Havana - Cuba"},{"tz":"America\/Hermosillo","location":"Hermosillo","code":"MX","country":"Mexico","title":"Hermosillo - Mexico"},{"tz":"America\/Indiana\/Indianapolis","location":"America","code":"US","country":"United States of America","title":"Indianapolis - Indiana - United States of America"},{"tz":"America\/Indiana\/Knox","location":"America","code":"US","country":"United States of America","title":"Knox - Indiana - United States of America"},{"tz":"America\/Indiana\/Marengo","location":"America","code":"US","country":"United States of America","title":"Marengo - Indiana - United States of America"},{"tz":"America\/Indiana\/Petersburg","location":"America","code":"US","country":"United States of America","title":"Petersburg - Indiana - United States of America"},{"tz":"America\/Indiana\/Tell_City","location":"America","code":"US","country":"United States of America","title":"Tell City - Indiana - United States of America"},{"tz":"America\/Indiana\/Vevay","location":"America","code":"US","country":"United States of America","title":"Vevay - Indiana - United States of America"},{"tz":"America\/Indiana\/Vincennes","location":"America","code":"US","country":"United States of America","title":"Vincennes - Indiana - United States of America"},{"tz":"America\/Indiana\/Winamac","location":"America","code":"US","country":"United States of America","title":"Winamac - Indiana - United States of America"},{"tz":"America\/Inuvik","location":"Inuvik","code":"CA","country":"Canada","title":"Inuvik - Canada"},{"tz":"America\/Iqaluit","location":"Iqaluit","code":"CA","country":"Canada","title":"Iqaluit - Canada"},{"tz":"America\/Jamaica","location":"Jamaica","code":"JM","country":"Jamaica","title":"Jamaica"},{"tz":"America\/Juneau","location":"Juneau","code":"US","country":"United States of America","title":"Juneau - Alaska - United States of America"},{"tz":"America\/Kentucky\/Louisville","location":"America","code":"US","country":"United States of America","title":"Louisville - Kentucky - United States of America"},{"tz":"America\/Kentucky\/Monticello","location":"America","code":"US","country":"United States of America","title":"Monticello - Kentucky - United States of America"},{"tz":"America\/Kralendijk","location":"Kralendijk","code":"BQ","country":"","title":"Kralendijk - Bonaire"},{"tz":"America\/La_Paz","location":"LaPaz","code":"BO","country":"Bolivia","title":"La Paz - Bolivia"},{"tz":"America\/Lima","location":"Lima","code":"PE","country":"Peru","title":"Lima - Peru"},{"tz":"America\/Los_Angeles","location":"LosAngeles","code":"US","country":"United States of America","title":"Los Angeles - California - United States of America"},{"tz":"America\/Lower_Princes","location":"LowerPrinces","code":"SX","country":"","title":"Lower Princes - Sint Maarten"},{"tz":"America\/Maceio","location":"Maceio","code":"BR","country":"Brazil","title":"Maceio - Brazil"},{"tz":"America\/Managua","location":"Managua","code":"NI","country":"Nicaragua","title":"Managua - Nicaragua"},{"tz":"America\/Manaus","location":"Manaus","code":"BR","country":"Brazil","title":"Manaus - Brazil"},{"tz":"America\/Marigot","location":"Marigot","code":"MF","country":"Saint-Martin (French part)","title":"Marigot - Saint-Martin"},{"tz":"America\/Martinique","location":"Martinique","code":"MQ","country":"Martinique","title":"Martinique"},{"tz":"America\/Matamoros","location":"Matamoros","code":"MX","country":"Mexico","title":"Matamoros - Mexico"},{"tz":"America\/Mazatlan","location":"Mazatlan","code":"MX","country":"Mexico","title":"Mazatlan - Mexico"},{"tz":"America\/Menominee","location":"Menominee","code":"US","country":"United States of America","title":"Menominee - Wisconsin - United States of America"},{"tz":"America\/Merida","location":"Merida","code":"MX","country":"Mexico","title":"Merida - Mexico"},{"tz":"America\/Metlakatla","location":"Metlakatla","code":"US","country":"United States of America","title":"Metlakatla - Alaska - United States of America"},{"tz":"America\/Mexico_City","location":"MexicoCity","code":"MX","country":"Mexico","title":"Mexico City - Mexico"},{"tz":"America\/Miquelon","location":"Miquelon","code":"PM","country":"Saint Pierre and Miquelon","title":"Miquelon - Saint Pierre and Miquelon"},{"tz":"America\/Moncton","location":"Moncton","code":"CA","country":"Canada","title":"Moncton - Canada"},{"tz":"America\/Monterrey","location":"Monterrey","code":"MX","country":"Mexico","title":"Monterrey - Mexico"},{"tz":"America\/Montevideo","location":"Montevideo","code":"UY","country":"Uruguay","title":"Montevideo - Uruguay"},{"tz":"America\/Montserrat","location":"Montserrat","code":"MS","country":"Montserrat","title":"Montserrat"},{"tz":"America\/Nassau","location":"Nassau","code":"BS","country":"Bahamas","title":"Nassau - Bahamas"},{"tz":"America\/New_York","location":"NewYork","code":"US","country":"United States of America","title":"New York - United States of America"},{"tz":"America\/Nome","location":"Nome","code":"US","country":"United States of America","title":"Nome - Alaska - United States of America"},{"tz":"America\/Noronha","location":"Noronha","code":"BR","country":"Brazil","title":"Noronha - Brazil"},{"tz":"America\/North_Dakota\/Beulah","location":"America","code":"US","country":"United States of America","title":"Beulah - North Dakota - United States of America"},{"tz":"America\/North_Dakota\/Center","location":"America","code":"US","country":"United States of America","title":"Center - North Dakota - United States of America"},{"tz":"America\/North_Dakota\/New_Salem","location":"America","code":"US","country":"United States of America","title":"New Salem - North Dakota - United States of America"},{"tz":"America\/Nuuk","location":"Nuuk","code":"GL","country":"Greenland","title":"Nuuk - Greenland"},{"tz":"America\/Ojinaga","location":"Ojinaga","code":"MX","country":"Mexico","title":"Ojinaga - Mexico"},{"tz":"America\/Panama","location":"Panama","code":"PA","country":"Panama","title":"Panama"},{"tz":"America\/Paramaribo","location":"Paramaribo","code":"SR","country":"Suriname","title":"Paramaribo - Suriname"},{"tz":"America\/Phoenix","location":"Phoenix","code":"US","country":"United States of America","title":"Phoenix - Arizona - United States of America"},{"tz":"America\/Port-au-Prince","location":"Port-au-Prince","code":"HT","country":"Haiti","title":"Port-au-Prince - Haiti"},{"tz":"America\/Port_of_Spain","location":"PortofSpain","code":"TT","country":"Trinidad and Tobago","title":"Port of Spain - Trinidad and Tobago"},{"tz":"America\/Porto_Velho","location":"PortoVelho","code":"BR","country":"Brazil","title":"Porto Velho - Brazil"},{"tz":"America\/Puerto_Rico","location":"PuertoRico","code":"PR","country":"Puerto Rico","title":"Puerto Rico"},{"tz":"America\/Punta_Arenas","location":"PuntaArenas","code":"CL","country":"Chile","title":"Punta Arenas - Chile"},{"tz":"America\/Rankin_Inlet","location":"RankinInlet","code":"CA","country":"Canada","title":"Rankin Inlet - Canada"},{"tz":"America\/Recife","location":"Recife","code":"BR","country":"Brazil","title":"Recife - Brazil"},{"tz":"America\/Regina","location":"Regina","code":"CA","country":"Canada","title":"Regina - Canada"},{"tz":"America\/Resolute","location":"Resolute","code":"CA","country":"Canada","title":"Resolute - Canada"},{"tz":"America\/Rio_Branco","location":"RioBranco","code":"BR","country":"Brazil","title":"Rio Branco - Brazil"},{"tz":"America\/Santarem","location":"Santarem","code":"BR","country":"Brazil","title":"Santarem - Brazil"},{"tz":"America\/Santiago","location":"Santiago","code":"CL","country":"Chile","title":"Santiago - Chile"},{"tz":"America\/Santo_Domingo","location":"SantoDomingo","code":"DO","country":"Dominican Republic","title":"Santo Domingo - Dominican Republic"},{"tz":"America\/Sao_Paulo","location":"SaoPaulo","code":"BR","country":"Brazil","title":"Sao Paulo - Brazil"},{"tz":"America\/Scoresbysund","location":"Scoresbysund","code":"GL","country":"Greenland","title":"Scoresbysund - Greenland"},{"tz":"America\/Sitka","location":"Sitka","code":"US","country":"United States of America","title":"Sitka - Alaska - United States of America"},{"tz":"America\/St_Barthelemy","location":"StBarthelemy","code":"BL","country":"Saint-Barthelemy","title":"Saint Barthelemy"},{"tz":"America\/St_Johns","location":"StJohns","code":"CA","country":"Canada","title":"St Johns - Canada"},{"tz":"America\/St_Kitts","location":"StKitts","code":"KN","country":"Saint Kitts and Nevis","title":"Saint Kitts and Nevis"},{"tz":"America\/St_Lucia","location":"StLucia","code":"LC","country":"Saint Lucia","title":"Saint Lucia"},{"tz":"America\/St_Thomas","location":"StThomas","code":"VI","country":"Virgin Islands","title":"St Thomas - US Virgin Islands"},{"tz":"America\/St_Vincent","location":"StVincent","code":"VC","country":"Saint Vincent and Grenadines","title":"Saint Vincent and Grenadines"},{"tz":"America\/Swift_Current","location":"SwiftCurrent","code":"CA","country":"Canada","title":"Swift Current - Canada"},{"tz":"America\/Tegucigalpa","location":"Tegucigalpa","code":"HN","country":"Honduras","title":"Tegucigalpa - Honduras"},{"tz":"America\/Thule","location":"Thule","code":"GL","country":"Greenland","title":"Thule - Greenland"},{"tz":"America\/Tijuana","location":"Tijuana","code":"MX","country":"Mexico","title":"Tijuana - Mexico"},{"tz":"America\/Toronto","location":"Toronto","code":"CA","country":"Canada","title":"Toronto - Canada"},{"tz":"America\/Tortola","location":"Tortola","code":"VG","country":"British Virgin Islands","title":"Tortola - British Virgin Islands"},{"tz":"America\/Vancouver","location":"Vancouver","code":"CA","country":"Canada","title":"Vancouver - Canada"},{"tz":"America\/Whitehorse","location":"Whitehorse","code":"CA","country":"Canada","title":"Whitehorse - Canada"},{"tz":"America\/Winnipeg","location":"Winnipeg","code":"CA","country":"Canada","title":"Winnipeg - Canada"},{"tz":"America\/Yakutat","location":"Yakutat","code":"US","country":"United States of America","title":"Yakutat - Alaska - United States of America"},{"tz":"Antarctica\/Casey","location":"Casey","code":"AQ","country":"Antarctica","title":"Casey - Antarctica"},{"tz":"Antarctica\/Davis","location":"Davis","code":"AQ","country":"Antarctica","title":"Davis - Antarctica"},{"tz":"Antarctica\/DumontDUrville","location":"DumontDUrville","code":"AQ","country":"Antarctica","title":"Dumont D'Urville - Antarctica"},{"tz":"Antarctica\/Macquarie","location":"Macquarie","code":"AU","country":"Australia","title":"Macquarie Island - Australia"},{"tz":"Antarctica\/Mawson","location":"Mawson","code":"AQ","country":"Antarctica","title":"Mawson - Antarctica"},{"tz":"Antarctica\/McMurdo","location":"McMurdo","code":"AQ","country":"Antarctica","title":"McMurdo - Antarctica"},{"tz":"Antarctica\/Palmer","location":"Palmer","code":"AQ","country":"Antarctica","title":"Palmer - Antarctica"},{"tz":"Antarctica\/Rothera","location":"Rothera","code":"AQ","country":"Antarctica","title":"Rothera - Antarctica"},{"tz":"Antarctica\/Syowa","location":"Syowa","code":"AQ","country":"Antarctica","title":"Syowa - Antarctica"},{"tz":"Antarctica\/Troll","location":"Troll","code":"AQ","country":"Antarctica","title":"Troll - Antarctica"},{"tz":"Antarctica\/Vostok","location":"Vostok","code":"AQ","country":"Antarctica","title":"Vostok - Antarctica"},{"tz":"Arctic\/Longyearbyen","location":"Longyearbyen","code":"SJ","country":"Svalbard and Jan Mayen Islands","title":"Longyearbyen - Svalbard and Jan Mayen Islands"},{"tz":"Asia\/Aden","location":"Aden","code":"YE","country":"Yemen","title":"Aden - Yemen"},{"tz":"Asia\/Almaty","location":"Almaty","code":"KZ","country":"Kazakhstan","title":"Almaty - Kazakhstan"},{"tz":"Asia\/Amman","location":"Amman","code":"JO","country":"Jordan","title":"Amman - Jordan"},{"tz":"Asia\/Anadyr","location":"Anadyr","code":"RU","country":"Russia","title":"Anadyr - Russia"},{"tz":"Asia\/Aqtau","location":"Aqtau","code":"KZ","country":"Kazakhstan","title":"Aqtau - Kazakhstan"},{"tz":"Asia\/Aqtobe","location":"Aqtobe","code":"KZ","country":"Kazakhstan","title":"Aqtobe - Kazakhstan"},{"tz":"Asia\/Ashgabat","location":"Ashgabat","code":"TM","country":"Turkmenistan","title":"Ashgabat - Turkmenistan"},{"tz":"Asia\/Atyrau","location":"Atyrau","code":"KZ","country":"Kazakhstan","title":"Atyrau - Kazakhstan"},{"tz":"Asia\/Baghdad","location":"Baghdad","code":"IQ","country":"Iraq","title":"Baghdad - Iraq"},{"tz":"Asia\/Bahrain","location":"Bahrain","code":"BH","country":"Bahrain","title":"Bahrain"},{"tz":"Asia\/Baku","location":"Baku","code":"AZ","country":"Azerbaijan","title":"Baku - Azerbaijan"},{"tz":"Asia\/Bangkok","location":"Bangkok","code":"TH","country":"Thailand","title":"Bangkok - Thailand"},{"tz":"Asia\/Barnaul","location":"Barnaul","code":"RU","country":"Russia","title":"Barnaul - Russia"},{"tz":"Asia\/Beirut","location":"Beirut","code":"LB","country":"Lebanon","title":"Beirut - Lebanon"},{"tz":"Asia\/Bishkek","location":"Bishkek","code":"KG","country":"Kyrgyzstan","title":"Bishkek - Kyrgyzstan"},{"tz":"Asia\/Brunei","location":"Brunei","code":"BN","country":"Brunei Darussalam","title":"Brunei Darussalam"},{"tz":"Asia\/Chita","location":"Chita","code":"RU","country":"Russia","title":"Chita - Russia"},{"tz":"Asia\/Choibalsan","location":"Choibalsan","code":"MN","country":"Mongolia","title":"Choibalsan - Mongolia"},{"tz":"Asia\/Colombo","location":"Colombo","code":"LK","country":"Sri Lanka","title":"Colombo - Sri Lanka"},{"tz":"Asia\/Damascus","location":"Damascus","code":"SY","country":"Syrian Arab Republic (Syria)","title":"Damascus - Syria"},{"tz":"Asia\/Dhaka","location":"Dhaka","code":"BD","country":"Bangladesh","title":"Dhaka - Bangladesh"},{"tz":"Asia\/Dili","location":"Dili","code":"TL","country":"Timor-Leste","title":"Dili - Timor-Leste"},{"tz":"Asia\/Dubai","location":"Dubai","code":"AE","country":"United Arab Emirates","title":"Dubai - United Arab Emirates"},{"tz":"Asia\/Dushanbe","location":"Dushanbe","code":"TJ","country":"Tajikistan","title":"Dushanbe - Tajikistan"},{"tz":"Asia\/Famagusta","location":"Famagusta","code":"CY","country":"Cyprus","title":"Famagusta - Cyprus"},{"tz":"Asia\/Gaza","location":"Gaza","code":"PS","country":"Palestinian Territory","title":"Gaza - Palestinian Territory"},{"tz":"Asia\/Hebron","location":"Hebron","code":"PS","country":"Palestinian Territory","title":"Hebron - Palestinian Territory"},{"tz":"Asia\/Ho_Chi_Minh","location":"HoChiMinh","code":"VN","country":"Viet Nam","title":"Ho Chi Minh City - Vietnam"},{"tz":"Asia\/Hong_Kong","location":"HongKong","code":"HK","country":"Hong Kong","title":"Hong Kong China"},{"tz":"Asia\/Hovd","location":"Hovd","code":"MN","country":"Mongolia","title":"Hovd - Mongolia"},{"tz":"Asia\/Irkutsk","location":"Irkutsk","code":"RU","country":"Russia","title":"Irkutsk - Russia"},{"tz":"Asia\/Jakarta","location":"Jakarta","code":"ID","country":"Indonesia","title":"Jakarta - Indonesia"},{"tz":"Asia\/Jayapura","location":"Jayapura","code":"ID","country":"Indonesia","title":"Jayapura - Indonesia"},{"tz":"Asia\/Jerusalem","location":"Jerusalem","code":"IL","country":"Israel","title":"Jerusalem - Israel"},{"tz":"Asia\/Kabul","location":"Kabul","code":"AF","country":"Afghanistan","title":"Kabul - Afghanistan"},{"tz":"Asia\/Kamchatka","location":"Kamchatka","code":"RU","country":"Russia","title":"Kamchatka - Russia"},{"tz":"Asia\/Karachi","location":"Karachi","code":"PK","country":"Pakistan","title":"Karachi - Pakistan"},{"tz":"Asia\/Kathmandu","location":"Kathmandu","code":"NP","country":"Nepal","title":"Kathmandu - Nepal"},{"tz":"Asia\/Khandyga","location":"Khandyga","code":"RU","country":"Russia","title":"Khandyga - Russia"},{"tz":"Asia\/Kolkata","location":"Kolkata","code":"IN","country":"India","title":"Kolkata - India"},{"tz":"Asia\/Krasnoyarsk","location":"Krasnoyarsk","code":"RU","country":"Russia","title":"Krasnoyarsk - Russia"},{"tz":"Asia\/Kuala_Lumpur","location":"KualaLumpur","code":"MY","country":"Malaysia","title":"Kuala Lumpur - Malaysia"},{"tz":"Asia\/Kuching","location":"Kuching","code":"MY","country":"Malaysia","title":"Kuching - Malaysia"},{"tz":"Asia\/Kuwait","location":"Kuwait","code":"KW","country":"Kuwait","title":"Kuwait"},{"tz":"Asia\/Macau","location":"Macau","code":"MO","country":"Macau","title":"Macau"},{"tz":"Asia\/Magadan","location":"Magadan","code":"RU","country":"Russia","title":"Magadan - Russia"},{"tz":"Asia\/Makassar","location":"Makassar","code":"ID","country":"Indonesia","title":"Makassar - Indonesia"},{"tz":"Asia\/Manila","location":"Manila","code":"PH","country":"Philippines","title":"Manila - Philippines"},{"tz":"Asia\/Muscat","location":"Muscat","code":"OM","country":"Oman","title":"Muscat - Oman"},{"tz":"Asia\/Nicosia","location":"Nicosia","code":"CY","country":"Cyprus","title":"Nicosia - Cyprus"},{"tz":"Asia\/Novokuznetsk","location":"Novokuznetsk","code":"RU","country":"Russia","title":"Novokuznetsk - Russia"},{"tz":"Asia\/Novosibirsk","location":"Novosibirsk","code":"RU","country":"Russia","title":"Novosibirsk - Russia"},{"tz":"Asia\/Omsk","location":"Omsk","code":"RU","country":"Russia","title":"Omsk - Russia"},{"tz":"Asia\/Oral","location":"Oral","code":"KZ","country":"Kazakhstan","title":"Oral - Kazakhstan"},{"tz":"Asia\/Phnom_Penh","location":"PhnomPenh","code":"KH","country":"Cambodia","title":"Phnom Penh - Cambodia"},{"tz":"Asia\/Pontianak","location":"Pontianak","code":"ID","country":"Indonesia","title":"Pontianak - Indonesia"},{"tz":"Asia\/Pyongyang","location":"Pyongyang","code":"KP","country":"Korea (North)","title":"Pyongyang - North Korea"},{"tz":"Asia\/Qatar","location":"Qatar","code":"QA","country":"Qatar","title":"Qatar"},{"tz":"Asia\/Qostanay","location":"Qostanay","code":"KZ","country":"Kazakhstan","title":"Qostanay - Kazakhstan"},{"tz":"Asia\/Qyzylorda","location":"Qyzylorda","code":"KZ","country":"Kazakhstan","title":"Qyzylorda - Kazakhstan"},{"tz":"Asia\/Riyadh","location":"Riyadh","code":"SA","country":"Saudi Arabia","title":"Riyadh - Saudi Arabia"},{"tz":"Asia\/Sakhalin","location":"Sakhalin","code":"RU","country":"Russia","title":"Sakhalin - Russia"},{"tz":"Asia\/Samarkand","location":"Samarkand","code":"UZ","country":"Uzbekistan","title":"Samarkand - Uzbekistan"},{"tz":"Asia\/Seoul","location":"Seoul","code":"KR","country":"Korea (South)","title":"Seoul - South Korea"},{"tz":"Asia\/Shanghai","location":"Shanghai","code":"CN","country":"China","title":"Shanghai - China"},{"tz":"Asia\/Singapore","location":"Singapore","code":"SG","country":"Singapore","title":"Singapore"},{"tz":"Asia\/Srednekolymsk","location":"Srednekolymsk","code":"RU","country":"Russia","title":"Srednekolymsk - Russia"},{"tz":"Asia\/Taipei","location":"Taipei","code":"TW","country":"Taiwan","title":"Taipei - Chinese Taipei"},{"tz":"Asia\/Tashkent","location":"Tashkent","code":"UZ","country":"Uzbekistan","title":"Tashkent - Uzbekistan"},{"tz":"Asia\/Tbilisi","location":"Tbilisi","code":"GE","country":"Georgia","title":"Tbilisi - Georgia"},{"tz":"Asia\/Tehran","location":"Tehran","code":"IR","country":"Iran","title":"Tehran - Iran"},{"tz":"Asia\/Thimphu","location":"Thimphu","code":"BT","country":"Bhutan","title":"Thimphu - Bhutan"},{"tz":"Asia\/Tokyo","location":"Tokyo","code":"JP","country":"Japan","title":"Tokyo - Japan"},{"tz":"Asia\/Tomsk","location":"Tomsk","code":"RU","country":"Russia","title":"Tomsk - Russia"},{"tz":"Asia\/Ulaanbaatar","location":"Ulaanbaatar","code":"MN","country":"Mongolia","title":"Ulaanbaatar - Mongolia"},{"tz":"Asia\/Urumqi","location":"Urumqi","code":"CN","country":"China","title":"Urumqi - China"},{"tz":"Asia\/Ust-Nera","location":"Ust-Nera","code":"RU","country":"Russia","title":"Ust-Nera - Russia"},{"tz":"Asia\/Vientiane","location":"Vientiane","code":"LA","country":"Lao PDR","title":"Vientiane - Laos"},{"tz":"Asia\/Vladivostok","location":"Vladivostok","code":"RU","country":"Russia","title":"Vladivostok - Russia"},{"tz":"Asia\/Yakutsk","location":"Yakutsk","code":"RU","country":"Russia","title":"Yakutsk - Russia"},{"tz":"Asia\/Yangon","location":"Yangon","code":"MM","country":"Myanmar","title":"Yangon - Myanmar"},{"tz":"Asia\/Yekaterinburg","location":"Yekaterinburg","code":"RU","country":"Russia","title":"Yekaterinburg - Russia"},{"tz":"Asia\/Yerevan","location":"Yerevan","code":"AM","country":"Armenia","title":"Yerevan - Armenia"},{"tz":"Atlantic\/Azores","location":"Azores","code":"PT","country":"Portugal","title":"Azores - Portugal"},{"tz":"Atlantic\/Bermuda","location":"Bermuda","code":"BM","country":"Bermuda","title":"Bermuda"},{"tz":"Atlantic\/Canary","location":"Canary","code":"ES","country":"Spain","title":"Canary Islands - Spain"},{"tz":"Atlantic\/Cape_Verde","location":"CapeVerde","code":"CV","country":"Cape Verde","title":"Cape Verde"},{"tz":"Atlantic\/Faroe","location":"Faroe","code":"FO","country":"Faroe Islands","title":"Faroe Islands"},{"tz":"Atlantic\/Madeira","location":"Madeira","code":"PT","country":"Portugal","title":"Madeira - Portugal"},{"tz":"Atlantic\/Reykjavik","location":"Reykjavik","code":"IS","country":"Iceland","title":"Reykjavik - Iceland"},{"tz":"Atlantic\/South_Georgia","location":"SouthGeorgia","code":"GS","country":"South Georgia and the South Sandwich Islands","title":"South Georgia and the South Sandwich Islands"},{"tz":"Atlantic\/St_Helena","location":"StHelena","code":"SH","country":"Saint Helena","title":"Saint Helena"},{"tz":"Atlantic\/Stanley","location":"Stanley","code":"FK","country":"Falkland Islands (Malvinas)","title":"Stanley - Falkland Islands"},{"tz":"Australia\/Adelaide","location":"Adelaide","code":"AU","country":"Australia","title":"Adelaide - Australia"},{"tz":"Australia\/Brisbane","location":"Brisbane","code":"AU","country":"Australia","title":"Brisbane - Australia"},{"tz":"Australia\/Broken_Hill","location":"BrokenHill","code":"AU","country":"Australia","title":"Broken Hill - Australia"},{"tz":"Australia\/Darwin","location":"Darwin","code":"AU","country":"Australia","title":"Darwin - Australia"},{"tz":"Australia\/Eucla","location":"Eucla","code":"AU","country":"Australia","title":"Eucla - Australia"},{"tz":"Australia\/Hobart","location":"Hobart","code":"AU","country":"Australia","title":"Hobart - Australia"},{"tz":"Australia\/Lindeman","location":"Lindeman","code":"AU","country":"Australia","title":"Lindeman - Australia"},{"tz":"Australia\/Lord_Howe","location":"LordHowe","code":"AU","country":"Australia","title":"Lord Howe - Australia"},{"tz":"Australia\/Melbourne","location":"Melbourne","code":"AU","country":"Australia","title":"Melbourne - Australia"},{"tz":"Australia\/Perth","location":"Perth","code":"AU","country":"Australia","title":"Perth - Australia"},{"tz":"Australia\/Sydney","location":"Sydney","code":"AU","country":"Australia","title":"Sydney - Australia"},{"tz":"Europe\/Amsterdam","location":"Amsterdam","code":"NL","country":"Netherlands","title":"Amsterdam - Netherlands"},{"tz":"Europe\/Andorra","location":"Andorra","code":"AD","country":"Andorra","title":"Andorra"},{"tz":"Europe\/Astrakhan","location":"Astrakhan","code":"RU","country":"Russia","title":"Astrakhan - Russia"},{"tz":"Europe\/Athens","location":"Athens","code":"GR","country":"Greece","title":"Athens - Greece"},{"tz":"Europe\/Belgrade","location":"Belgrade","code":"RS","country":"Serbia","title":"Belgrade - Serbia"},{"tz":"Europe\/Berlin","location":"Berlin","code":"DE","country":"Germany","title":"Berlin - Germany"},{"tz":"Europe\/Bratislava","location":"Bratislava","code":"SK","country":"Slovakia","title":"Bratislava - Slovakia"},{"tz":"Europe\/Brussels","location":"Brussels","code":"BE","country":"Belgium","title":"Brussels - Belgium"},{"tz":"Europe\/Bucharest","location":"Bucharest","code":"RO","country":"Romania","title":"Bucharest - Romania"},{"tz":"Europe\/Budapest","location":"Budapest","code":"HU","country":"Hungary","title":"Budapest - Hungary"},{"tz":"Europe\/Busingen","location":"Busingen","code":"DE","country":"Germany","title":"Busingen - Germany"},{"tz":"Europe\/Chisinau","location":"Chisinau","code":"MD","country":"Moldova","title":"Chisinau - Moldova"},{"tz":"Europe\/Copenhagen","location":"Copenhagen","code":"DK","country":"Denmark","title":"Copenhagen - Denmark"},{"tz":"Europe\/Dublin","location":"Dublin","code":"IE","country":"Ireland","title":"Dublin - Ireland"},{"tz":"Europe\/Gibraltar","location":"Gibraltar","code":"GI","country":"Gibraltar","title":"Gibraltar"},{"tz":"Europe\/Guernsey","location":"Guernsey","code":"GG","country":"Guernsey","title":"Guernsey"},{"tz":"Europe\/Helsinki","location":"Helsinki","code":"FI","country":"Finland","title":"Helsinki - Finland"},{"tz":"Europe\/Isle_of_Man","location":"IsleofMan","code":"IM","country":"Isle of Man","title":"Isle of Man"},{"tz":"Europe\/Istanbul","location":"Istanbul","code":"TR","country":"Turkey","title":"Istanbul - Turkey"},{"tz":"Europe\/Jersey","location":"Jersey","code":"JE","country":"Jersey","title":"Jersey"},{"tz":"Europe\/Kaliningrad","location":"Kaliningrad","code":"RU","country":"Russia","title":"Kaliningrad - Russia"},{"tz":"Europe\/Kirov","location":"Kirov","code":"RU","country":"Russia","title":"Kirov - Russia"},{"tz":"Europe\/Kyiv","location":"Kyiv","code":"UA","country":"Ukraine","title":"Kyiv - Ukraine"},{"tz":"Europe\/Lisbon","location":"Lisbon","code":"PT","country":"Portugal","title":"Lisbon - Portugal"},{"tz":"Europe\/Ljubljana","location":"Ljubljana","code":"SI","country":"Slovenia","title":"Ljubljana - Slovenia"},{"tz":"Europe\/London","location":"London","code":"GB","country":"United Kingdom","title":"London - United Kingdom"},{"tz":"Europe\/Luxembourg","location":"Luxembourg","code":"LU","country":"Luxembourg","title":"Luxembourg"},{"tz":"Europe\/Madrid","location":"Madrid","code":"ES","country":"Spain","title":"Madrid - Spain"},{"tz":"Europe\/Malta","location":"Malta","code":"MT","country":"Malta","title":"Malta"},{"tz":"Europe\/Mariehamn","location":"Mariehamn","code":"AX","country":"Aland Islands","title":"Mariehamn - Aland Islands"},{"tz":"Europe\/Minsk","location":"Minsk","code":"BY","country":"Belarus","title":"Minsk - Belarus"},{"tz":"Europe\/Monaco","location":"Monaco","code":"MC","country":"Monaco","title":"Monaco"},{"tz":"Europe\/Moscow","location":"Moscow","code":"RU","country":"Russia","title":"Moscow - Russia"},{"tz":"Europe\/Oslo","location":"Oslo","code":"NO","country":"Norway","title":"Oslo - Norway"},{"tz":"Europe\/Paris","location":"Paris","code":"FR","country":"France","title":"Paris - France"},{"tz":"Europe\/Podgorica","location":"Podgorica","code":"ME","country":"Montenegro","title":"Podgorica - Montenegro"},{"tz":"Europe\/Prague","location":"Prague","code":"CZ","country":"Czech Republic","title":"Prague - Czech Republic"},{"tz":"Europe\/Riga","location":"Riga","code":"LV","country":"Latvia","title":"Riga - Latvia"},{"tz":"Europe\/Rome","location":"Rome","code":"IT","country":"Italy","title":"Rome - Italy"},{"tz":"Europe\/Samara","location":"Samara","code":"RU","country":"Russia","title":"Samara - russia"},{"tz":"Europe\/San_Marino","location":"SanMarino","code":"SM","country":"San Marino","title":"San Marino"},{"tz":"Europe\/Sarajevo","location":"Sarajevo","code":"BA","country":"Bosnia and Herzegovina","title":"Sarajevo - Bosnia and Herzergovina"},{"tz":"Europe\/Saratov","location":"Saratov","code":"RU","country":"Russia","title":"Saratov - Russia"},{"tz":"Europe\/Simferopol","location":"Simferopol","code":"UA","country":"Ukraine","title":"Simferopol - Ukraine"},{"tz":"Europe\/Skopje","location":"Skopje","code":"MK","country":"Macedonia","title":"Skopje - Macedonia"},{"tz":"Europe\/Sofia","location":"Sofia","code":"BG","country":"Bulgaria","title":"Sofia - Bulgaria"},{"tz":"Europe\/Stockholm","location":"Stockholm","code":"SE","country":"Sweden","title":"Stockholm - Sweden"},{"tz":"Europe\/Tallinn","location":"Tallinn","code":"EE","country":"Estonia","title":"Tallinn - Estonia"},{"tz":"Europe\/Tirane","location":"Tirane","code":"AL","country":"Albania","title":"Tirana - Albania"},{"tz":"Europe\/Ulyanovsk","location":"Ulyanovsk","code":"RU","country":"Russia","title":"Ulyanovsk - Russia"},{"tz":"Europe\/Vaduz","location":"Vaduz","code":"LI","country":"Liechtenstein","title":"Vaduz - Liechtenstein"},{"tz":"Europe\/Vatican","location":"Vatican","code":"VA","country":"Holy See (Vatican City State)","title":"Vatican City"},{"tz":"Europe\/Vienna","location":"Vienna","code":"AT","country":"Austria","title":"Vienna - Austria"},{"tz":"Europe\/Vilnius","location":"Vilnius","code":"LT","country":"Lithuania","title":"Vilnius - Lithuania"},{"tz":"Europe\/Volgograd","location":"Volgograd","code":"RU","country":"Russia","title":"Volgograd - Russia"},{"tz":"Europe\/Warsaw","location":"Warsaw","code":"PL","country":"Poland","title":"Warsaw - Poland"},{"tz":"Europe\/Zagreb","location":"Zagreb","code":"HR","country":"Croatia","title":"Zagreb - Croatia"},{"tz":"Europe\/Zurich","location":"Zurich","code":"CH","country":"Switzerland","title":"Zurich - Switzerland"},{"tz":"Indian\/Antananarivo","location":"Antananarivo","code":"MG","country":"Madagascar","title":"Antananarivo - Madagascar"},{"tz":"Indian\/Chagos","location":"Chagos","code":"IO","country":"British Indian Ocean Territory","title":"Chagos - British Indian Ocean Territory"},{"tz":"Indian\/Christmas","location":"Christmas","code":"CX","country":"Christmas Island","title":"Christmas Island"},{"tz":"Indian\/Cocos","location":"Cocos","code":"CC","country":"Cocos (Keeling) Islands","title":"Cocos (Keeling) Islands"},{"tz":"Indian\/Comoro","location":"Comoro","code":"KM","country":"Comoros","title":"Comoros"},{"tz":"Indian\/Kerguelen","location":"Kerguelen","code":"TF","country":"French Southern Territories","title":"Kerguelen - French Southern Territories"},{"tz":"Indian\/Mahe","location":"Mahe","code":"SC","country":"Seychelles","title":"Mahe - Seychelles"},{"tz":"Indian\/Maldives","location":"Maldives","code":"MV","country":"Maldives","title":"Maldives"},{"tz":"Indian\/Mauritius","location":"Mauritius","code":"MU","country":"Mauritius","title":"Mauritius"},{"tz":"Indian\/Mayotte","location":"Mayotte","code":"YT","country":"Mayotte","title":"Mayotte"},{"tz":"Indian\/Reunion","location":"Reunion","code":"RE","country":"Reunion","title":"Reunion"},{"tz":"Pacific\/Apia","location":"Apia","code":"WS","country":"Samoa","title":"Apia - Samoa"},{"tz":"Pacific\/Auckland","location":"Auckland","code":"NZ","country":"New Zealand","title":"Auckland - New Zealand"},{"tz":"Pacific\/Bougainville","location":"Bougainville","code":"PG","country":"Papua New Guinea","title":"Bougainville - Papua New Guinea"},{"tz":"Pacific\/Chatham","location":"Chatham","code":"NZ","country":"New Zealand","title":"Chatham Islands - New Zealand"},{"tz":"Pacific\/Chuuk","location":"Chuuk","code":"FM","country":"Micronesia","title":"Chuuk - Micronesia"},{"tz":"Pacific\/Easter","location":"Easter","code":"CL","country":"Chile","title":"Easter Island - Chile"},{"tz":"Pacific\/Efate","location":"Efate","code":"VU","country":"Vanuatu","title":"Efate - Vanuatu"},{"tz":"Pacific\/Fakaofo","location":"Fakaofo","code":"TK","country":"Tokelau","title":"Fakaofo - Tokelau"},{"tz":"Pacific\/Fiji","location":"Fiji","code":"FJ","country":"Fiji","title":"Fiji"},{"tz":"Pacific\/Funafuti","location":"Funafuti","code":"TV","country":"Tuvalu","title":"Funafuti - Tuvalu"},{"tz":"Pacific\/Galapagos","location":"Galapagos","code":"EC","country":"Ecuador","title":"Galapagos Islands - Ecuador"},{"tz":"Pacific\/Gambier","location":"Gambier","code":"PF","country":"French Polynesia","title":"Gambier - French Polynesia"},{"tz":"Pacific\/Guadalcanal","location":"Guadalcanal","code":"SB","country":"Solomon Islands","title":"Guadalcanal - Solomon Islands"},{"tz":"Pacific\/Guam","location":"Guam","code":"GU","country":"Guam","title":"Guam"},{"tz":"Pacific\/Honolulu","location":"Honolulu","code":"US","country":"United States of America","title":"Honolulu - Hawaii - United States of America"},{"tz":"Pacific\/Kanton","location":"Kanton","code":"KI","country":"Kiribati","title":"Kanton - Kiribati"},{"tz":"Pacific\/Kiritimati","location":"Kiritimati","code":"KI","country":"Kiribati","title":"Kiritimati - Kiribati"},{"tz":"Pacific\/Kosrae","location":"Kosrae","code":"FM","country":"Micronesia","title":"Kosrae - Micronesia"},{"tz":"Pacific\/Kwajalein","location":"Kwajalein","code":"MH","country":"Marshall Islands","title":"Kwajalein - Marshall Islands"},{"tz":"Pacific\/Majuro","location":"Majuro","code":"MH","country":"Marshall Islands","title":"Majuro - Marshall Islands"},{"tz":"Pacific\/Marquesas","location":"Marquesas","code":"PF","country":"French Polynesia","title":"Marquesas - French Polynesia"},{"tz":"Pacific\/Midway","location":"Midway","code":"UM","country":"US Minor Outlying Islands","title":"Midway - US Minor Outlying Islands"},{"tz":"Pacific\/Nauru","location":"Nauru","code":"NR","country":"Nauru","title":"Nauru"},{"tz":"Pacific\/Niue","location":"Niue","code":"NU","country":"Niue","title":"Niue"},{"tz":"Pacific\/Norfolk","location":"Norfolk","code":"NF","country":"Norfolk Island","title":"Norfolk Island"},{"tz":"Pacific\/Noumea","location":"Noumea","code":"NC","country":"New Caledonia","title":"Noumea - New Caledonia"},{"tz":"Pacific\/Pago_Pago","location":"PagoPago","code":"AS","country":"American Samoa","title":"Pago Pago - American Samoa"},{"tz":"Pacific\/Palau","location":"Palau","code":"PW","country":"Palau","title":"Palau"},{"tz":"Pacific\/Pitcairn","location":"Pitcairn","code":"PN","country":"Pitcairn","title":"Pitcairn"},{"tz":"Pacific\/Pohnpei","location":"Pohnpei","code":"FM","country":"Micronesia","title":"Pohnpei - Micronesia"},{"tz":"Pacific\/Port_Moresby","location":"PortMoresby","code":"PG","country":"Papua New Guinea","title":"Port Moresby - Papua New Guinea"},{"tz":"Pacific\/Rarotonga","location":"Rarotonga","code":"CK","country":"Cook Islands","title":"Rarotonga - Cook Islands"},{"tz":"Pacific\/Saipan","location":"Saipan","code":"MP","country":"Northern Mariana Islands","title":"Saipan - Northern Marinara Islands"},{"tz":"Pacific\/Tahiti","location":"Tahiti","code":"PF","country":"French Polynesia","title":"Tahiti - French Polynesia"},{"tz":"Pacific\/Tarawa","location":"Tarawa","code":"KI","country":"Kiribati","title":"Tarawa - Kiribati"},{"tz":"Pacific\/Tongatapu","location":"Tongatapu","code":"TO","country":"Tonga","title":"Tongatapu - Tonga"},{"tz":"Pacific\/Wake","location":"Wake","code":"UM","country":"US Minor Outlying Islands","title":"Wake - US Minor Outlying Islands"},{"tz":"Pacific\/Wallis","location":"Wallis","code":"WF","country":"Wallis and Futuna Islands","title":"Wallis and Futuna Islands"},{"tz":"UTC","location":"UTC","code":"UTC","country":"","title":"UTC\/GMT"}]
Stream Nations Championship 2026 LIVE
Hemispheres collide in the new Nations Championship. Stream live, replays and highlights free on RugbyPass TV.


Comments
Join free and tell us what you really think!
Sign up for free