Right from the third minute of Argentina’s win over New Zealand, the Pumas’ intent was clear. From their first attacking launch of the game, Nico Sanchez dropped back into the pocket and tried to hit a drop goal with no advantage in his favour.
Stream Nations Championship 2026 LIVE
Hemispheres collide in the new Nations Championship. Stream live, replays and highlights free on RugbyPass TV.
His attempt swung wide but the drop goal sent a message – Argentina believed they would win this game through defence, not trying to outscore the All Blacks in a try-fest. They just needed to keep the scoreboard ticking over with threes whilst they would back their defence to hold out Ian Foster’s side at the other end.
This was a bold ploy; the Pumas have succumbed to large scores at the hands of the All Blacks in recent years.
Perhaps they had the realisation that matching the All Blacks with flair wasn’t working, with their own wild attacking bravado often functioning against them. In last year’s test that they lost 20-16, an unneeded cutout pass on the stroke of halftime intercepted by Brodie Retallick gifted the All Blacks seven points, which in the end cost Argentina the win.
The new approach we saw on the weekend mirrors the likes of England and the Springboks, who focus on brutal defence rather than attack. The Pumas certainly proved capable of bringing that, on the back of an inspired performance from captain Pablo Matera, Nico Sanchez and unheralded flanker Marcos Kremer.
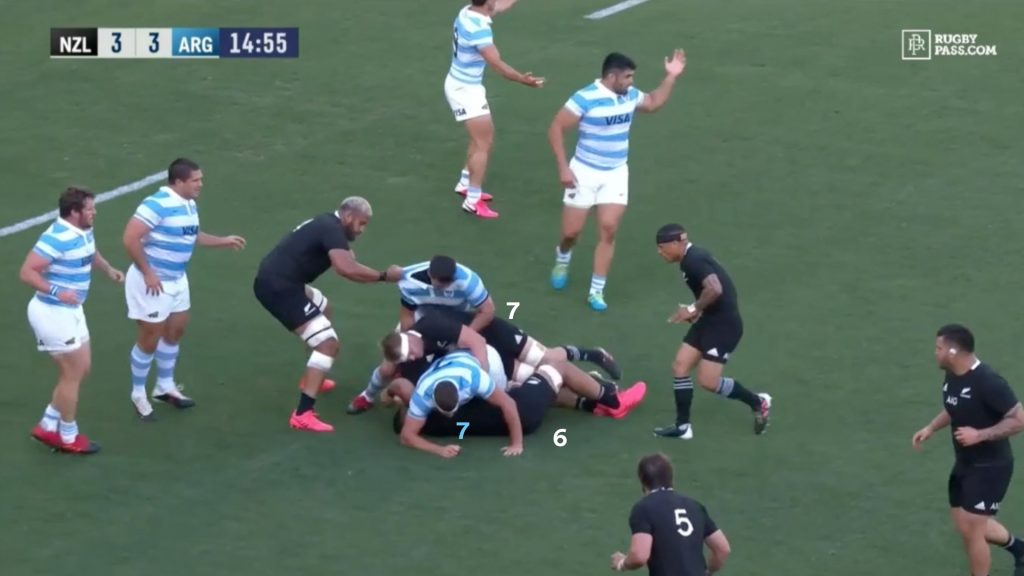
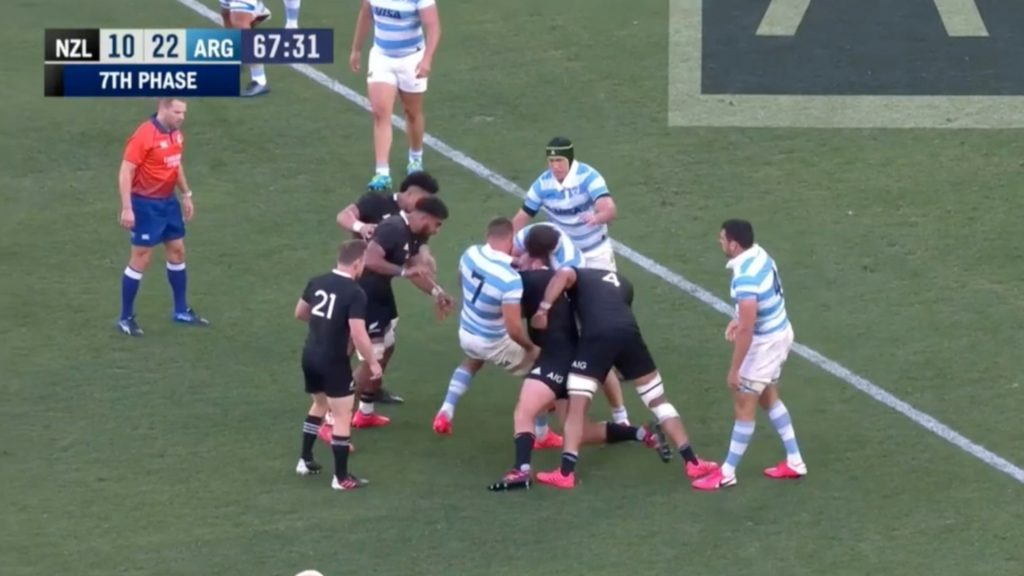
Marcos Kremer was perhaps the most vital cog in the Puma’s historic victory over the All Blacks. (Photo by Cameron Spencer/Getty Images)
Kremer was a mad man who became a thorn in the All Blacks side, flying into bodies with little regard for his own safety. His insane tackle count is a mark of his unrelenting desire to keep NZ at bay. He went out there to hurt the All Blacks physically and disrupt play, and he did that from his first tackle.
When Jordie Barrett cut back to run at an opening by the ruck on the All Blacks’ first chance with ball-in-hand out of a pressure zone, Kremer was back up on his feet quickly to put a stinging shot on the winger that left him on his haunches for the rest of the possession.
When Sam Whitelock was penalised for an illegal entry at the end of that same sequence, it was Kremer again who shoved Shannon Frizell, before clapping in his face which prompted the All Black to retaliate and give Argentina their first three points of the day.
Kremer set the tone for a day in which Argentina would get under the All Blacks skin, tactically outplay them with watertight defence, and inch-by-inch claw their way to a substantial lead that they couldn’t give up.
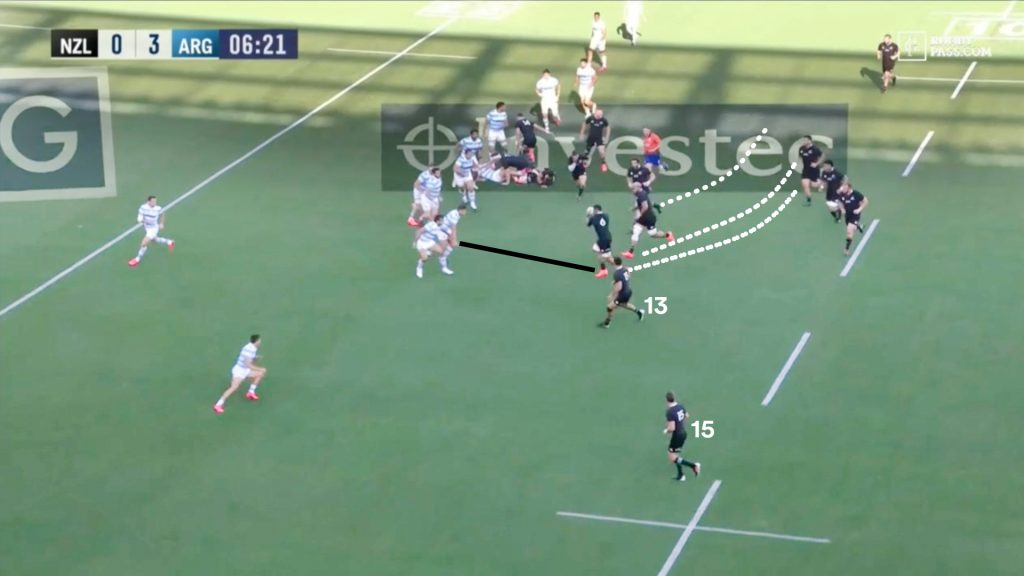
The All Blacks first attacking launch proved as much, when Argentina were able to batter them back past where the original line out took place.
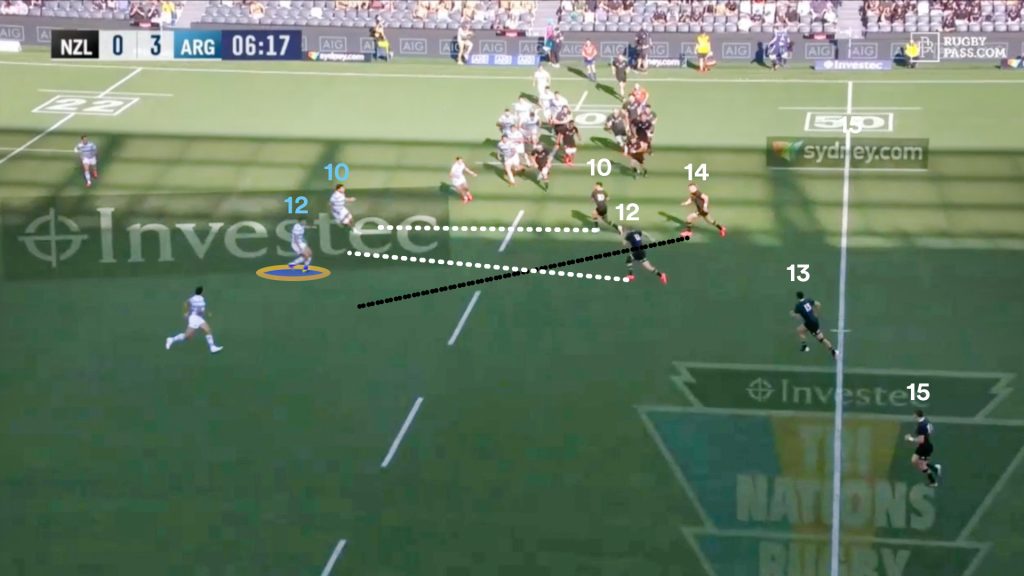
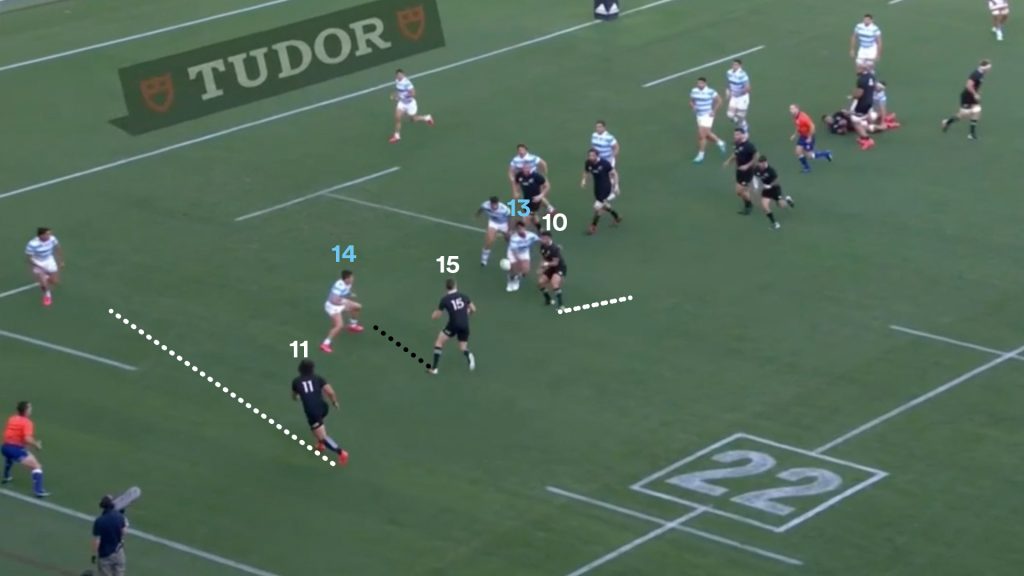
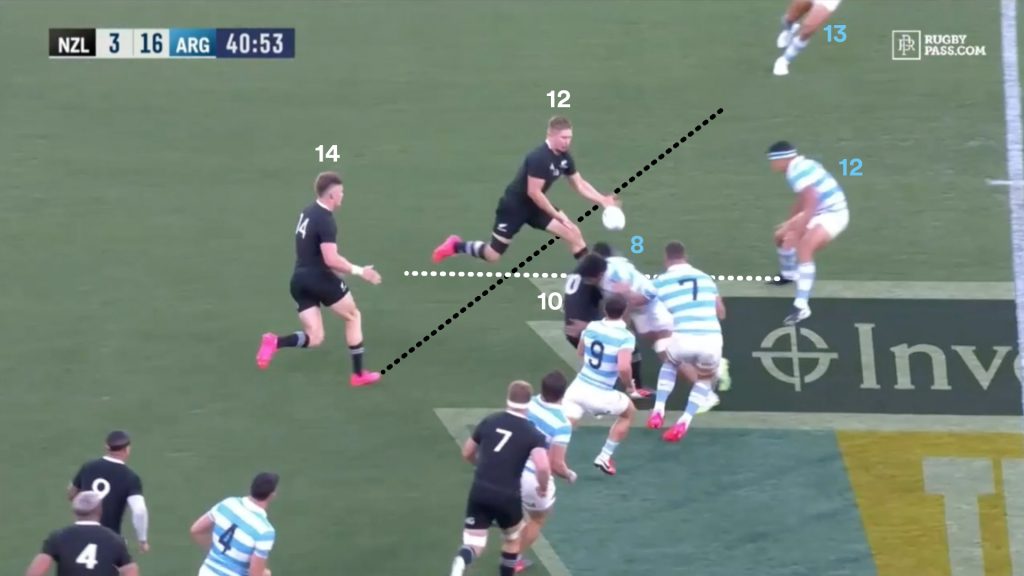
The All Blacks came with a plan to target debutant inside centre Santiago Chocobares (12), using a common starter play they have used for years to attack hischannel.
The play design sends two players either side of the defending 12, in this case Jack Goodhue ran at Chocobares’ inside shoulder with blind winger Jordie Barrett an option out the back to attack his outside shoulder. Flyhalf Richie Mo’unga had the option to use either of the two short options or run himself.
Because this play targets the 10-12 channel, it is usually the first phase of what is a planned multi-phase launch. The first ruck will have ‘narrow’ spacing, not too far from the original lineout, allowing more phases to be mapped out the same way.
The forwards will fold over to provide a carry on the second phase, setting up a third phase strike to the edge or switch. These ‘slow burner’ type of patterns are typically used by the All Blacks against strong defensive sides, where they look to scheme mismatches on forwards in the latter phases.
The first phase play successfully compressed Argentina’s inside channel. The presence of Goodhue and Barrett attracts Chocobares (12) inward, but he is not followed by his outside centre Matias Orlando. The gap between Argentina’s 12 and the 13 is substantial. This is where the opportunity was throughout the day but the All Blacks did not find it.
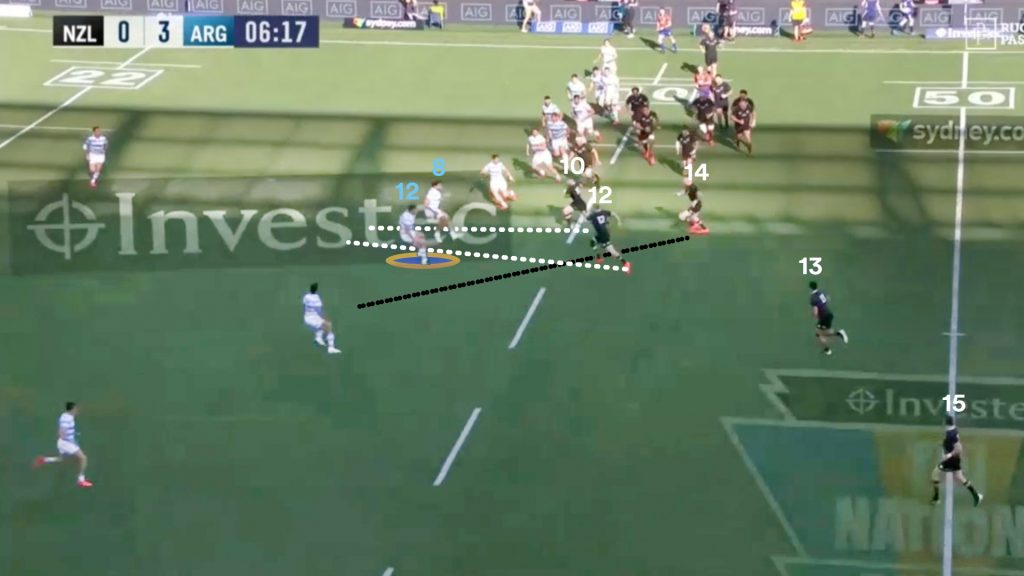
Mo’unga decided to test the defence by running himself and managed to poke through to the other side to give the All Blacks a ‘win’ on first phase and front-foot ball to work with.
The debutant Chocobares does a good job of ‘rerouting’ Jack Goodhue inside, forcing the centre off course and unable to run a good support line for Mo’unga. Had he been on the outside shoulder of the Crusaders pivot, a line break was on offer with a smart offload. Instead, Goodhue crashes into the tackler and falls to the ground in the traffic jam.
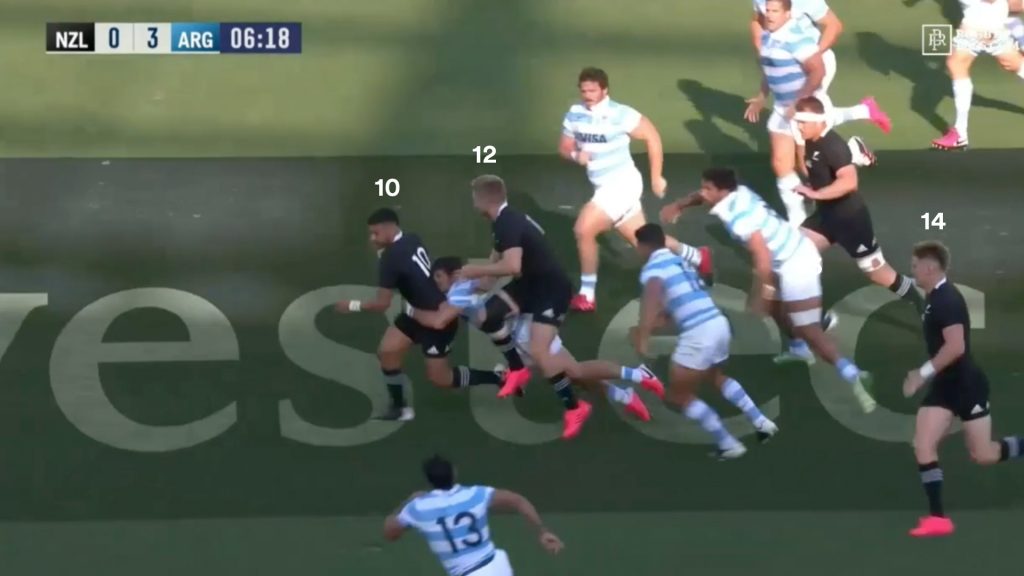
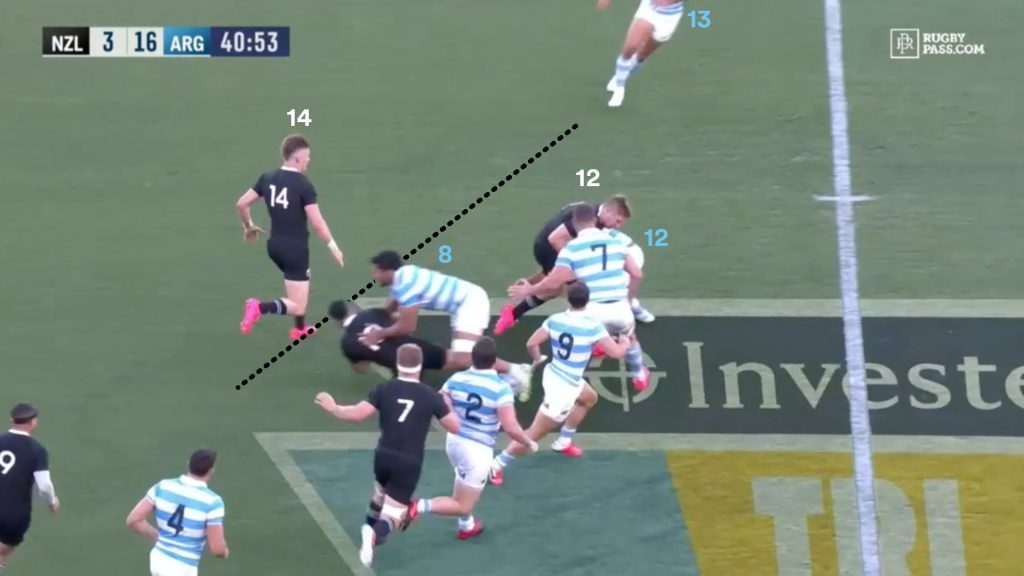
However, the All Blacks were still in a good situation after the first phase, having made significant ground and forcing the Pumas to go the long way back around the ruck. As a result, you could have thrown a blanket over the defence as they were so bunched together.
The opportunity was there to give the backs ‘hot’ ball and abandon the original multi-phase play. A long pass from Aaron Smith (9) to Anton Lienert-Brown (13) would have given Beauden Barrett and Caleb Clarke the opportunity to attack a wilted left edge with the Pumas scrambling.
Instead, Smith uses the forward pod coming around the corner to carry which is easy enough for Argentina to defend. Shannon Frizell rumbles into the teeth of the Argentinian defence and they succeed in slowing down the tempo.
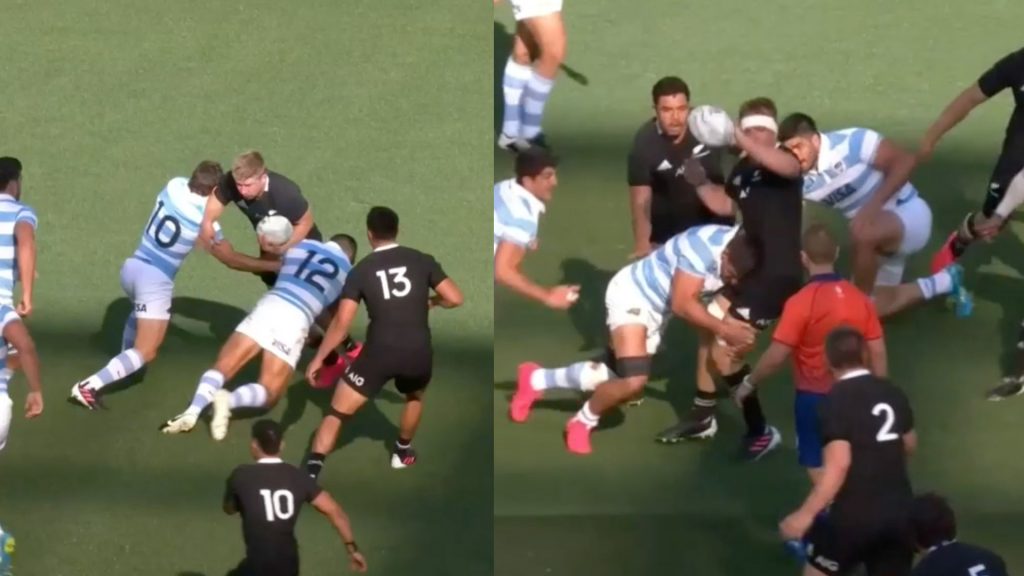
What happened from here was magnificent from Ledesma’s side. After weathering the initial onslaught and momentum on the first two phases, they smash the All Blacks all the way back past the 40-metre line and force Beauden Barrett to raise the white flag and put up a contested kick.
On the sixth phase, Jack Goodhue is hit in a two-man tackle behind the gain line and offloads to the nearest player. The All Blacks keep trying to offload in the tackle to try and salvage the situation and end up losing massive ground before Richie Mo’unga is swallowed up back at the 40-metre line.
Goodhue hit in a two-man tackle before offloading, while Cane tries again to offload in the tackle of Matera.
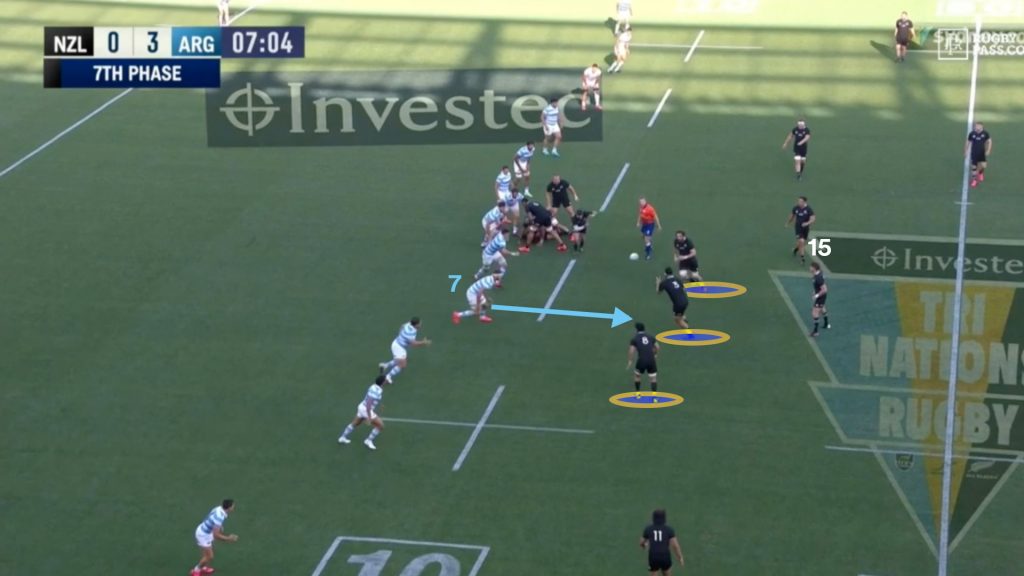
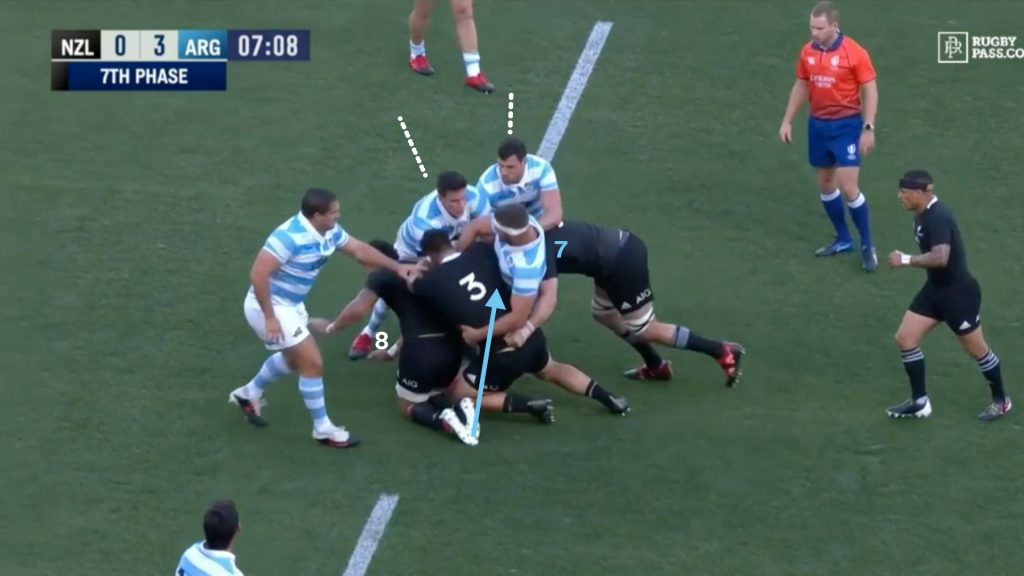
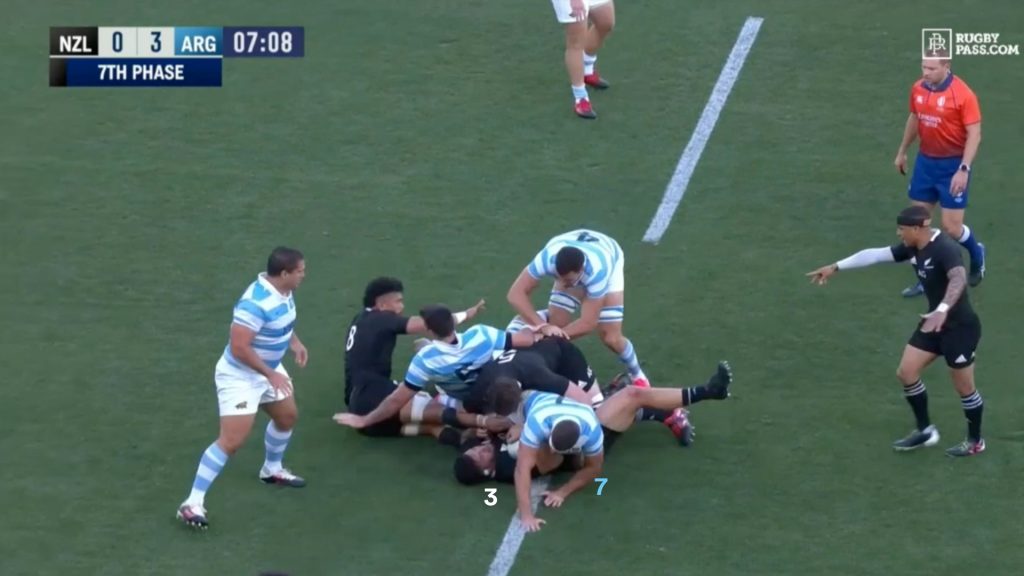
Having lost all ascendency, the All Blacks try to reset with a carry to enable the side to re-organise and gather their composure. The Pumas, with all the momentum, have their human missile Marcos Kremer ready to fire at the next All Blacks ball carrier.
This is where the Pumas’ defensive tactics really unsettled the All Blacks attack.
Their defensive plan was to create slow ball by holding carriers up off the ground. By doing so, they blurred the lines between ruck & maul as the All Blacks forwards struggled to get knees to the ground. Without the ‘release’ call, it gave the Pumas license to lie all over the ruck and Aaron Smith had poor delivery all afternoon.
The latchers really struggled to clean out the Pumas players holding the ball carriers up. Above, Ardie Savea ends up underneath Tyrel Lomax, while Sam Whitelock targets Kremer but ends up on top of him when the pile collapsed.
There is no way the All Blacks can get a quick recycle, allowing the defensive line to reset and dictate terms. If you can’t stop Aaron Smith, stop Aaron Smith getting quick ball.
The Pumas were able to do this all day through the strength of their men, often using two-man tackles to disrupt play.
Another part of Argentina’s disruption of the All Blacks’ set-piece attack included competing for every ball at lineout, even on their own five-metre line. They successfully disrupted the throw multiple times, leading to a poor start for half of the All Blacks’ launch plays.
Messy ball made it easy for Argentina to defend the first phase well, which offered extra time to fold before open side flanker Kremer cratered the second phase carry behind the gain line or slowed the recycle.
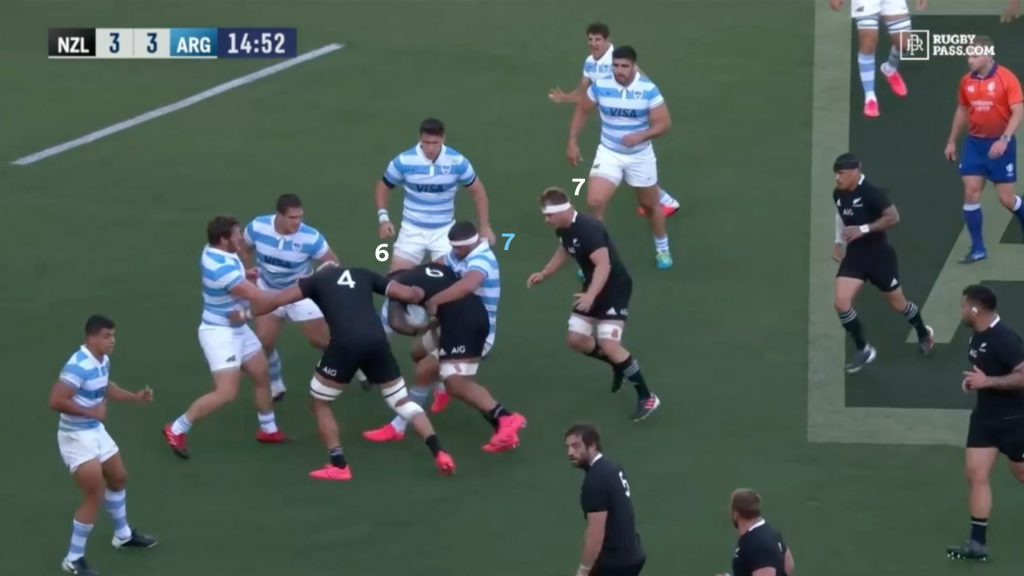
If they carried again for a third phase the same way, often Matera or hooker Julian Montoya would be there to ‘chop and compete’ as a duo, with one tackling and the next man getting over the ball.
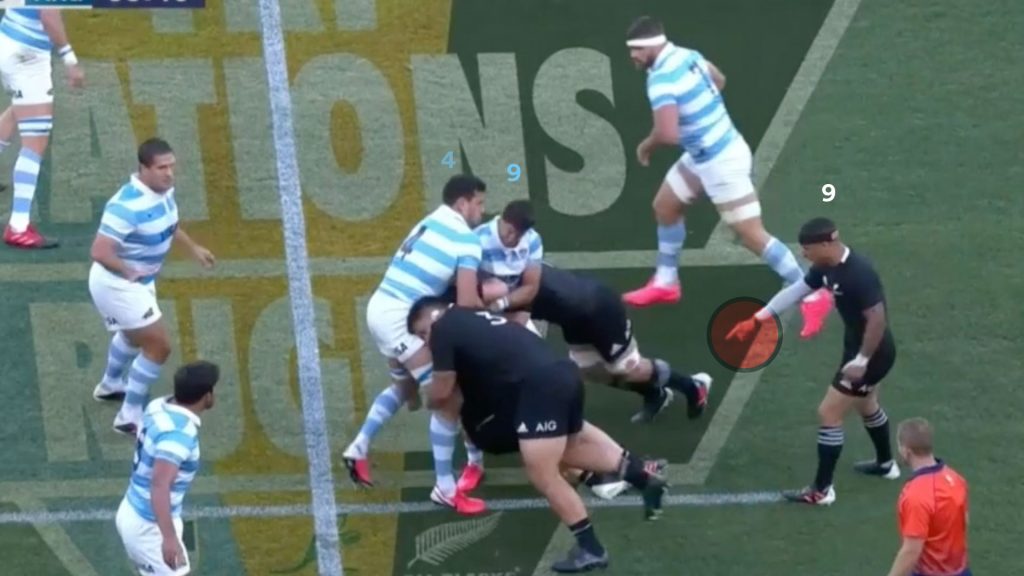
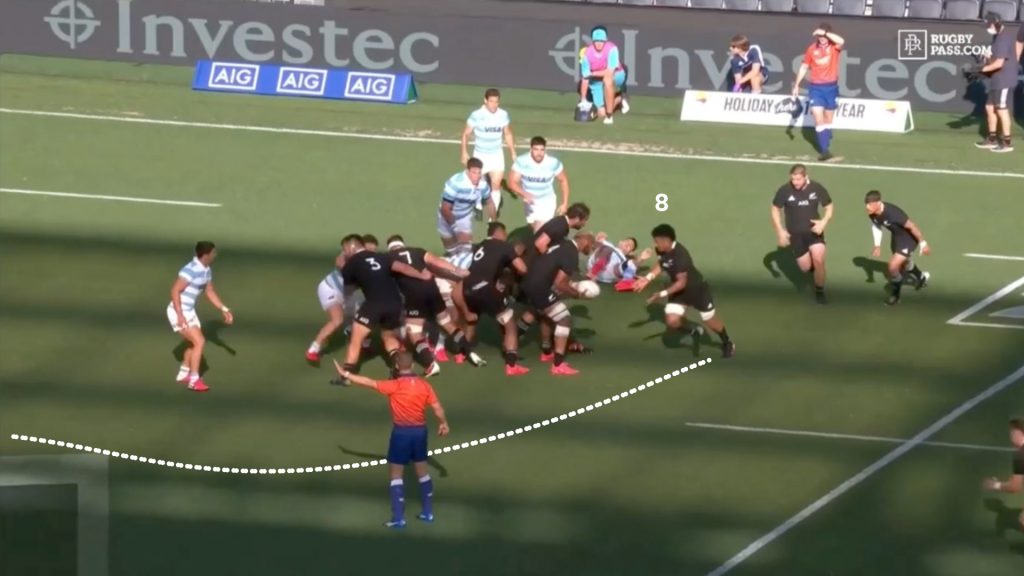
When the All Blacks finally get a clean lineout launch midway through the first half, Argentina’s defence repel the All Blacks’ multi-phase play in this fashion, starting with an incredible one-on-one tackle by Rodrigo Bruni on Ardie Savea.
The All Blacks used Ardie Savea on a slingshot line around the maul at pace to target the Pumas in the 10 channel, with the aim of generating gain line with a strong first-up carry. However, as seen above in the first launch, the Pumas had made a defensive adjustment to take flyhalf Sanchez out of the front line and use their Number 8 there instead.
In what could go down as one of the tackles of the year, Bruni stopped Savea at full speed dead in his tracks as if he had run into a brick wall. The Argentinian loose forward was then able to hold Savea up despite the attention of two more All Blacks, buying time for his side to set a solid defensive line.
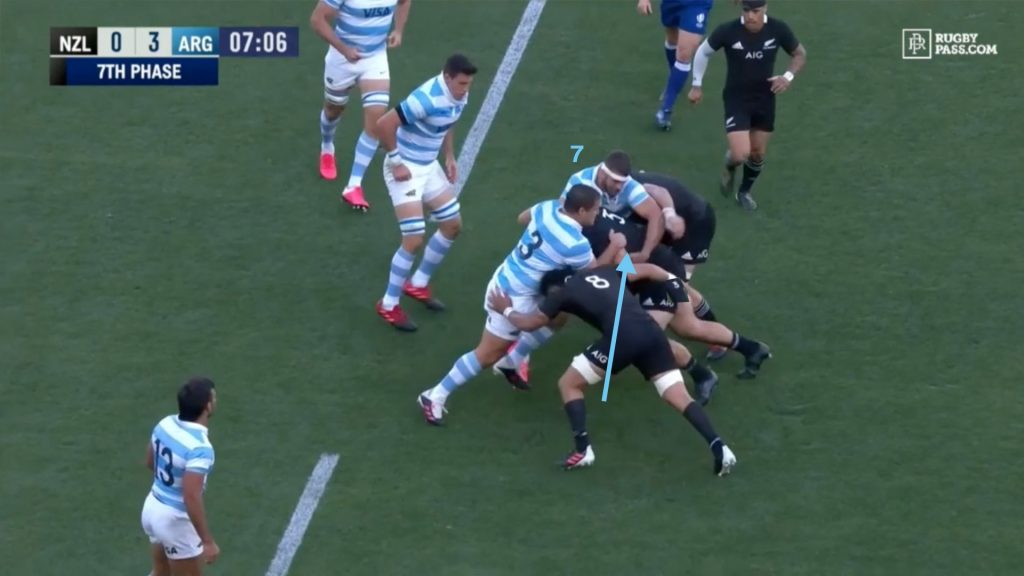
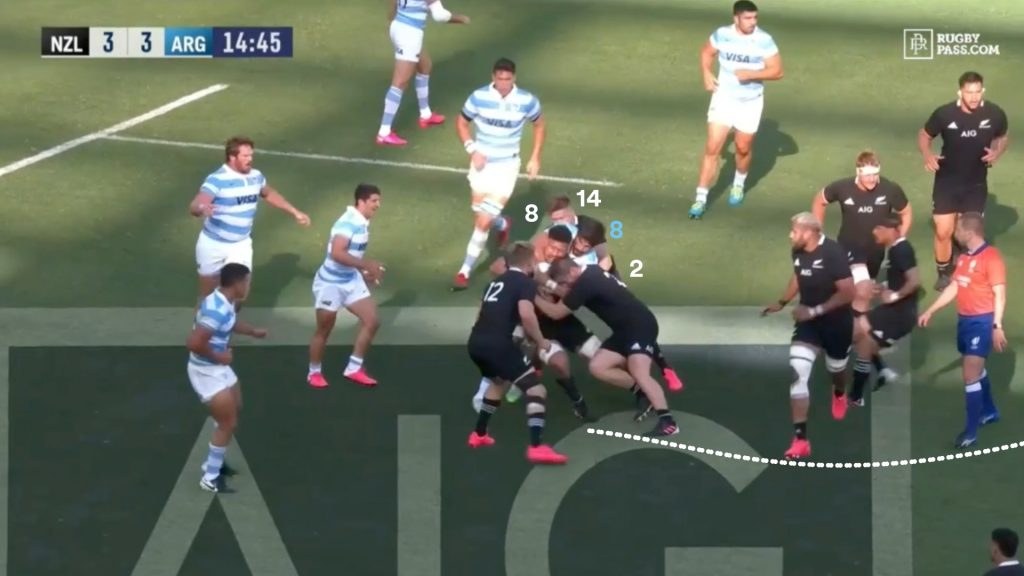
The ball is so slow the Pumas are able to set a perfect line before the second phase carry. Both teams are standing still and the defence knows what is going to happen. Kremer lines himself up again to take out the All Blacks carrier Frizell.
Kremer can’t get a dominant hit initially but holds onto Frizell and drives him sideways to prevent him from getting to ground. The result is just as good, with the Pumas again creating excruciatingly slow ball for the All Blacks. Sam Cane (7) tries to clear Kremer off the ball carrier but ends up collapsing the pile on top of the ball, killing the All Blacks tempo for the third phase strike.
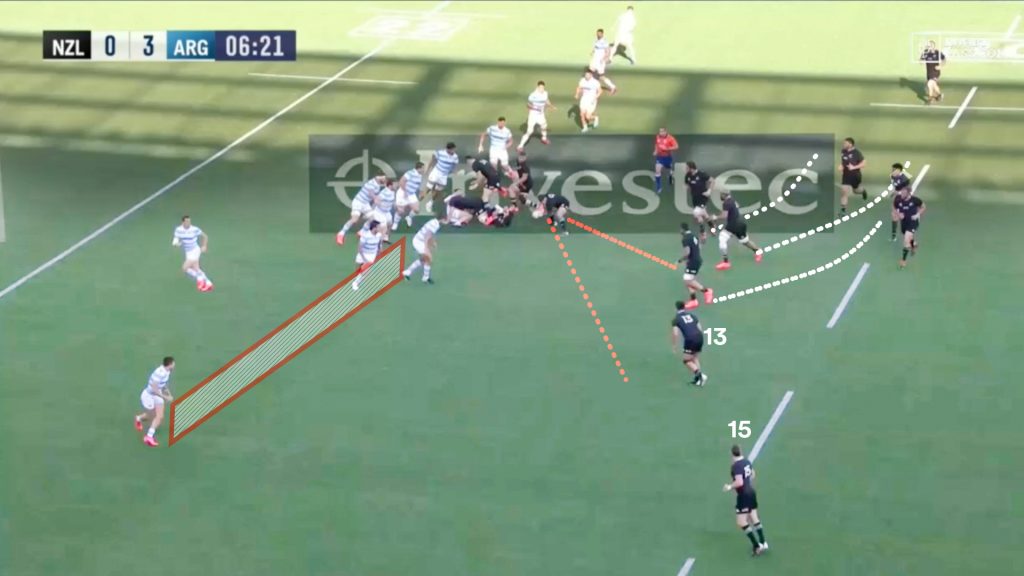
The All Blacks don’t have the momentum they would have wanted by the time they get to release the backs on the strike phase. As Aaron Smith prepares to pass, every player is static and the Pumas are set to push up off the line.
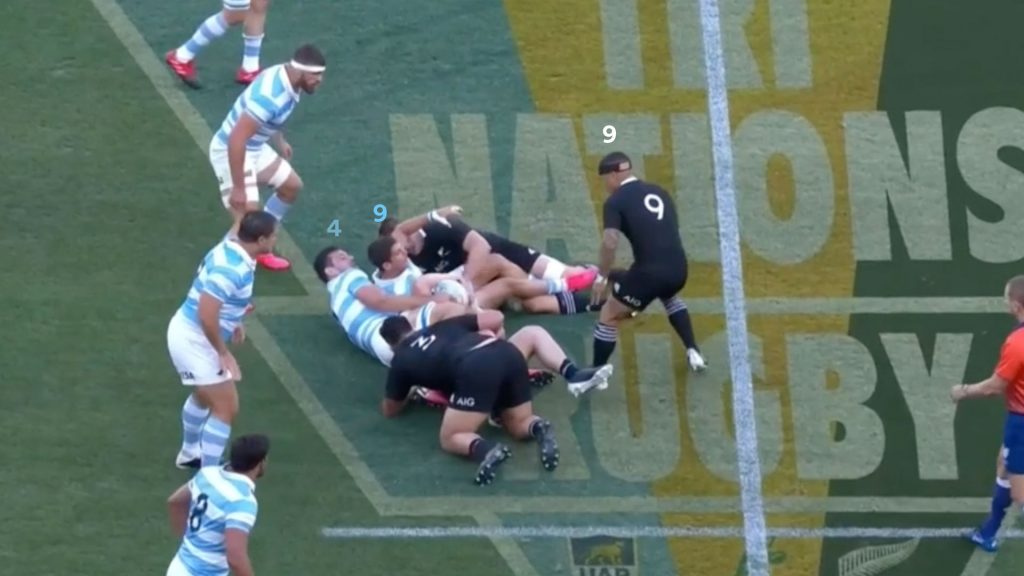
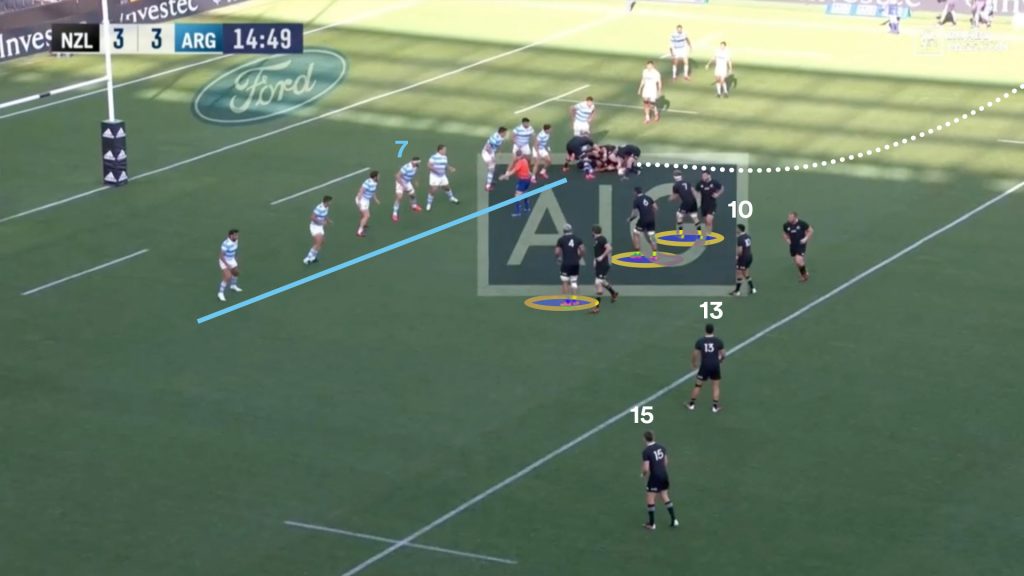
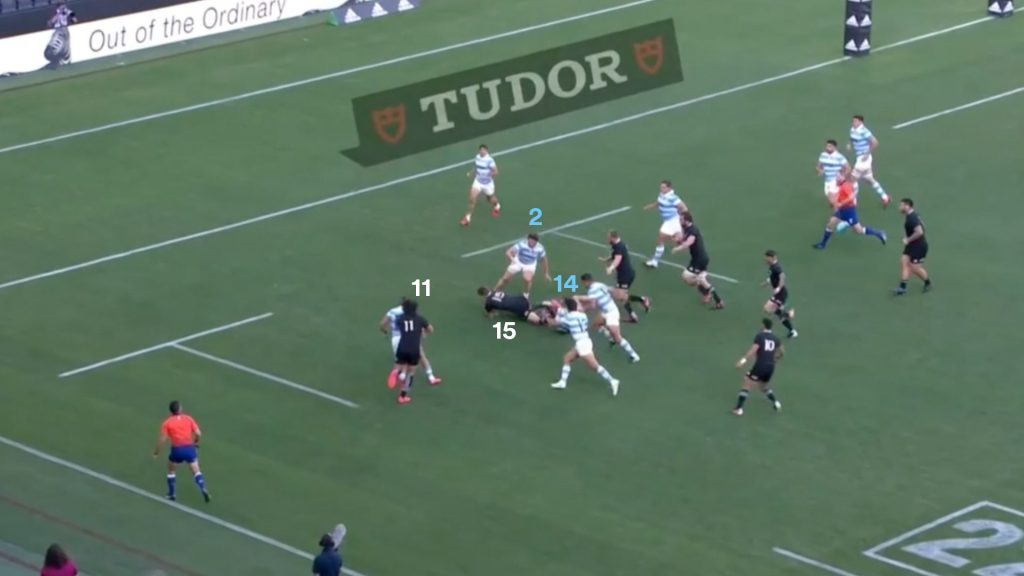
They try to run Mo’unga off a pod screen but the Pumas edge defence adapts well. No players commit to the forward pod runners, allowing them to ‘swim’ past and offer inside support cover.
Matias Orlando (13) and Bautista Delguy (14) stay connected and take their assigned men, leaving Caleb Clarke free for the last defender.
Delguy completes the chop tackle on Barrett, who is isolated, while Montoya (2) is the first man there to compete for the ball and wins a holding on penalty.
This turnover was the result of exceptional off-the-ball work by the Pumas and execution of the ‘chop and compete’ technique by Delguy and Montoya.
The Argentine winger is able to obstruct Joe Moody as he is still in the tackle zone, preventing an effective clean out and giving Montoya a higher chance of holding his position over the ball. Montoya is only able to get there by making smart commit decisions, ‘holding off’ and avoiding contact with the All Blacks forwards pod and then pushing out to provide inside cover.
Another Pumas player shielded Caleb Clarke from getting to Barrett, working to assist on the crucial penalty.
The effect of holding the All Blacks players up later paid dividends in the half when the All Blacks runners actually wanted to get to ground as quickly as possible. Pablo Matera’s turnover in the first half was a result of Frizell submitting in Matera’s tackle, but the captain was left on his feet able to pounce over the ball.
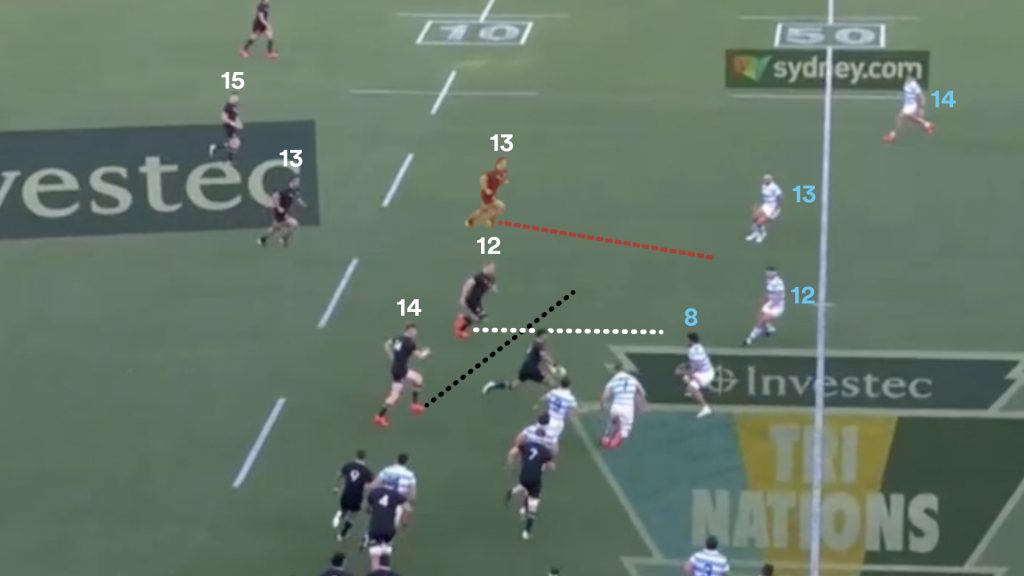
Argentina’s dominance continued in the second half as the All Blacks struggled to run effective launch plays. They continued with the same first phase play we saw in the first half and found the Bruni-Chocobares combination to be resolute.
Mo’unga plays Goodhue short on the first iteration of the play in the second half, who crashed into Chocobares. Again the gap between the two Argentine midfielders is visible.
The All Blacks recognise this so the third time they run the play, Mo’unga tries to play Barrett out behind Goodhue. The problem is the timing is a little off and the depth of Barrett allows Chocobares to progress through both reads and put a shot on the right wing.
Chocobares had Goodhue covered, before switching assignments to take Jordie Barrett when the back door pass was identified. The defensive awareness of the young midfielder was outstanding, covering multiple options and making the right decision each time.
What the All Blacks needed was a wide option integrated into the play to give Mo’unga a third possible pass. Having centre Anton Lienert-Brown hit the gap between the 12 and 13 on an early cutout pass would have been interesting.
With Chocobares needing to stay tight to cover the threat of both Goodhue and Barrett, an angled run across the face of Matias Orlando by Lienert-Brown may have been able to exploit the wide spacing outside of the young 12.
A potential variation of the play with a flatter Lienert-Brown (13) involved as a wider option for Mo’unga
The issue with multi-phase strike patterns is that the outside backs often aren’t involved in the first phase play in any capacity, reducing the difficulty of the assignment for the defence. The fewer options to cover, the easier it is to defend.
If the second phase is a planned carry anyway, there is no reason why Lienert-Brown or Beauden Barrett can’t be involved to add an extra running line on the first phase. If they aren’t used they have two phases to get back into position. If they are used, it was likley the best option given what the defence was showing.
As the All Blacks continued with their multi-phase patterns, the Pumas continued with holding up the ball carriers on second and third phase, making a mess of the ruck and forcing slow ball. Kremer continued to disrupt play, nailing the forwards behind the gain line while others often stripped the ball out forcing turnovers in the tackle.
The attack began to unravel out of frustration, with forwards throwing wild offloads they normally wouldn’t while general handling errors crept into the game.
It was a masterful defensive showing from the Pumas, who really put the spotlight on the All Blacks pack. They turned the breakdown on its head and the All Blacks pack had no answer, seeing their clean out game become ineffective and their carry game become a lethargic mess.
As a result, they gave away unnecessary penalties whilst in possession, lost the ball in contact repeatedly and gave their backs no time or space.
The difference between the two sides in the end was only penalties, as the Pumas kept the scoreboard ticking over while the All Blacks insisted on taking set-piece launches that were scuttled every time.
It wasn’t a lopsided contest but the All Blacks failed to respect the Pumas defence and let the game slip too far out of reach.
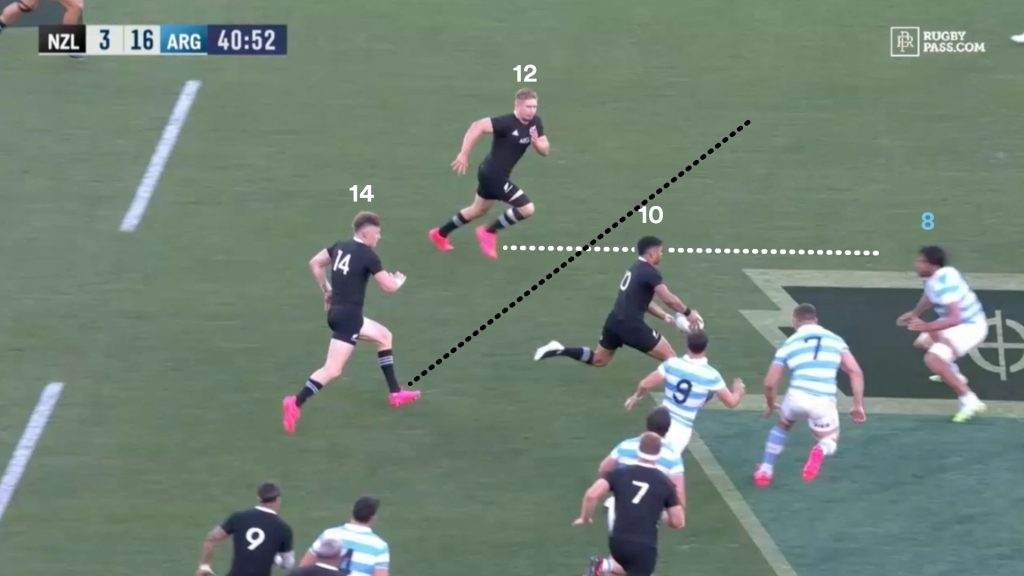
In the second test, the All Blacks can make adjustments to improve their attack, looking at using some wider strikes and fewer carries. They will need to scheme more effectively as the power game was stuffed brutally by the Argentinian back row. Thus, playing away from these players may pay dividends.
After a positive gain line carry on first phase, the All Blacks could hit the edge straight away to try get more touches for Beauden Barrett, instead of carrying into the likes of Kremer who will be lining up the likely ball carrier on the fold.
The much-praised short attacking kick game could be brought back, although the All Blacks never had enough continuity to actually use it against the Pumas. NZ only ever managed a few phases before the ball was turned over, which means that looking for quicker width could be the answer.
Most of all, the All Blacks need to stay patient and recognise they do not need to score a bunch of tries to win the test. If the Pumas are proving resolute again, simply take the points on offer to stay in the game and stay within striking distance.
The Pumas lead got out of hand, but they only scored one try. It wasn’t a lopsided contest but the All Blacks failed to respect the Pumas defence and let the game slip too far out of reach.
No {{resultsType == 0 ? "fixtures" : "results"}} for {{resultName()}}.
{{article.cp.n}}
{{article.t}}
{{article.e.name}}
{{article.c}}
{{article.d}}
No news results for {{resultName()}}.
{{item.n}}
No RPTV results for {{resultName()}}.
Popular
{{comp.n}}
Tournament
{{team.n}}
Team
{{player.n}}
{{player.t}}
Edition & Time Zone
{{current.name}}
Set time zone automatically
{{selectedTimezoneTitle}} (auto)
Choose a different time zone
Editions
{{item.title}}
Change Time Zone
{{item.title}}
[{"tz":"Africa\/Abidjan","location":"Abidjan","code":"CI","country":"Cate d'Ivoire","title":"Abidjan - Cote d'Ivoire"},{"tz":"Africa\/Accra","location":"Accra","code":"GH","country":"Ghana","title":"Accra - Ghana"},{"tz":"Africa\/Addis_Ababa","location":"AddisAbaba","code":"ET","country":"Ethiopia","title":"Addis Ababa - Ethiopia"},{"tz":"Africa\/Algiers","location":"Algiers","code":"DZ","country":"Algeria","title":"Algiers - Algeria"},{"tz":"Africa\/Asmara","location":"Asmara","code":"ER","country":"Eritrea","title":"Asmara - Eritrea"},{"tz":"Africa\/Bamako","location":"Bamako","code":"ML","country":"Mali","title":"Bamako - Mali"},{"tz":"Africa\/Bangui","location":"Bangui","code":"CF","country":"Central African Republic","title":"Bangui - Central African Republic"},{"tz":"Africa\/Banjul","location":"Banjul","code":"GM","country":"Gambia","title":"Banjul - Gambia"},{"tz":"Africa\/Bissau","location":"Bissau","code":"GW","country":"Guinea-Bissau","title":"Bissau - Guinea-Bissau"},{"tz":"Africa\/Blantyre","location":"Blantyre","code":"MW","country":"Malawi","title":"Blantyre - Malawi"},{"tz":"Africa\/Brazzaville","location":"Brazzaville","code":"CG","country":"Congo (Brazzaville)","title":"Brazzaville - The Republic of the Congo"},{"tz":"Africa\/Bujumbura","location":"Bujumbura","code":"BI","country":"Burundi","title":"Bujumbura - Burundi"},{"tz":"Africa\/Cairo","location":"Cairo","code":"EG","country":"Egypt","title":"Cairo - Egypt"},{"tz":"Africa\/Casablanca","location":"Casablanca","code":"MA","country":"Morocco","title":"Casablanca - Morocco"},{"tz":"Africa\/Ceuta","location":"Ceuta","code":"ES","country":"Spain","title":"Ceuta - Spain"},{"tz":"Africa\/Conakry","location":"Conakry","code":"GN","country":"Guinea","title":"Conakry - Guinea"},{"tz":"Africa\/Dakar","location":"Dakar","code":"SN","country":"Senegal","title":"Dakar - Senegal"},{"tz":"Africa\/Dar_es_Salaam","location":"DaresSalaam","code":"TZ","country":"Tanzania","title":"Dar es Salaam - Tanzania"},{"tz":"Africa\/Djibouti","location":"Djibouti","code":"DJ","country":"Djibouti","title":"Djibouti"},{"tz":"Africa\/Douala","location":"Douala","code":"CM","country":"Cameroon","title":"Douala - Cameroon"},{"tz":"Africa\/El_Aaiun","location":"ElAaiun","code":"EH","country":"Western Sahara","title":"El Aaiun - Western Sahara"},{"tz":"Africa\/Freetown","location":"Freetown","code":"SL","country":"Sierra Leone","title":"Freetown - Sierra Leone"},{"tz":"Africa\/Gaborone","location":"Gaborone","code":"BW","country":"Botswana","title":"Gaborone - Botswana"},{"tz":"Africa\/Harare","location":"Harare","code":"ZW","country":"Zimbabwe","title":"Harare - Zimbabwe"},{"tz":"Africa\/Johannesburg","location":"Johannesburg","code":"ZA","country":"South Africa","title":"Johannesburg - South Africa"},{"tz":"Africa\/Juba","location":"Juba","code":"SS","country":"South Sudan","title":"Juba - South Sudan"},{"tz":"Africa\/Kampala","location":"Kampala","code":"UG","country":"Uganda","title":"Kampala - Uganda"},{"tz":"Africa\/Khartoum","location":"Khartoum","code":"SD","country":"Sudan","title":"Khartoum - Sudan"},{"tz":"Africa\/Kigali","location":"Kigali","code":"RW","country":"Rwanda","title":"Kigali - Rwanda"},{"tz":"Africa\/Kinshasa","location":"Kinshasa","code":"CD","country":"Congo (Kinshasa)","title":"Kinshasa - The Democratic Republic of Congo"},{"tz":"Africa\/Lagos","location":"Lagos","code":"NG","country":"Nigeria","title":"Lagos - Nigeria "},{"tz":"Africa\/Libreville","location":"Libreville","code":"GA","country":"Gabon","title":"Libreville - Gabon"},{"tz":"Africa\/Lome","location":"Lome","code":"TG","country":"Togo","title":"Lome - Togo"},{"tz":"Africa\/Luanda","location":"Luanda","code":"AO","country":"Angola","title":"Luanda - Angola"},{"tz":"Africa\/Lubumbashi","location":"Lubumbashi","code":"CD","country":"Congo (Kinshasa)","title":"Lubumbashi - The Democratic Republic of Congo"},{"tz":"Africa\/Lusaka","location":"Lusaka","code":"ZM","country":"Zambia","title":"Lusaka - Zambia"},{"tz":"Africa\/Malabo","location":"Malabo","code":"GQ","country":"Equatorial Guinea","title":"Malabo - Equatorial Guinea"},{"tz":"Africa\/Maputo","location":"Maputo","code":"MZ","country":"Mozambique","title":"Maputo - Mozambique"},{"tz":"Africa\/Maseru","location":"Maseru","code":"LS","country":"Lesotho","title":"Maseru - Lesotho"},{"tz":"Africa\/Mbabane","location":"Mbabane","code":"SZ","country":"Swaziland","title":"Mbabane - Eswatini"},{"tz":"Africa\/Mogadishu","location":"Mogadishu","code":"SO","country":"Somalia","title":"Mogadishu - Somalia"},{"tz":"Africa\/Monrovia","location":"Monrovia","code":"LR","country":"Liberia","title":"Monrovia - Liberia"},{"tz":"Africa\/Nairobi","location":"Nairobi","code":"KE","country":"Kenya","title":"Nairobi - Kenya"},{"tz":"Africa\/Ndjamena","location":"Ndjamena","code":"TD","country":"Chad","title":"Ndjamena - Chad"},{"tz":"Africa\/Niamey","location":"Niamey","code":"NE","country":"Niger","title":"Niamey - Niger"},{"tz":"Africa\/Nouakchott","location":"Nouakchott","code":"MR","country":"Mauritania","title":"Nouakchott - Mauritania"},{"tz":"Africa\/Ouagadougou","location":"Ouagadougou","code":"BF","country":"Burkina Faso","title":"Ouagadougou - Burkina Faso"},{"tz":"Africa\/Porto-Novo","location":"Porto-Novo","code":"BJ","country":"Benin","title":"Porto-Novo - Benin"},{"tz":"Africa\/Sao_Tome","location":"SaoTome","code":"ST","country":"Sao Tome and Principe","title":"Sao Tome and Principe"},{"tz":"Africa\/Tripoli","location":"Tripoli","code":"LY","country":"Libya","title":"Tripoli - Libya"},{"tz":"Africa\/Tunis","location":"Tunis","code":"TN","country":"Tunisia","title":"Tunis - Tunisia"},{"tz":"Africa\/Windhoek","location":"Windhoek","code":"NA","country":"Namibia","title":"Windhoek - Namibia"},{"tz":"America\/Adak","location":"Adak","code":"US","country":"United States of America","title":"Adak - Alaska - United States of America"},{"tz":"America\/Anchorage","location":"Anchorage","code":"US","country":"United States of America","title":"Anchorage - Alaska - United States of America"},{"tz":"America\/Anguilla","location":"Anguilla","code":"AI","country":"Anguilla","title":"Anguilla"},{"tz":"America\/Antigua","location":"Antigua","code":"AG","country":"Antigua and Barbuda","title":"Antigua and Barbuda"},{"tz":"America\/Araguaina","location":"Araguaina","code":"BR","country":"Brazil","title":"Araguaina - Brazil"},{"tz":"America\/Argentina\/Buenos_Aires","location":"America","code":"AR","country":"Argentina","title":"Buenos Aires - Argentina"},{"tz":"America\/Argentina\/Catamarca","location":"America","code":"AR","country":"Argentina","title":"Catamarca - Argentina"},{"tz":"America\/Argentina\/Cordoba","location":"America","code":"AR","country":"Argentina","title":"Cordoba - Argentina"},{"tz":"America\/Argentina\/Jujuy","location":"America","code":"AR","country":"Argentina","title":"Jujuy - Argentina"},{"tz":"America\/Argentina\/La_Rioja","location":"America","code":"AR","country":"Argentina","title":"La Rioja - Argentina"},{"tz":"America\/Argentina\/Mendoza","location":"America","code":"AR","country":"Argentina","title":"Mendoza - Argentina"},{"tz":"America\/Argentina\/Rio_Gallegos","location":"America","code":"AR","country":"Argentina","title":"Rio Gallegos - Argentina"},{"tz":"America\/Argentina\/Salta","location":"America","code":"AR","country":"Argentina","title":"Salta - Argentina"},{"tz":"America\/Argentina\/San_Juan","location":"America","code":"AR","country":"Argentina","title":"San Juan - Argentina"},{"tz":"America\/Argentina\/San_Luis","location":"America","code":"AR","country":"Argentina","title":"San Luis - Argentina"},{"tz":"America\/Argentina\/Tucuman","location":"America","code":"AR","country":"Argentina","title":"Tucuman - Argentina"},{"tz":"America\/Argentina\/Ushuaia","location":"America","code":"AR","country":"Argentina","title":"Ushuaia - Argentina"},{"tz":"America\/Aruba","location":"Aruba","code":"AW","country":"Aruba","title":"Aruba"},{"tz":"America\/Asuncion","location":"Asuncion","code":"PY","country":"Paraguay","title":"Asuncion - Paraguay"},{"tz":"America\/Atikokan","location":"Atikokan","code":"CA","country":"Canada","title":"Atikokan - Canada"},{"tz":"America\/Bahia","location":"Bahia","code":"BR","country":"Brazil","title":"Bahia - Brazil"},{"tz":"America\/Bahia_Banderas","location":"BahiaBanderas","code":"MX","country":"Mexico","title":"Bahia Banderas - Mexico"},{"tz":"America\/Barbados","location":"Barbados","code":"BB","country":"Barbados","title":"Barbados"},{"tz":"America\/Belem","location":"Belem","code":"BR","country":"Brazil","title":"Belem - Brazil"},{"tz":"America\/Belize","location":"Belize","code":"BZ","country":"Belize","title":"Belize"},{"tz":"America\/Blanc-Sablon","location":"Blanc-Sablon","code":"CA","country":"Canada","title":"Blanc-Sablon - Canada"},{"tz":"America\/Boa_Vista","location":"BoaVista","code":"BR","country":"Brazil","title":"Boa Vista - Brazil"},{"tz":"America\/Bogota","location":"Bogota","code":"CO","country":"Colombia","title":"Bogota - Colombia"},{"tz":"America\/Boise","location":"Boise","code":"US","country":"United States of America","title":"Boise - Idaho - United States of America"},{"tz":"America\/Cambridge_Bay","location":"CambridgeBay","code":"CA","country":"Canada","title":"Cambridge Bay - Canada"},{"tz":"America\/Campo_Grande","location":"CampoGrande","code":"BR","country":"Brazil","title":"Campo Grande - Brazil"},{"tz":"America\/Cancun","location":"Cancun","code":"MX","country":"Mexico","title":"Cancun - Mexico"},{"tz":"America\/Caracas","location":"Caracas","code":"VE","country":"Venezuela (Bolivarian Republic)","title":"Caracas - Venezuela"},{"tz":"America\/Cayenne","location":"Cayenne","code":"GF","country":"French Guiana","title":"Cayenne - French Guiana"},{"tz":"America\/Cayman","location":"Cayman","code":"KY","country":"Cayman Islands","title":"Cayman Islands"},{"tz":"America\/Chicago","location":"Chicago","code":"US","country":"United States of America","title":"Chicago - Illinois - United States of America"},{"tz":"America\/Chihuahua","location":"Chihuahua","code":"MX","country":"Mexico","title":"Chihuahua - Mexico"},{"tz":"America\/Ciudad_Juarez","location":"CiudadJuarez","code":"MX","country":"Mexico","title":"Ciudad Juarez - Mexico"},{"tz":"America\/Costa_Rica","location":"CostaRica","code":"CR","country":"Costa Rica","title":"Costa Rica"},{"tz":"America\/Creston","location":"Creston","code":"CA","country":"Canada","title":"Creston - Canada"},{"tz":"America\/Cuiaba","location":"Cuiaba","code":"BR","country":"Brazil","title":"Cuiaba - Brazil"},{"tz":"America\/Curacao","location":"Curacao","code":"CW","country":"","title":"Curacao"},{"tz":"America\/Danmarkshavn","location":"Danmarkshavn","code":"GL","country":"Greenland","title":"Danmarkshavn - Greenland"},{"tz":"America\/Dawson","location":"Dawson","code":"CA","country":"Canada","title":"Dawson - Canada"},{"tz":"America\/Dawson_Creek","location":"DawsonCreek","code":"CA","country":"Canada","title":"Dawson Creek - Canada"},{"tz":"America\/Denver","location":"Denver","code":"US","country":"United States of America","title":"Denver - Colorado - United States of America"},{"tz":"America\/Detroit","location":"Detroit","code":"US","country":"United States of America","title":"Detroit - Michigan - United States of America"},{"tz":"America\/Dominica","location":"Dominica","code":"DM","country":"Dominica","title":"Dominica"},{"tz":"America\/Edmonton","location":"Edmonton","code":"CA","country":"Canada","title":"Edmonton - Canada"},{"tz":"America\/Eirunepe","location":"Eirunepe","code":"BR","country":"Brazil","title":"Eirunepe - Brazil"},{"tz":"America\/El_Salvador","location":"ElSalvador","code":"SV","country":"El Salvador","title":"El Salvador"},{"tz":"America\/Fort_Nelson","location":"FortNelson","code":"CA","country":"Canada","title":"Fort Nelson - Canada"},{"tz":"America\/Fortaleza","location":"Fortaleza","code":"BR","country":"Brazil","title":"Fortaleza - Brazil"},{"tz":"America\/Glace_Bay","location":"GlaceBay","code":"CA","country":"Canada","title":"Glace Bay - Canada"},{"tz":"America\/Goose_Bay","location":"GooseBay","code":"CA","country":"Canada","title":"Goose Bay - Canada"},{"tz":"America\/Grand_Turk","location":"GrandTurk","code":"TC","country":"Turks and Caicos Islands","title":"Grand Turk - Turks and Caicos Islands"},{"tz":"America\/Grenada","location":"Grenada","code":"GD","country":"Grenada","title":"Grenada"},{"tz":"America\/Guadeloupe","location":"Guadeloupe","code":"GP","country":"Guadeloupe","title":"Guadeloupe"},{"tz":"America\/Guatemala","location":"Guatemala","code":"GT","country":"Guatemala","title":"Guatemala"},{"tz":"America\/Guayaquil","location":"Guayaquil","code":"EC","country":"Ecuador","title":"Guayaquil - Ecuador"},{"tz":"America\/Guyana","location":"Guyana","code":"GY","country":"Guyana","title":"Guyana"},{"tz":"America\/Halifax","location":"Halifax","code":"CA","country":"Canada","title":"Halifax - Canada"},{"tz":"America\/Havana","location":"Havana","code":"CU","country":"Cuba","title":"Havana - Cuba"},{"tz":"America\/Hermosillo","location":"Hermosillo","code":"MX","country":"Mexico","title":"Hermosillo - Mexico"},{"tz":"America\/Indiana\/Indianapolis","location":"America","code":"US","country":"United States of America","title":"Indianapolis - Indiana - United States of America"},{"tz":"America\/Indiana\/Knox","location":"America","code":"US","country":"United States of America","title":"Knox - Indiana - United States of America"},{"tz":"America\/Indiana\/Marengo","location":"America","code":"US","country":"United States of America","title":"Marengo - Indiana - United States of America"},{"tz":"America\/Indiana\/Petersburg","location":"America","code":"US","country":"United States of America","title":"Petersburg - Indiana - United States of America"},{"tz":"America\/Indiana\/Tell_City","location":"America","code":"US","country":"United States of America","title":"Tell City - Indiana - United States of America"},{"tz":"America\/Indiana\/Vevay","location":"America","code":"US","country":"United States of America","title":"Vevay - Indiana - United States of America"},{"tz":"America\/Indiana\/Vincennes","location":"America","code":"US","country":"United States of America","title":"Vincennes - Indiana - United States of America"},{"tz":"America\/Indiana\/Winamac","location":"America","code":"US","country":"United States of America","title":"Winamac - Indiana - United States of America"},{"tz":"America\/Inuvik","location":"Inuvik","code":"CA","country":"Canada","title":"Inuvik - Canada"},{"tz":"America\/Iqaluit","location":"Iqaluit","code":"CA","country":"Canada","title":"Iqaluit - Canada"},{"tz":"America\/Jamaica","location":"Jamaica","code":"JM","country":"Jamaica","title":"Jamaica"},{"tz":"America\/Juneau","location":"Juneau","code":"US","country":"United States of America","title":"Juneau - Alaska - United States of America"},{"tz":"America\/Kentucky\/Louisville","location":"America","code":"US","country":"United States of America","title":"Louisville - Kentucky - United States of America"},{"tz":"America\/Kentucky\/Monticello","location":"America","code":"US","country":"United States of America","title":"Monticello - Kentucky - United States of America"},{"tz":"America\/Kralendijk","location":"Kralendijk","code":"BQ","country":"","title":"Kralendijk - Bonaire"},{"tz":"America\/La_Paz","location":"LaPaz","code":"BO","country":"Bolivia","title":"La Paz - Bolivia"},{"tz":"America\/Lima","location":"Lima","code":"PE","country":"Peru","title":"Lima - Peru"},{"tz":"America\/Los_Angeles","location":"LosAngeles","code":"US","country":"United States of America","title":"Los Angeles - California - United States of America"},{"tz":"America\/Lower_Princes","location":"LowerPrinces","code":"SX","country":"","title":"Lower Princes - Sint Maarten"},{"tz":"America\/Maceio","location":"Maceio","code":"BR","country":"Brazil","title":"Maceio - Brazil"},{"tz":"America\/Managua","location":"Managua","code":"NI","country":"Nicaragua","title":"Managua - Nicaragua"},{"tz":"America\/Manaus","location":"Manaus","code":"BR","country":"Brazil","title":"Manaus - Brazil"},{"tz":"America\/Marigot","location":"Marigot","code":"MF","country":"Saint-Martin (French part)","title":"Marigot - Saint-Martin"},{"tz":"America\/Martinique","location":"Martinique","code":"MQ","country":"Martinique","title":"Martinique"},{"tz":"America\/Matamoros","location":"Matamoros","code":"MX","country":"Mexico","title":"Matamoros - Mexico"},{"tz":"America\/Mazatlan","location":"Mazatlan","code":"MX","country":"Mexico","title":"Mazatlan - Mexico"},{"tz":"America\/Menominee","location":"Menominee","code":"US","country":"United States of America","title":"Menominee - Wisconsin - United States of America"},{"tz":"America\/Merida","location":"Merida","code":"MX","country":"Mexico","title":"Merida - Mexico"},{"tz":"America\/Metlakatla","location":"Metlakatla","code":"US","country":"United States of America","title":"Metlakatla - Alaska - United States of America"},{"tz":"America\/Mexico_City","location":"MexicoCity","code":"MX","country":"Mexico","title":"Mexico City - Mexico"},{"tz":"America\/Miquelon","location":"Miquelon","code":"PM","country":"Saint Pierre and Miquelon","title":"Miquelon - Saint Pierre and Miquelon"},{"tz":"America\/Moncton","location":"Moncton","code":"CA","country":"Canada","title":"Moncton - Canada"},{"tz":"America\/Monterrey","location":"Monterrey","code":"MX","country":"Mexico","title":"Monterrey - Mexico"},{"tz":"America\/Montevideo","location":"Montevideo","code":"UY","country":"Uruguay","title":"Montevideo - Uruguay"},{"tz":"America\/Montserrat","location":"Montserrat","code":"MS","country":"Montserrat","title":"Montserrat"},{"tz":"America\/Nassau","location":"Nassau","code":"BS","country":"Bahamas","title":"Nassau - Bahamas"},{"tz":"America\/New_York","location":"NewYork","code":"US","country":"United States of America","title":"New York - United States of America"},{"tz":"America\/Nome","location":"Nome","code":"US","country":"United States of America","title":"Nome - Alaska - United States of America"},{"tz":"America\/Noronha","location":"Noronha","code":"BR","country":"Brazil","title":"Noronha - Brazil"},{"tz":"America\/North_Dakota\/Beulah","location":"America","code":"US","country":"United States of America","title":"Beulah - North Dakota - United States of America"},{"tz":"America\/North_Dakota\/Center","location":"America","code":"US","country":"United States of America","title":"Center - North Dakota - United States of America"},{"tz":"America\/North_Dakota\/New_Salem","location":"America","code":"US","country":"United States of America","title":"New Salem - North Dakota - United States of America"},{"tz":"America\/Nuuk","location":"Nuuk","code":"GL","country":"Greenland","title":"Nuuk - Greenland"},{"tz":"America\/Ojinaga","location":"Ojinaga","code":"MX","country":"Mexico","title":"Ojinaga - Mexico"},{"tz":"America\/Panama","location":"Panama","code":"PA","country":"Panama","title":"Panama"},{"tz":"America\/Paramaribo","location":"Paramaribo","code":"SR","country":"Suriname","title":"Paramaribo - Suriname"},{"tz":"America\/Phoenix","location":"Phoenix","code":"US","country":"United States of America","title":"Phoenix - Arizona - United States of America"},{"tz":"America\/Port-au-Prince","location":"Port-au-Prince","code":"HT","country":"Haiti","title":"Port-au-Prince - Haiti"},{"tz":"America\/Port_of_Spain","location":"PortofSpain","code":"TT","country":"Trinidad and Tobago","title":"Port of Spain - Trinidad and Tobago"},{"tz":"America\/Porto_Velho","location":"PortoVelho","code":"BR","country":"Brazil","title":"Porto Velho - Brazil"},{"tz":"America\/Puerto_Rico","location":"PuertoRico","code":"PR","country":"Puerto Rico","title":"Puerto Rico"},{"tz":"America\/Punta_Arenas","location":"PuntaArenas","code":"CL","country":"Chile","title":"Punta Arenas - Chile"},{"tz":"America\/Rankin_Inlet","location":"RankinInlet","code":"CA","country":"Canada","title":"Rankin Inlet - Canada"},{"tz":"America\/Recife","location":"Recife","code":"BR","country":"Brazil","title":"Recife - Brazil"},{"tz":"America\/Regina","location":"Regina","code":"CA","country":"Canada","title":"Regina - Canada"},{"tz":"America\/Resolute","location":"Resolute","code":"CA","country":"Canada","title":"Resolute - Canada"},{"tz":"America\/Rio_Branco","location":"RioBranco","code":"BR","country":"Brazil","title":"Rio Branco - Brazil"},{"tz":"America\/Santarem","location":"Santarem","code":"BR","country":"Brazil","title":"Santarem - Brazil"},{"tz":"America\/Santiago","location":"Santiago","code":"CL","country":"Chile","title":"Santiago - Chile"},{"tz":"America\/Santo_Domingo","location":"SantoDomingo","code":"DO","country":"Dominican Republic","title":"Santo Domingo - Dominican Republic"},{"tz":"America\/Sao_Paulo","location":"SaoPaulo","code":"BR","country":"Brazil","title":"Sao Paulo - Brazil"},{"tz":"America\/Scoresbysund","location":"Scoresbysund","code":"GL","country":"Greenland","title":"Scoresbysund - Greenland"},{"tz":"America\/Sitka","location":"Sitka","code":"US","country":"United States of America","title":"Sitka - Alaska - United States of America"},{"tz":"America\/St_Barthelemy","location":"StBarthelemy","code":"BL","country":"Saint-Barthelemy","title":"Saint Barthelemy"},{"tz":"America\/St_Johns","location":"StJohns","code":"CA","country":"Canada","title":"St Johns - Canada"},{"tz":"America\/St_Kitts","location":"StKitts","code":"KN","country":"Saint Kitts and Nevis","title":"Saint Kitts and Nevis"},{"tz":"America\/St_Lucia","location":"StLucia","code":"LC","country":"Saint Lucia","title":"Saint Lucia"},{"tz":"America\/St_Thomas","location":"StThomas","code":"VI","country":"Virgin Islands","title":"St Thomas - US Virgin Islands"},{"tz":"America\/St_Vincent","location":"StVincent","code":"VC","country":"Saint Vincent and Grenadines","title":"Saint Vincent and Grenadines"},{"tz":"America\/Swift_Current","location":"SwiftCurrent","code":"CA","country":"Canada","title":"Swift Current - Canada"},{"tz":"America\/Tegucigalpa","location":"Tegucigalpa","code":"HN","country":"Honduras","title":"Tegucigalpa - Honduras"},{"tz":"America\/Thule","location":"Thule","code":"GL","country":"Greenland","title":"Thule - Greenland"},{"tz":"America\/Tijuana","location":"Tijuana","code":"MX","country":"Mexico","title":"Tijuana - Mexico"},{"tz":"America\/Toronto","location":"Toronto","code":"CA","country":"Canada","title":"Toronto - Canada"},{"tz":"America\/Tortola","location":"Tortola","code":"VG","country":"British Virgin Islands","title":"Tortola - British Virgin Islands"},{"tz":"America\/Vancouver","location":"Vancouver","code":"CA","country":"Canada","title":"Vancouver - Canada"},{"tz":"America\/Whitehorse","location":"Whitehorse","code":"CA","country":"Canada","title":"Whitehorse - Canada"},{"tz":"America\/Winnipeg","location":"Winnipeg","code":"CA","country":"Canada","title":"Winnipeg - Canada"},{"tz":"America\/Yakutat","location":"Yakutat","code":"US","country":"United States of America","title":"Yakutat - Alaska - United States of America"},{"tz":"Antarctica\/Casey","location":"Casey","code":"AQ","country":"Antarctica","title":"Casey - Antarctica"},{"tz":"Antarctica\/Davis","location":"Davis","code":"AQ","country":"Antarctica","title":"Davis - Antarctica"},{"tz":"Antarctica\/DumontDUrville","location":"DumontDUrville","code":"AQ","country":"Antarctica","title":"Dumont D'Urville - Antarctica"},{"tz":"Antarctica\/Macquarie","location":"Macquarie","code":"AU","country":"Australia","title":"Macquarie Island - Australia"},{"tz":"Antarctica\/Mawson","location":"Mawson","code":"AQ","country":"Antarctica","title":"Mawson - Antarctica"},{"tz":"Antarctica\/McMurdo","location":"McMurdo","code":"AQ","country":"Antarctica","title":"McMurdo - Antarctica"},{"tz":"Antarctica\/Palmer","location":"Palmer","code":"AQ","country":"Antarctica","title":"Palmer - Antarctica"},{"tz":"Antarctica\/Rothera","location":"Rothera","code":"AQ","country":"Antarctica","title":"Rothera - Antarctica"},{"tz":"Antarctica\/Syowa","location":"Syowa","code":"AQ","country":"Antarctica","title":"Syowa - Antarctica"},{"tz":"Antarctica\/Troll","location":"Troll","code":"AQ","country":"Antarctica","title":"Troll - Antarctica"},{"tz":"Antarctica\/Vostok","location":"Vostok","code":"AQ","country":"Antarctica","title":"Vostok - Antarctica"},{"tz":"Arctic\/Longyearbyen","location":"Longyearbyen","code":"SJ","country":"Svalbard and Jan Mayen Islands","title":"Longyearbyen - Svalbard and Jan Mayen Islands"},{"tz":"Asia\/Aden","location":"Aden","code":"YE","country":"Yemen","title":"Aden - Yemen"},{"tz":"Asia\/Almaty","location":"Almaty","code":"KZ","country":"Kazakhstan","title":"Almaty - Kazakhstan"},{"tz":"Asia\/Amman","location":"Amman","code":"JO","country":"Jordan","title":"Amman - Jordan"},{"tz":"Asia\/Anadyr","location":"Anadyr","code":"RU","country":"Russia","title":"Anadyr - Russia"},{"tz":"Asia\/Aqtau","location":"Aqtau","code":"KZ","country":"Kazakhstan","title":"Aqtau - Kazakhstan"},{"tz":"Asia\/Aqtobe","location":"Aqtobe","code":"KZ","country":"Kazakhstan","title":"Aqtobe - Kazakhstan"},{"tz":"Asia\/Ashgabat","location":"Ashgabat","code":"TM","country":"Turkmenistan","title":"Ashgabat - Turkmenistan"},{"tz":"Asia\/Atyrau","location":"Atyrau","code":"KZ","country":"Kazakhstan","title":"Atyrau - Kazakhstan"},{"tz":"Asia\/Baghdad","location":"Baghdad","code":"IQ","country":"Iraq","title":"Baghdad - Iraq"},{"tz":"Asia\/Bahrain","location":"Bahrain","code":"BH","country":"Bahrain","title":"Bahrain"},{"tz":"Asia\/Baku","location":"Baku","code":"AZ","country":"Azerbaijan","title":"Baku - Azerbaijan"},{"tz":"Asia\/Bangkok","location":"Bangkok","code":"TH","country":"Thailand","title":"Bangkok - Thailand"},{"tz":"Asia\/Barnaul","location":"Barnaul","code":"RU","country":"Russia","title":"Barnaul - Russia"},{"tz":"Asia\/Beirut","location":"Beirut","code":"LB","country":"Lebanon","title":"Beirut - Lebanon"},{"tz":"Asia\/Bishkek","location":"Bishkek","code":"KG","country":"Kyrgyzstan","title":"Bishkek - Kyrgyzstan"},{"tz":"Asia\/Brunei","location":"Brunei","code":"BN","country":"Brunei Darussalam","title":"Brunei Darussalam"},{"tz":"Asia\/Chita","location":"Chita","code":"RU","country":"Russia","title":"Chita - Russia"},{"tz":"Asia\/Choibalsan","location":"Choibalsan","code":"MN","country":"Mongolia","title":"Choibalsan - Mongolia"},{"tz":"Asia\/Colombo","location":"Colombo","code":"LK","country":"Sri Lanka","title":"Colombo - Sri Lanka"},{"tz":"Asia\/Damascus","location":"Damascus","code":"SY","country":"Syrian Arab Republic (Syria)","title":"Damascus - Syria"},{"tz":"Asia\/Dhaka","location":"Dhaka","code":"BD","country":"Bangladesh","title":"Dhaka - Bangladesh"},{"tz":"Asia\/Dili","location":"Dili","code":"TL","country":"Timor-Leste","title":"Dili - Timor-Leste"},{"tz":"Asia\/Dubai","location":"Dubai","code":"AE","country":"United Arab Emirates","title":"Dubai - United Arab Emirates"},{"tz":"Asia\/Dushanbe","location":"Dushanbe","code":"TJ","country":"Tajikistan","title":"Dushanbe - Tajikistan"},{"tz":"Asia\/Famagusta","location":"Famagusta","code":"CY","country":"Cyprus","title":"Famagusta - Cyprus"},{"tz":"Asia\/Gaza","location":"Gaza","code":"PS","country":"Palestinian Territory","title":"Gaza - Palestinian Territory"},{"tz":"Asia\/Hebron","location":"Hebron","code":"PS","country":"Palestinian Territory","title":"Hebron - Palestinian Territory"},{"tz":"Asia\/Ho_Chi_Minh","location":"HoChiMinh","code":"VN","country":"Viet Nam","title":"Ho Chi Minh City - Vietnam"},{"tz":"Asia\/Hong_Kong","location":"HongKong","code":"HK","country":"Hong Kong","title":"Hong Kong China"},{"tz":"Asia\/Hovd","location":"Hovd","code":"MN","country":"Mongolia","title":"Hovd - Mongolia"},{"tz":"Asia\/Irkutsk","location":"Irkutsk","code":"RU","country":"Russia","title":"Irkutsk - Russia"},{"tz":"Asia\/Jakarta","location":"Jakarta","code":"ID","country":"Indonesia","title":"Jakarta - Indonesia"},{"tz":"Asia\/Jayapura","location":"Jayapura","code":"ID","country":"Indonesia","title":"Jayapura - Indonesia"},{"tz":"Asia\/Jerusalem","location":"Jerusalem","code":"IL","country":"Israel","title":"Jerusalem - Israel"},{"tz":"Asia\/Kabul","location":"Kabul","code":"AF","country":"Afghanistan","title":"Kabul - Afghanistan"},{"tz":"Asia\/Kamchatka","location":"Kamchatka","code":"RU","country":"Russia","title":"Kamchatka - Russia"},{"tz":"Asia\/Karachi","location":"Karachi","code":"PK","country":"Pakistan","title":"Karachi - Pakistan"},{"tz":"Asia\/Kathmandu","location":"Kathmandu","code":"NP","country":"Nepal","title":"Kathmandu - Nepal"},{"tz":"Asia\/Khandyga","location":"Khandyga","code":"RU","country":"Russia","title":"Khandyga - Russia"},{"tz":"Asia\/Kolkata","location":"Kolkata","code":"IN","country":"India","title":"Kolkata - India"},{"tz":"Asia\/Krasnoyarsk","location":"Krasnoyarsk","code":"RU","country":"Russia","title":"Krasnoyarsk - Russia"},{"tz":"Asia\/Kuala_Lumpur","location":"KualaLumpur","code":"MY","country":"Malaysia","title":"Kuala Lumpur - Malaysia"},{"tz":"Asia\/Kuching","location":"Kuching","code":"MY","country":"Malaysia","title":"Kuching - Malaysia"},{"tz":"Asia\/Kuwait","location":"Kuwait","code":"KW","country":"Kuwait","title":"Kuwait"},{"tz":"Asia\/Macau","location":"Macau","code":"MO","country":"Macau","title":"Macau"},{"tz":"Asia\/Magadan","location":"Magadan","code":"RU","country":"Russia","title":"Magadan - Russia"},{"tz":"Asia\/Makassar","location":"Makassar","code":"ID","country":"Indonesia","title":"Makassar - Indonesia"},{"tz":"Asia\/Manila","location":"Manila","code":"PH","country":"Philippines","title":"Manila - Philippines"},{"tz":"Asia\/Muscat","location":"Muscat","code":"OM","country":"Oman","title":"Muscat - Oman"},{"tz":"Asia\/Nicosia","location":"Nicosia","code":"CY","country":"Cyprus","title":"Nicosia - Cyprus"},{"tz":"Asia\/Novokuznetsk","location":"Novokuznetsk","code":"RU","country":"Russia","title":"Novokuznetsk - Russia"},{"tz":"Asia\/Novosibirsk","location":"Novosibirsk","code":"RU","country":"Russia","title":"Novosibirsk - Russia"},{"tz":"Asia\/Omsk","location":"Omsk","code":"RU","country":"Russia","title":"Omsk - Russia"},{"tz":"Asia\/Oral","location":"Oral","code":"KZ","country":"Kazakhstan","title":"Oral - Kazakhstan"},{"tz":"Asia\/Phnom_Penh","location":"PhnomPenh","code":"KH","country":"Cambodia","title":"Phnom Penh - Cambodia"},{"tz":"Asia\/Pontianak","location":"Pontianak","code":"ID","country":"Indonesia","title":"Pontianak - Indonesia"},{"tz":"Asia\/Pyongyang","location":"Pyongyang","code":"KP","country":"Korea (North)","title":"Pyongyang - North Korea"},{"tz":"Asia\/Qatar","location":"Qatar","code":"QA","country":"Qatar","title":"Qatar"},{"tz":"Asia\/Qostanay","location":"Qostanay","code":"KZ","country":"Kazakhstan","title":"Qostanay - Kazakhstan"},{"tz":"Asia\/Qyzylorda","location":"Qyzylorda","code":"KZ","country":"Kazakhstan","title":"Qyzylorda - Kazakhstan"},{"tz":"Asia\/Riyadh","location":"Riyadh","code":"SA","country":"Saudi Arabia","title":"Riyadh - Saudi Arabia"},{"tz":"Asia\/Sakhalin","location":"Sakhalin","code":"RU","country":"Russia","title":"Sakhalin - Russia"},{"tz":"Asia\/Samarkand","location":"Samarkand","code":"UZ","country":"Uzbekistan","title":"Samarkand - Uzbekistan"},{"tz":"Asia\/Seoul","location":"Seoul","code":"KR","country":"Korea (South)","title":"Seoul - South Korea"},{"tz":"Asia\/Shanghai","location":"Shanghai","code":"CN","country":"China","title":"Shanghai - China"},{"tz":"Asia\/Singapore","location":"Singapore","code":"SG","country":"Singapore","title":"Singapore"},{"tz":"Asia\/Srednekolymsk","location":"Srednekolymsk","code":"RU","country":"Russia","title":"Srednekolymsk - Russia"},{"tz":"Asia\/Taipei","location":"Taipei","code":"TW","country":"Taiwan","title":"Taipei - Chinese Taipei"},{"tz":"Asia\/Tashkent","location":"Tashkent","code":"UZ","country":"Uzbekistan","title":"Tashkent - Uzbekistan"},{"tz":"Asia\/Tbilisi","location":"Tbilisi","code":"GE","country":"Georgia","title":"Tbilisi - Georgia"},{"tz":"Asia\/Tehran","location":"Tehran","code":"IR","country":"Iran","title":"Tehran - Iran"},{"tz":"Asia\/Thimphu","location":"Thimphu","code":"BT","country":"Bhutan","title":"Thimphu - Bhutan"},{"tz":"Asia\/Tokyo","location":"Tokyo","code":"JP","country":"Japan","title":"Tokyo - Japan"},{"tz":"Asia\/Tomsk","location":"Tomsk","code":"RU","country":"Russia","title":"Tomsk - Russia"},{"tz":"Asia\/Ulaanbaatar","location":"Ulaanbaatar","code":"MN","country":"Mongolia","title":"Ulaanbaatar - Mongolia"},{"tz":"Asia\/Urumqi","location":"Urumqi","code":"CN","country":"China","title":"Urumqi - China"},{"tz":"Asia\/Ust-Nera","location":"Ust-Nera","code":"RU","country":"Russia","title":"Ust-Nera - Russia"},{"tz":"Asia\/Vientiane","location":"Vientiane","code":"LA","country":"Lao PDR","title":"Vientiane - Laos"},{"tz":"Asia\/Vladivostok","location":"Vladivostok","code":"RU","country":"Russia","title":"Vladivostok - Russia"},{"tz":"Asia\/Yakutsk","location":"Yakutsk","code":"RU","country":"Russia","title":"Yakutsk - Russia"},{"tz":"Asia\/Yangon","location":"Yangon","code":"MM","country":"Myanmar","title":"Yangon - Myanmar"},{"tz":"Asia\/Yekaterinburg","location":"Yekaterinburg","code":"RU","country":"Russia","title":"Yekaterinburg - Russia"},{"tz":"Asia\/Yerevan","location":"Yerevan","code":"AM","country":"Armenia","title":"Yerevan - Armenia"},{"tz":"Atlantic\/Azores","location":"Azores","code":"PT","country":"Portugal","title":"Azores - Portugal"},{"tz":"Atlantic\/Bermuda","location":"Bermuda","code":"BM","country":"Bermuda","title":"Bermuda"},{"tz":"Atlantic\/Canary","location":"Canary","code":"ES","country":"Spain","title":"Canary Islands - Spain"},{"tz":"Atlantic\/Cape_Verde","location":"CapeVerde","code":"CV","country":"Cape Verde","title":"Cape Verde"},{"tz":"Atlantic\/Faroe","location":"Faroe","code":"FO","country":"Faroe Islands","title":"Faroe Islands"},{"tz":"Atlantic\/Madeira","location":"Madeira","code":"PT","country":"Portugal","title":"Madeira - Portugal"},{"tz":"Atlantic\/Reykjavik","location":"Reykjavik","code":"IS","country":"Iceland","title":"Reykjavik - Iceland"},{"tz":"Atlantic\/South_Georgia","location":"SouthGeorgia","code":"GS","country":"South Georgia and the South Sandwich Islands","title":"South Georgia and the South Sandwich Islands"},{"tz":"Atlantic\/St_Helena","location":"StHelena","code":"SH","country":"Saint Helena","title":"Saint Helena"},{"tz":"Atlantic\/Stanley","location":"Stanley","code":"FK","country":"Falkland Islands (Malvinas)","title":"Stanley - Falkland Islands"},{"tz":"Australia\/Adelaide","location":"Adelaide","code":"AU","country":"Australia","title":"Adelaide - Australia"},{"tz":"Australia\/Brisbane","location":"Brisbane","code":"AU","country":"Australia","title":"Brisbane - Australia"},{"tz":"Australia\/Broken_Hill","location":"BrokenHill","code":"AU","country":"Australia","title":"Broken Hill - Australia"},{"tz":"Australia\/Darwin","location":"Darwin","code":"AU","country":"Australia","title":"Darwin - Australia"},{"tz":"Australia\/Eucla","location":"Eucla","code":"AU","country":"Australia","title":"Eucla - Australia"},{"tz":"Australia\/Hobart","location":"Hobart","code":"AU","country":"Australia","title":"Hobart - Australia"},{"tz":"Australia\/Lindeman","location":"Lindeman","code":"AU","country":"Australia","title":"Lindeman - Australia"},{"tz":"Australia\/Lord_Howe","location":"LordHowe","code":"AU","country":"Australia","title":"Lord Howe - Australia"},{"tz":"Australia\/Melbourne","location":"Melbourne","code":"AU","country":"Australia","title":"Melbourne - Australia"},{"tz":"Australia\/Perth","location":"Perth","code":"AU","country":"Australia","title":"Perth - Australia"},{"tz":"Australia\/Sydney","location":"Sydney","code":"AU","country":"Australia","title":"Sydney - Australia"},{"tz":"Europe\/Amsterdam","location":"Amsterdam","code":"NL","country":"Netherlands","title":"Amsterdam - Netherlands"},{"tz":"Europe\/Andorra","location":"Andorra","code":"AD","country":"Andorra","title":"Andorra"},{"tz":"Europe\/Astrakhan","location":"Astrakhan","code":"RU","country":"Russia","title":"Astrakhan - Russia"},{"tz":"Europe\/Athens","location":"Athens","code":"GR","country":"Greece","title":"Athens - Greece"},{"tz":"Europe\/Belgrade","location":"Belgrade","code":"RS","country":"Serbia","title":"Belgrade - Serbia"},{"tz":"Europe\/Berlin","location":"Berlin","code":"DE","country":"Germany","title":"Berlin - Germany"},{"tz":"Europe\/Bratislava","location":"Bratislava","code":"SK","country":"Slovakia","title":"Bratislava - Slovakia"},{"tz":"Europe\/Brussels","location":"Brussels","code":"BE","country":"Belgium","title":"Brussels - Belgium"},{"tz":"Europe\/Bucharest","location":"Bucharest","code":"RO","country":"Romania","title":"Bucharest - Romania"},{"tz":"Europe\/Budapest","location":"Budapest","code":"HU","country":"Hungary","title":"Budapest - Hungary"},{"tz":"Europe\/Busingen","location":"Busingen","code":"DE","country":"Germany","title":"Busingen - Germany"},{"tz":"Europe\/Chisinau","location":"Chisinau","code":"MD","country":"Moldova","title":"Chisinau - Moldova"},{"tz":"Europe\/Copenhagen","location":"Copenhagen","code":"DK","country":"Denmark","title":"Copenhagen - Denmark"},{"tz":"Europe\/Dublin","location":"Dublin","code":"IE","country":"Ireland","title":"Dublin - Ireland"},{"tz":"Europe\/Gibraltar","location":"Gibraltar","code":"GI","country":"Gibraltar","title":"Gibraltar"},{"tz":"Europe\/Guernsey","location":"Guernsey","code":"GG","country":"Guernsey","title":"Guernsey"},{"tz":"Europe\/Helsinki","location":"Helsinki","code":"FI","country":"Finland","title":"Helsinki - Finland"},{"tz":"Europe\/Isle_of_Man","location":"IsleofMan","code":"IM","country":"Isle of Man","title":"Isle of Man"},{"tz":"Europe\/Istanbul","location":"Istanbul","code":"TR","country":"Turkey","title":"Istanbul - Turkey"},{"tz":"Europe\/Jersey","location":"Jersey","code":"JE","country":"Jersey","title":"Jersey"},{"tz":"Europe\/Kaliningrad","location":"Kaliningrad","code":"RU","country":"Russia","title":"Kaliningrad - Russia"},{"tz":"Europe\/Kirov","location":"Kirov","code":"RU","country":"Russia","title":"Kirov - Russia"},{"tz":"Europe\/Kyiv","location":"Kyiv","code":"UA","country":"Ukraine","title":"Kyiv - Ukraine"},{"tz":"Europe\/Lisbon","location":"Lisbon","code":"PT","country":"Portugal","title":"Lisbon - Portugal"},{"tz":"Europe\/Ljubljana","location":"Ljubljana","code":"SI","country":"Slovenia","title":"Ljubljana - Slovenia"},{"tz":"Europe\/London","location":"London","code":"GB","country":"United Kingdom","title":"London - United Kingdom"},{"tz":"Europe\/Luxembourg","location":"Luxembourg","code":"LU","country":"Luxembourg","title":"Luxembourg"},{"tz":"Europe\/Madrid","location":"Madrid","code":"ES","country":"Spain","title":"Madrid - Spain"},{"tz":"Europe\/Malta","location":"Malta","code":"MT","country":"Malta","title":"Malta"},{"tz":"Europe\/Mariehamn","location":"Mariehamn","code":"AX","country":"Aland Islands","title":"Mariehamn - Aland Islands"},{"tz":"Europe\/Minsk","location":"Minsk","code":"BY","country":"Belarus","title":"Minsk - Belarus"},{"tz":"Europe\/Monaco","location":"Monaco","code":"MC","country":"Monaco","title":"Monaco"},{"tz":"Europe\/Moscow","location":"Moscow","code":"RU","country":"Russia","title":"Moscow - Russia"},{"tz":"Europe\/Oslo","location":"Oslo","code":"NO","country":"Norway","title":"Oslo - Norway"},{"tz":"Europe\/Paris","location":"Paris","code":"FR","country":"France","title":"Paris - France"},{"tz":"Europe\/Podgorica","location":"Podgorica","code":"ME","country":"Montenegro","title":"Podgorica - Montenegro"},{"tz":"Europe\/Prague","location":"Prague","code":"CZ","country":"Czech Republic","title":"Prague - Czech Republic"},{"tz":"Europe\/Riga","location":"Riga","code":"LV","country":"Latvia","title":"Riga - Latvia"},{"tz":"Europe\/Rome","location":"Rome","code":"IT","country":"Italy","title":"Rome - Italy"},{"tz":"Europe\/Samara","location":"Samara","code":"RU","country":"Russia","title":"Samara - russia"},{"tz":"Europe\/San_Marino","location":"SanMarino","code":"SM","country":"San Marino","title":"San Marino"},{"tz":"Europe\/Sarajevo","location":"Sarajevo","code":"BA","country":"Bosnia and Herzegovina","title":"Sarajevo - Bosnia and Herzergovina"},{"tz":"Europe\/Saratov","location":"Saratov","code":"RU","country":"Russia","title":"Saratov - Russia"},{"tz":"Europe\/Simferopol","location":"Simferopol","code":"UA","country":"Ukraine","title":"Simferopol - Ukraine"},{"tz":"Europe\/Skopje","location":"Skopje","code":"MK","country":"Macedonia","title":"Skopje - Macedonia"},{"tz":"Europe\/Sofia","location":"Sofia","code":"BG","country":"Bulgaria","title":"Sofia - Bulgaria"},{"tz":"Europe\/Stockholm","location":"Stockholm","code":"SE","country":"Sweden","title":"Stockholm - Sweden"},{"tz":"Europe\/Tallinn","location":"Tallinn","code":"EE","country":"Estonia","title":"Tallinn - Estonia"},{"tz":"Europe\/Tirane","location":"Tirane","code":"AL","country":"Albania","title":"Tirana - Albania"},{"tz":"Europe\/Ulyanovsk","location":"Ulyanovsk","code":"RU","country":"Russia","title":"Ulyanovsk - Russia"},{"tz":"Europe\/Vaduz","location":"Vaduz","code":"LI","country":"Liechtenstein","title":"Vaduz - Liechtenstein"},{"tz":"Europe\/Vatican","location":"Vatican","code":"VA","country":"Holy See (Vatican City State)","title":"Vatican City"},{"tz":"Europe\/Vienna","location":"Vienna","code":"AT","country":"Austria","title":"Vienna - Austria"},{"tz":"Europe\/Vilnius","location":"Vilnius","code":"LT","country":"Lithuania","title":"Vilnius - Lithuania"},{"tz":"Europe\/Volgograd","location":"Volgograd","code":"RU","country":"Russia","title":"Volgograd - Russia"},{"tz":"Europe\/Warsaw","location":"Warsaw","code":"PL","country":"Poland","title":"Warsaw - Poland"},{"tz":"Europe\/Zagreb","location":"Zagreb","code":"HR","country":"Croatia","title":"Zagreb - Croatia"},{"tz":"Europe\/Zurich","location":"Zurich","code":"CH","country":"Switzerland","title":"Zurich - Switzerland"},{"tz":"Indian\/Antananarivo","location":"Antananarivo","code":"MG","country":"Madagascar","title":"Antananarivo - Madagascar"},{"tz":"Indian\/Chagos","location":"Chagos","code":"IO","country":"British Indian Ocean Territory","title":"Chagos - British Indian Ocean Territory"},{"tz":"Indian\/Christmas","location":"Christmas","code":"CX","country":"Christmas Island","title":"Christmas Island"},{"tz":"Indian\/Cocos","location":"Cocos","code":"CC","country":"Cocos (Keeling) Islands","title":"Cocos (Keeling) Islands"},{"tz":"Indian\/Comoro","location":"Comoro","code":"KM","country":"Comoros","title":"Comoros"},{"tz":"Indian\/Kerguelen","location":"Kerguelen","code":"TF","country":"French Southern Territories","title":"Kerguelen - French Southern Territories"},{"tz":"Indian\/Mahe","location":"Mahe","code":"SC","country":"Seychelles","title":"Mahe - Seychelles"},{"tz":"Indian\/Maldives","location":"Maldives","code":"MV","country":"Maldives","title":"Maldives"},{"tz":"Indian\/Mauritius","location":"Mauritius","code":"MU","country":"Mauritius","title":"Mauritius"},{"tz":"Indian\/Mayotte","location":"Mayotte","code":"YT","country":"Mayotte","title":"Mayotte"},{"tz":"Indian\/Reunion","location":"Reunion","code":"RE","country":"Reunion","title":"Reunion"},{"tz":"Pacific\/Apia","location":"Apia","code":"WS","country":"Samoa","title":"Apia - Samoa"},{"tz":"Pacific\/Auckland","location":"Auckland","code":"NZ","country":"New Zealand","title":"Auckland - New Zealand"},{"tz":"Pacific\/Bougainville","location":"Bougainville","code":"PG","country":"Papua New Guinea","title":"Bougainville - Papua New Guinea"},{"tz":"Pacific\/Chatham","location":"Chatham","code":"NZ","country":"New Zealand","title":"Chatham Islands - New Zealand"},{"tz":"Pacific\/Chuuk","location":"Chuuk","code":"FM","country":"Micronesia","title":"Chuuk - Micronesia"},{"tz":"Pacific\/Easter","location":"Easter","code":"CL","country":"Chile","title":"Easter Island - Chile"},{"tz":"Pacific\/Efate","location":"Efate","code":"VU","country":"Vanuatu","title":"Efate - Vanuatu"},{"tz":"Pacific\/Fakaofo","location":"Fakaofo","code":"TK","country":"Tokelau","title":"Fakaofo - Tokelau"},{"tz":"Pacific\/Fiji","location":"Fiji","code":"FJ","country":"Fiji","title":"Fiji"},{"tz":"Pacific\/Funafuti","location":"Funafuti","code":"TV","country":"Tuvalu","title":"Funafuti - Tuvalu"},{"tz":"Pacific\/Galapagos","location":"Galapagos","code":"EC","country":"Ecuador","title":"Galapagos Islands - Ecuador"},{"tz":"Pacific\/Gambier","location":"Gambier","code":"PF","country":"French Polynesia","title":"Gambier - French Polynesia"},{"tz":"Pacific\/Guadalcanal","location":"Guadalcanal","code":"SB","country":"Solomon Islands","title":"Guadalcanal - Solomon Islands"},{"tz":"Pacific\/Guam","location":"Guam","code":"GU","country":"Guam","title":"Guam"},{"tz":"Pacific\/Honolulu","location":"Honolulu","code":"US","country":"United States of America","title":"Honolulu - Hawaii - United States of America"},{"tz":"Pacific\/Kanton","location":"Kanton","code":"KI","country":"Kiribati","title":"Kanton - Kiribati"},{"tz":"Pacific\/Kiritimati","location":"Kiritimati","code":"KI","country":"Kiribati","title":"Kiritimati - Kiribati"},{"tz":"Pacific\/Kosrae","location":"Kosrae","code":"FM","country":"Micronesia","title":"Kosrae - Micronesia"},{"tz":"Pacific\/Kwajalein","location":"Kwajalein","code":"MH","country":"Marshall Islands","title":"Kwajalein - Marshall Islands"},{"tz":"Pacific\/Majuro","location":"Majuro","code":"MH","country":"Marshall Islands","title":"Majuro - Marshall Islands"},{"tz":"Pacific\/Marquesas","location":"Marquesas","code":"PF","country":"French Polynesia","title":"Marquesas - French Polynesia"},{"tz":"Pacific\/Midway","location":"Midway","code":"UM","country":"US Minor Outlying Islands","title":"Midway - US Minor Outlying Islands"},{"tz":"Pacific\/Nauru","location":"Nauru","code":"NR","country":"Nauru","title":"Nauru"},{"tz":"Pacific\/Niue","location":"Niue","code":"NU","country":"Niue","title":"Niue"},{"tz":"Pacific\/Norfolk","location":"Norfolk","code":"NF","country":"Norfolk Island","title":"Norfolk Island"},{"tz":"Pacific\/Noumea","location":"Noumea","code":"NC","country":"New Caledonia","title":"Noumea - New Caledonia"},{"tz":"Pacific\/Pago_Pago","location":"PagoPago","code":"AS","country":"American Samoa","title":"Pago Pago - American Samoa"},{"tz":"Pacific\/Palau","location":"Palau","code":"PW","country":"Palau","title":"Palau"},{"tz":"Pacific\/Pitcairn","location":"Pitcairn","code":"PN","country":"Pitcairn","title":"Pitcairn"},{"tz":"Pacific\/Pohnpei","location":"Pohnpei","code":"FM","country":"Micronesia","title":"Pohnpei - Micronesia"},{"tz":"Pacific\/Port_Moresby","location":"PortMoresby","code":"PG","country":"Papua New Guinea","title":"Port Moresby - Papua New Guinea"},{"tz":"Pacific\/Rarotonga","location":"Rarotonga","code":"CK","country":"Cook Islands","title":"Rarotonga - Cook Islands"},{"tz":"Pacific\/Saipan","location":"Saipan","code":"MP","country":"Northern Mariana Islands","title":"Saipan - Northern Marinara Islands"},{"tz":"Pacific\/Tahiti","location":"Tahiti","code":"PF","country":"French Polynesia","title":"Tahiti - French Polynesia"},{"tz":"Pacific\/Tarawa","location":"Tarawa","code":"KI","country":"Kiribati","title":"Tarawa - Kiribati"},{"tz":"Pacific\/Tongatapu","location":"Tongatapu","code":"TO","country":"Tonga","title":"Tongatapu - Tonga"},{"tz":"Pacific\/Wake","location":"Wake","code":"UM","country":"US Minor Outlying Islands","title":"Wake - US Minor Outlying Islands"},{"tz":"Pacific\/Wallis","location":"Wallis","code":"WF","country":"Wallis and Futuna Islands","title":"Wallis and Futuna Islands"},{"tz":"UTC","location":"UTC","code":"UTC","country":"","title":"UTC\/GMT"}]


Comments
Join free and tell us what you really think!
Sign up for free