

Wallabies flyhalf Noah Lolesio is just seven tests into his burgeoning international career, with six of those starts in the 10 jersey, and he has had the pleasure of playing the All Blacks on four of those occasions.
Few 21-year-old flyhalves are asked to take on such a task this early in their careers, leading to some up-and-downs for him over the course of those matches. The promising sign for Rennie is that the upside is there; after a horror debut in Sydney last year, Lolesio has bounced back to show tremendous growth in his second year.
What experienced Wallabies 10s often lacked in the Cheika-era is enough upside. The supposedly ‘safe’ options have at times proven to be as wayward and error-ridden as a fresh 20-year-old, yet at the same time have struggled to make much happen.
Lolesio has made errors, but at the same time has hit back to make big plays and create tries for the Wallabies.
On the first attacking launch of the second test, the Wallabies used a chip kick in-behind the All Blacks line, the same play they used to score early against New Zealand in Brisbane last year.
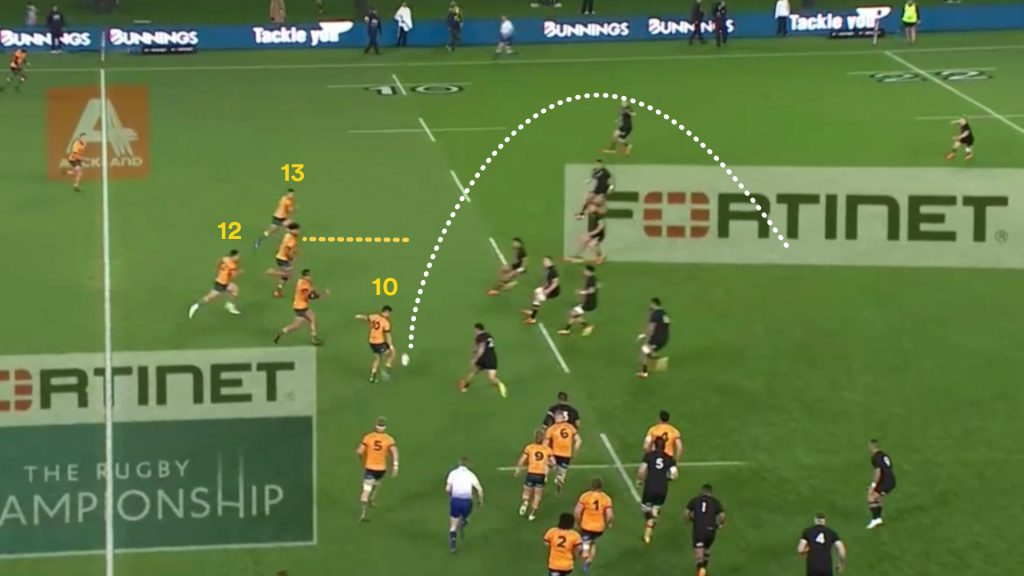
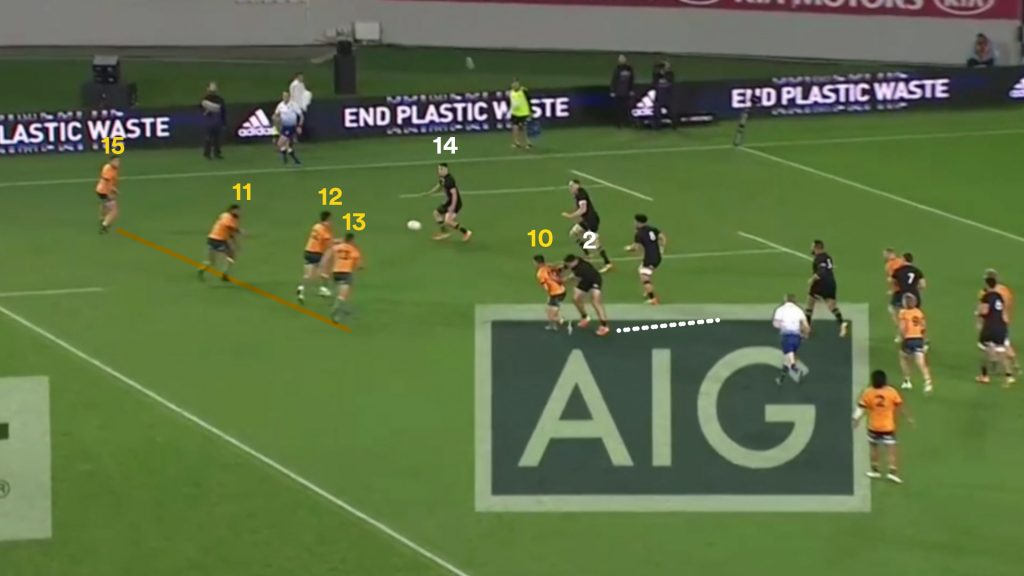
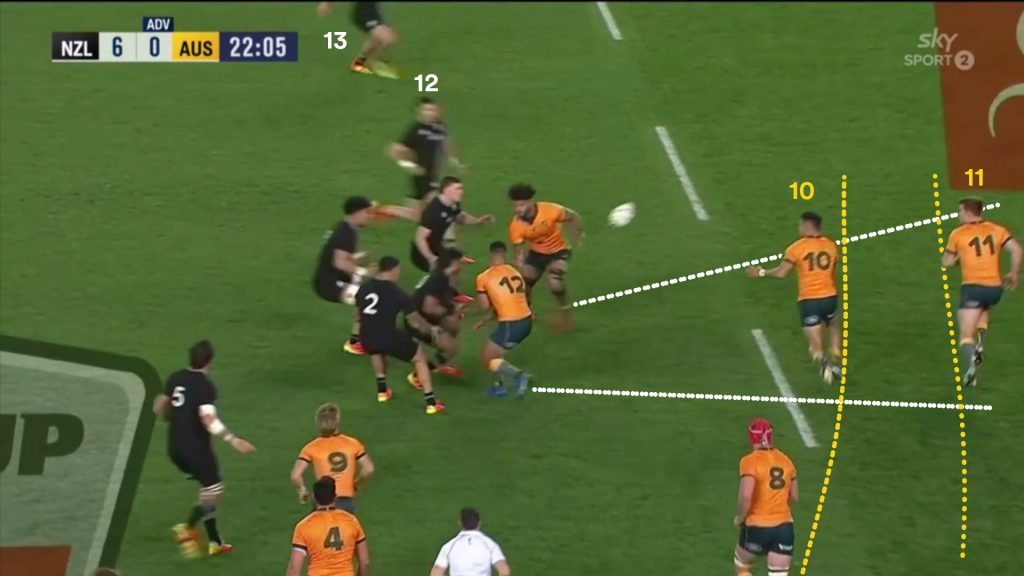
After regathering the kick, the Wallabies have a chance to use front-foot ball to attack the same way and Lolesio flattens up at first receiver to do so. The players outside him also flatten up, looking to play on top of the All Blacks line.
Lolesio is caught between two roles here, playing distributor or holding the ball a bit longer and ball-playing, while he is made to feel under pressure by the All Blacks.
The flat backline makes it difficult for the 10 to distribute wide but the pressure makes it difficult for Lolesio to take it to the line and ball-play.
The 21-year-old felt like the line speed was coming and rushed through decisions, but in reality, it was only Taylor (2) coming forward as a one-out blitzer.
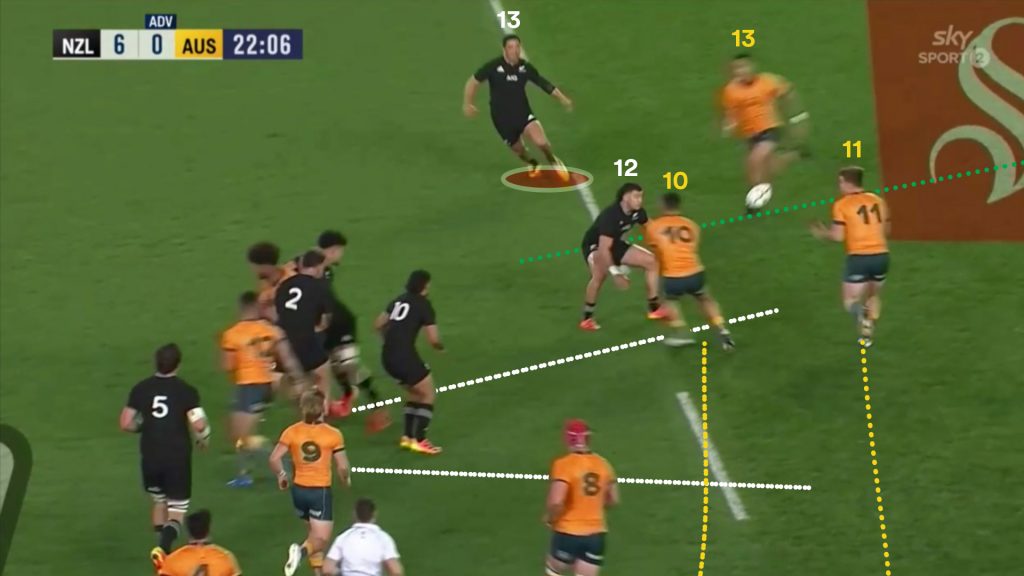
Lolesio gets too lateral too early and opts for the long ball to Tom Banks (15) which is picked off by Rieko Ioane (13) for seven points at the other end.
With Taylor (2) committed to pressuring Lolesio, the Wallabies actually had a three-on-two advantage to the outside. As the flyhalf matures and gets more comfortable under the rush, he will learn to take what the defence gives him and live another day.
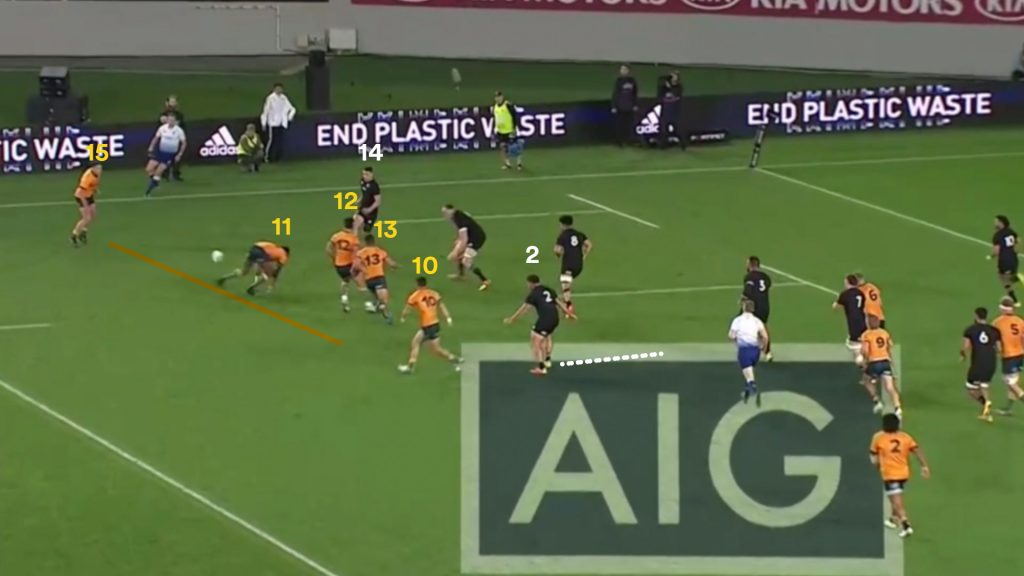
By staying square, taking the contact from Taylor and playing a low-risk pass to Michael Hooper he would have given his side that three-on-two opportunity – albeit he would not be the one to pull the trigger on the key pass.
Drawing contact from Taylor is a win for the Wallabies as it takes one less player out from the inside cover, and at times that just has to be the option to take.
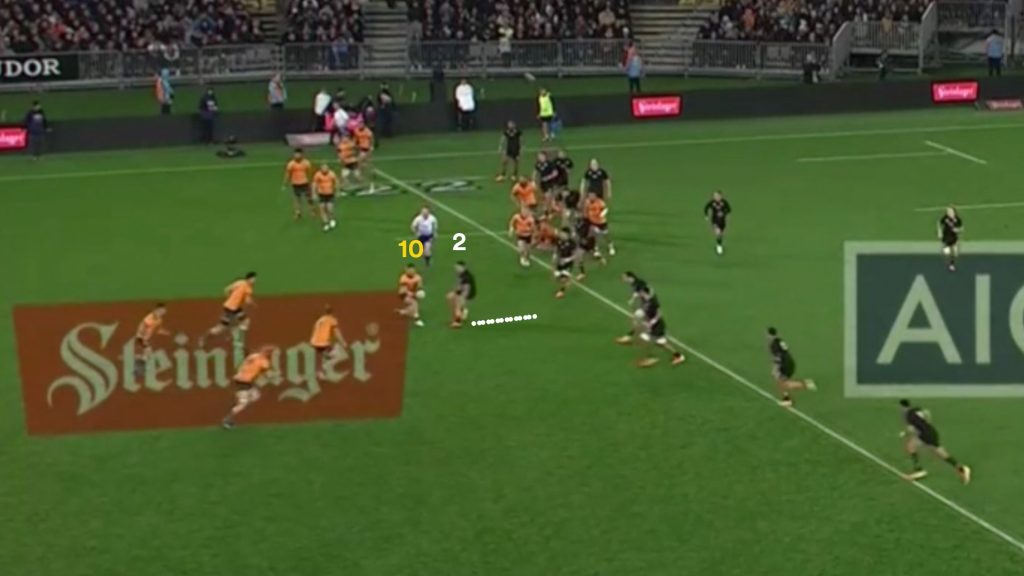
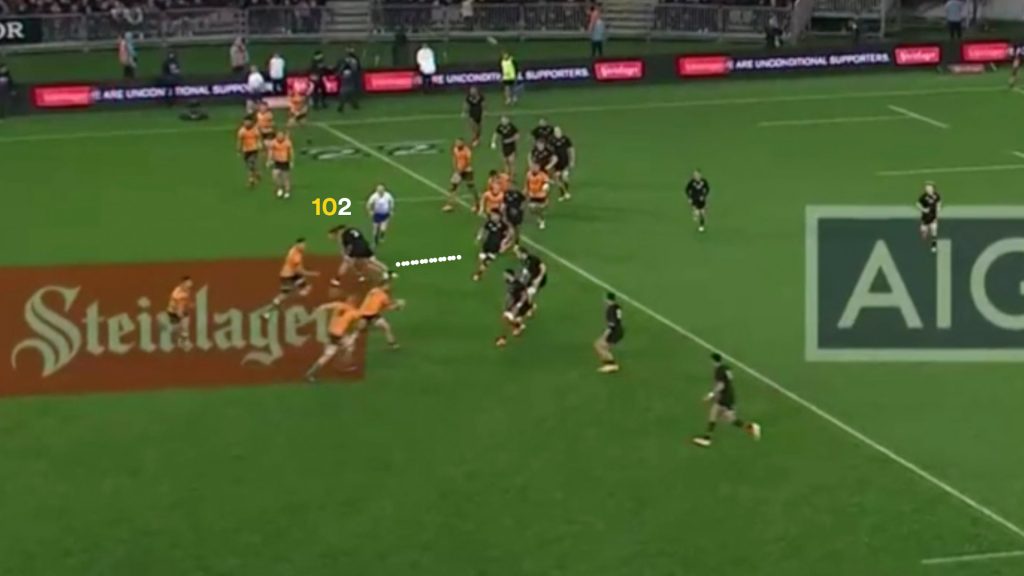
The same instance occurred a short while later when the Wallabies were looking to release the backs after some strong build-up off Tate McDermott, and again the long ball from Lolesio fails to find its mark and ends up on the turf.
The All Blacks used Codie Taylor (2) throughout both tests to track Lolesio and put pressure on the young flyhalf around the park, particularly after the first phase plays.
The Crusaders hooker, from the tail of the defensive line out, would look to follow Lolesio and then shoot up when he received the ball and make contact.
Where Lolesio excelled in attack was when the 10 had more space and time to assess his options without being under duress. Using pods and playing Lolesio out the back was one way the Wallabies manufactured more room for their 10 to work with.
The Wallabies attack, which is predominantly off 9, did often pick the right moments to attack wide, and the promising aspect for the Wallabies is Lolesio didn’t overplay his hand in these situations.
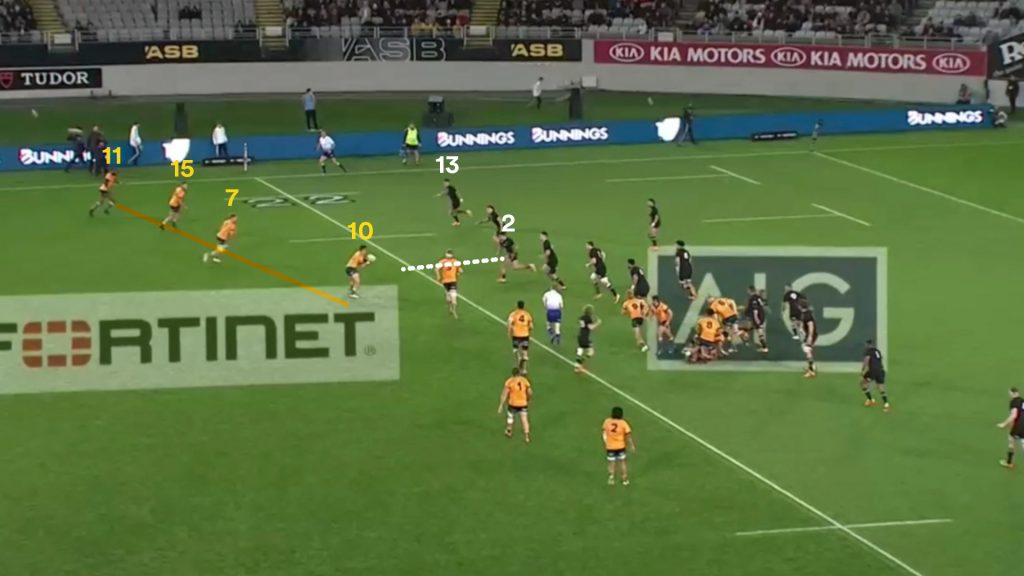
After some lead-up work to thin out the All Blacks, the Wallabies use a two-man pod to create some extra protection for their 10 and the backs set-up with more depth than on the Ioane intercept.

A good pullback pass from Matt Philip and a strong support line from Rob Valetini creates contact in the front line to give Lolesio the chance to attack coming around the corner of the block.
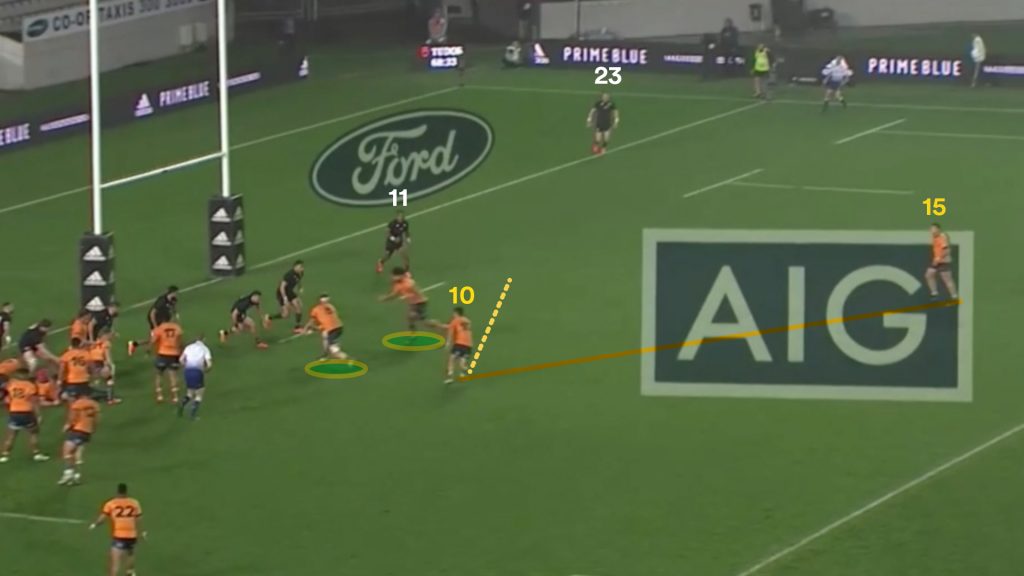
The flyhalf holds up the pass just long enough to prevent Sevu Reece (11) from drifting, straightening up his line before opting for the next man, Tom Banks (15), instead of the floated pass over the top.

When Lolesio plays the ball to Banks, Jordie Barrett (23) has to collapse in and the Wallabies fullback is able to then get the last pass away to Andrew Kellaway (14) for a walk-in try.
Lolesio’s touch was vitally important in capitalising on this opportunity, forcing the All Blacks to cover every man in the movement. Often the Wallabies shoot themselves in the foot by going to the long ball, allowing the defence to drift while the ball sails in the air.
Had Lolesio wound up a big cutout pass to Kellaway, there is no guarantee he has any space to score with the cover defence having time to scramble to the known target.
When Lolesio was injected behind screens on back door passes from set-piece plays, we saw the young 10 make good reads and create opportunities for his outside men.
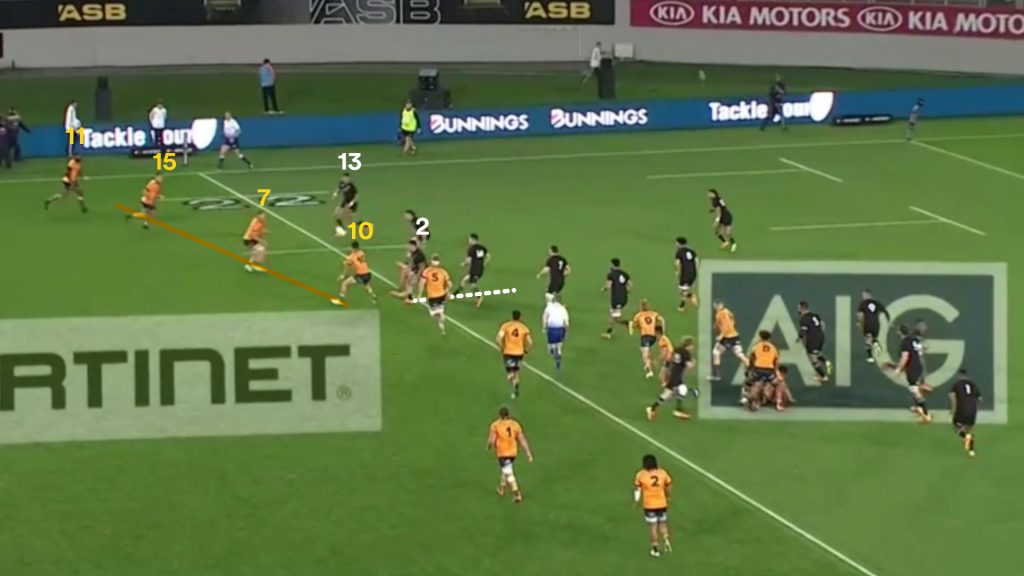
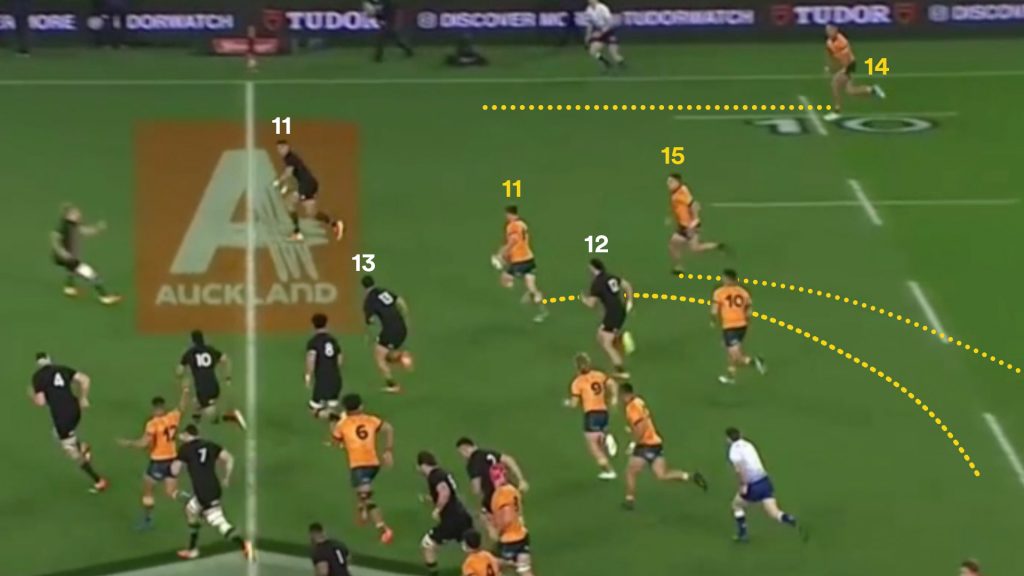
Early in the second test, the Wallabies successfully create a jam in the midfield and free up Lolesio coming around the edge with winger Andrew Kellaway in support.
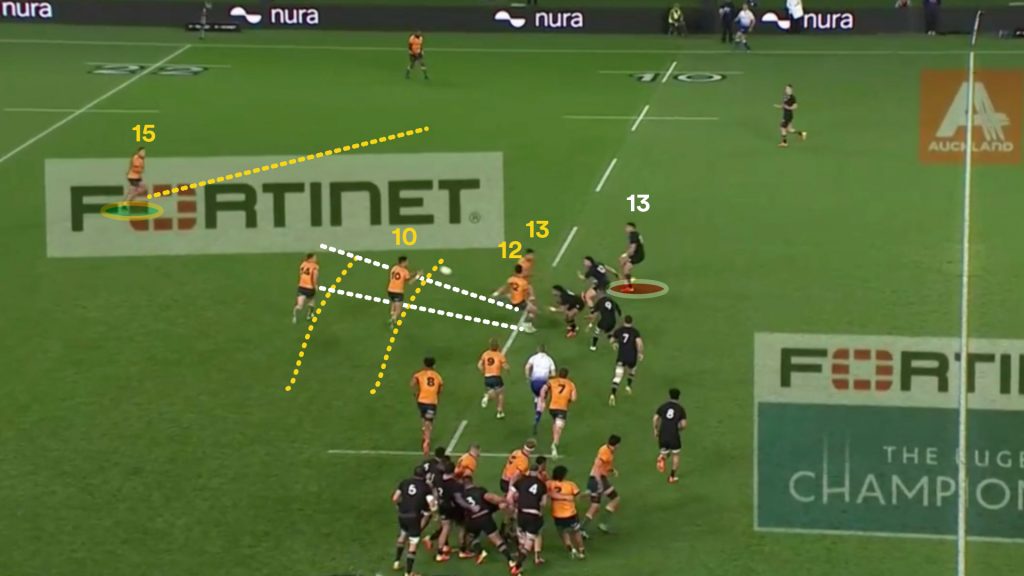
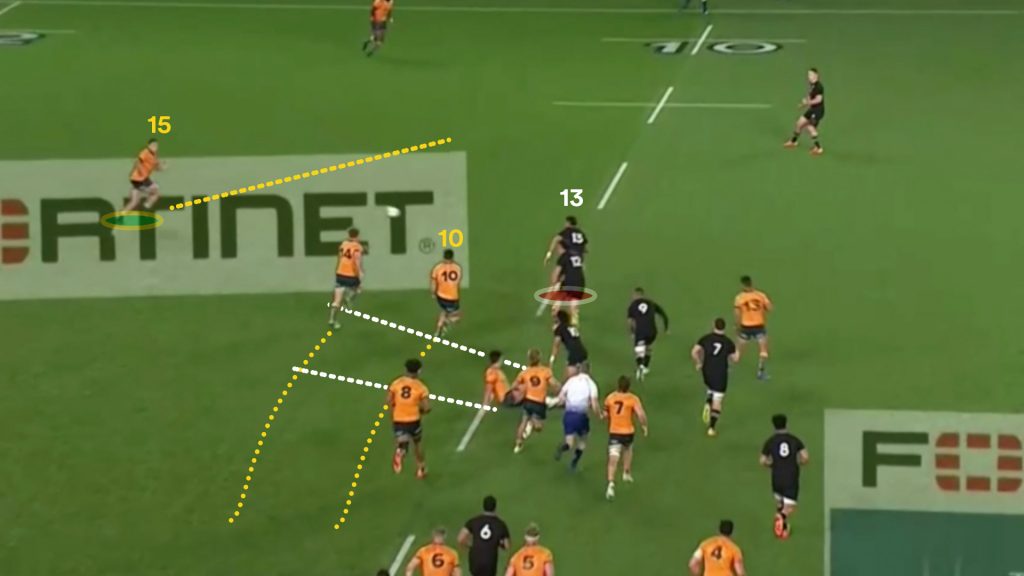
Having lured Rieko Ioane (13) to stay interested in tight, Lolesio provides the early wide ball to Tom Banks (15) on the outside break to use the space. Although Ioane is very fast and can close this gap, this is a great opportunity for the Wallabies to put pressure on the All Blacks and earn metres upfield.
The high angle illustrates Lolesio’s correct read with Kellaway covered and Banks’ availabile.

This is an area where the Wallabies outside backs were poor throughout the two tests, often opting to kick downfield, which typically resulted in kicking too far and letting the All Blacks off the hook.
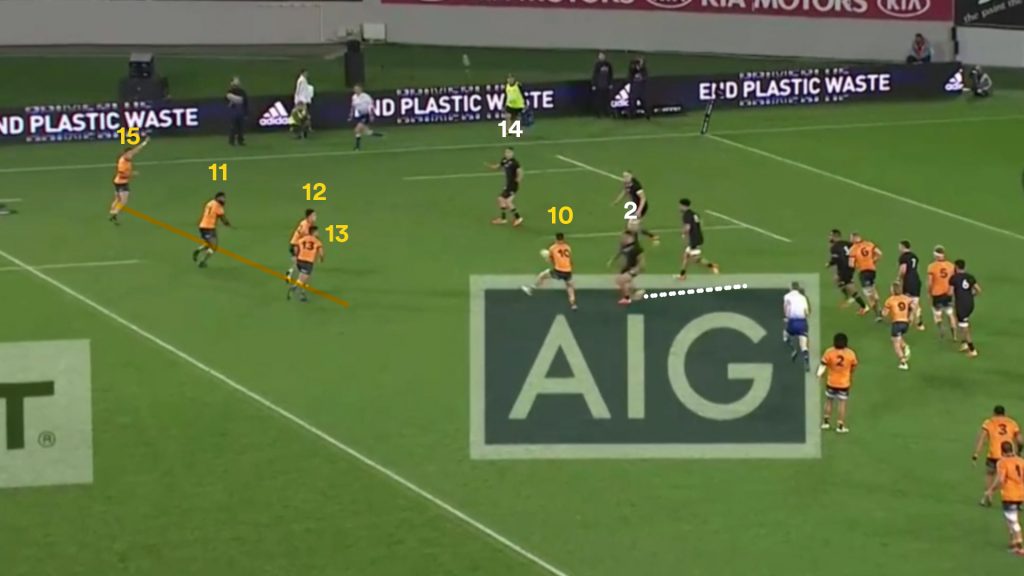
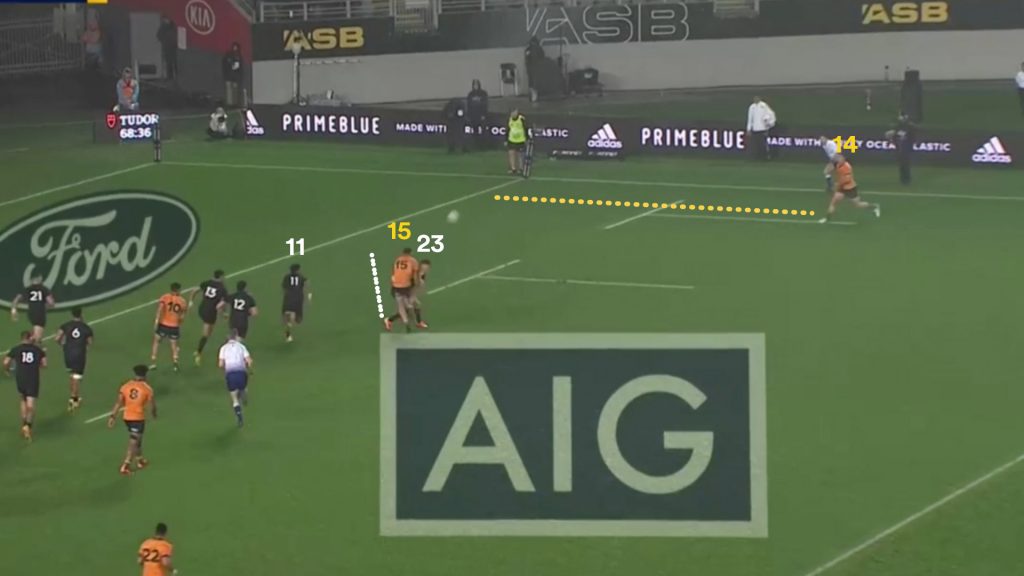
In this instance, while Ioane (13) is bearing down to close on Banks (15), Will Jordan (14) is turned in and Damian McKenzie (15) is playing deep and jockey coverage.

Banks had speedster Marika Koroibete (11) outside with 15-metres of a space to work with and his other winger Andrew Kellaway (14) looming up on the inside. The Wallabies fullback has to come up with a better play than hoofing it downfield in this situation.
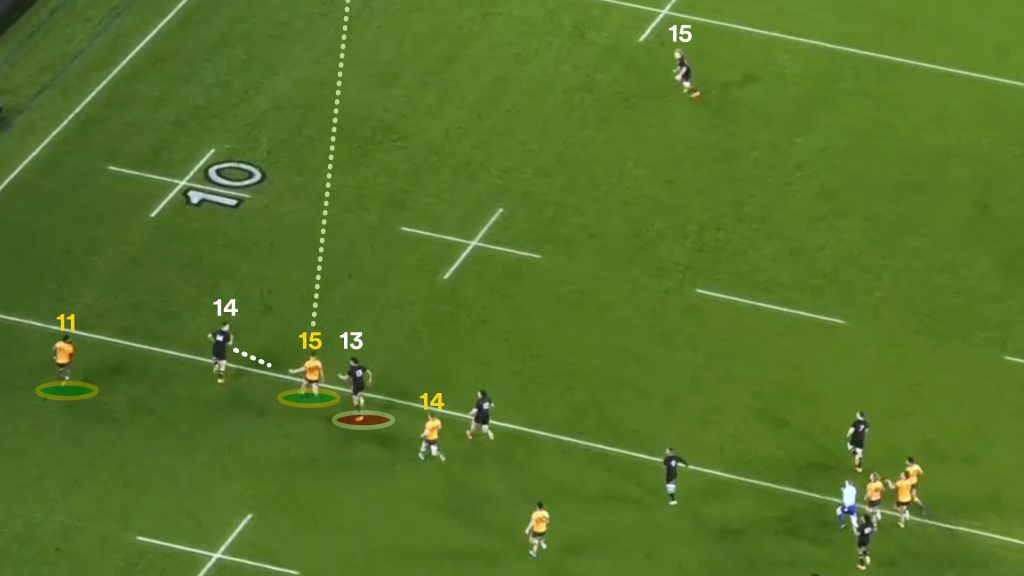
Getting Jordan (14) to commit into the tackle and freeing Koroibete down the edge would have given the flying Fijian a chance to find Kellaway back on the inside or beat McKenzie one-on-one.
Kellaway (14) made the same poor decision on the same play in the first test after some quick hands from Lolesio freed the winger coming around the corner.
A beautiful line from Len Ikitau (13) pulls Anton Lienert-Brown (13) into contact, giving Kellaway (11) a free pass around the edge with two players in support outside him.
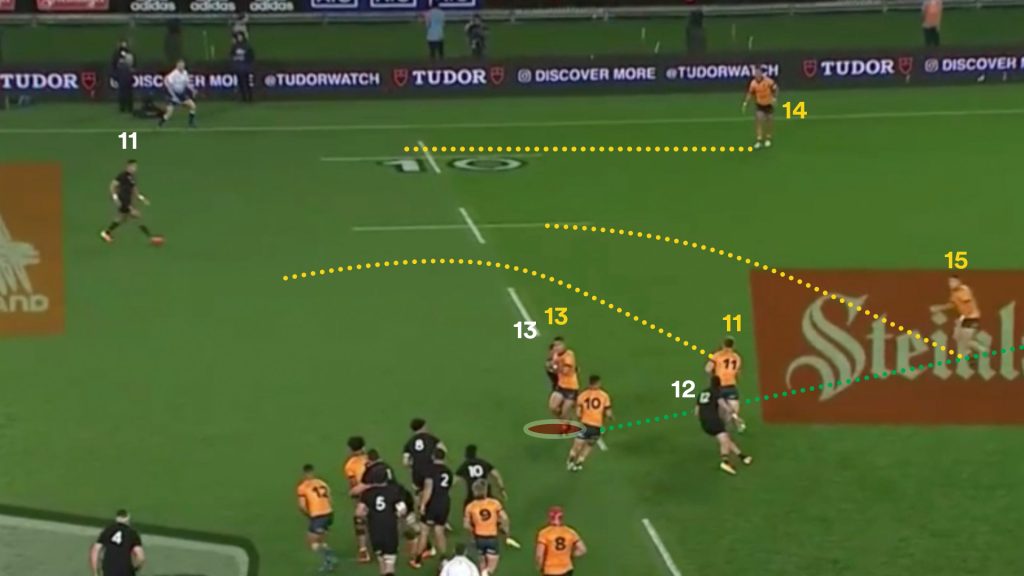
After a few paces with the ball-in-hand he opts to punt the ball downfield which rolled into the in-goal area for an easy goal-line restart.
Perhaps Banks (15) and Petaia (14) were off a little on their timing to anticipate Kellaway’s run, but again it was a questionable decision to kick instead of keeping the play alive and trying to make the most of the situation while the All Blacks backfield was under pressure.
The All Blacks are playing jockey defence in order to recover from a bad spot, which means the invitation was there for the Wallabies to press the issue and they just didn’t do it.
Despite the bad decision-making, the lead-up work from Lolesio gave the outside backs an opportunity from the midfield launch.
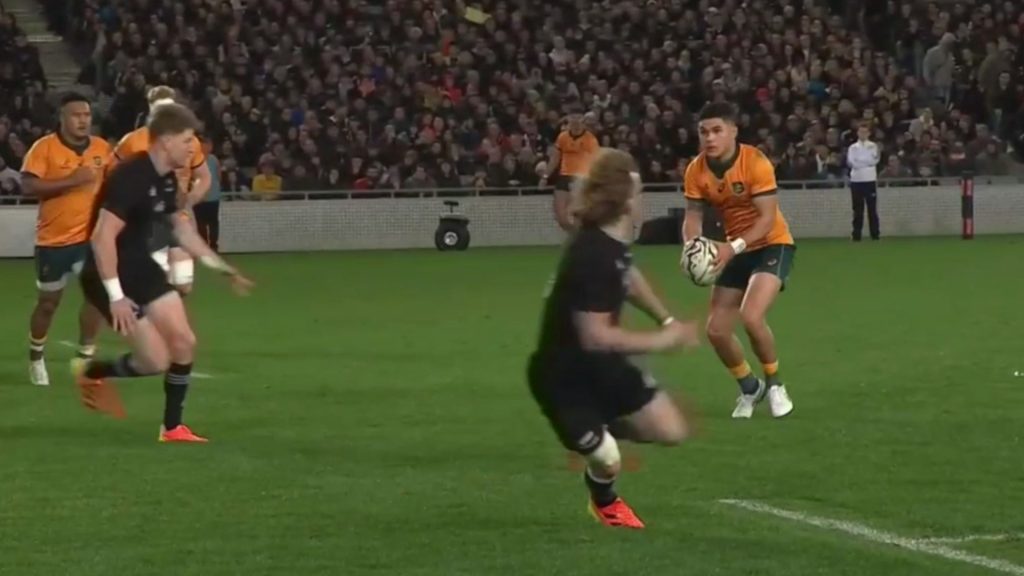
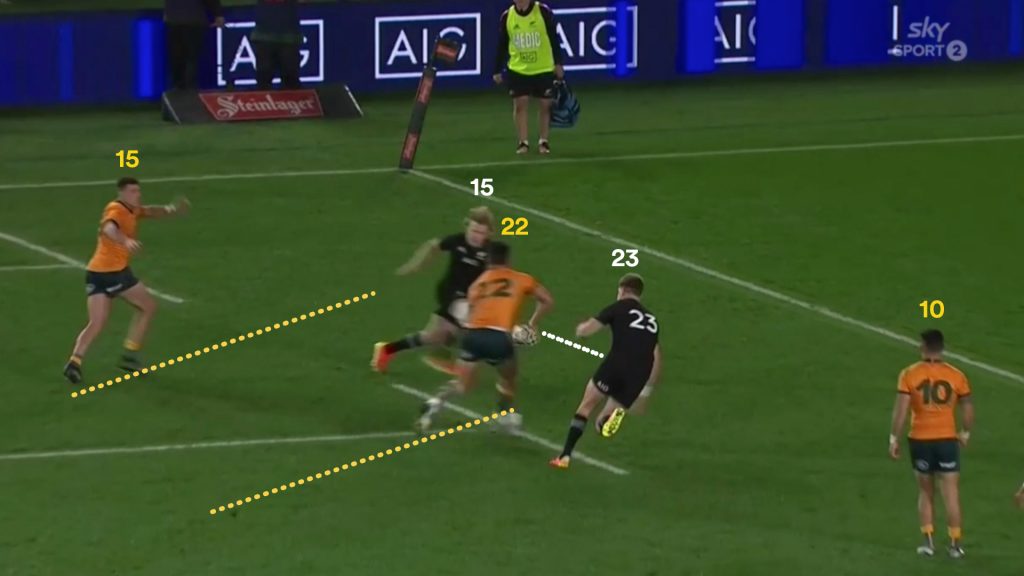
We saw the same calm, composed decision-making and execution in the final twenty minutes of the first test with the All Blacks on their goal line in a similar situation.
The long ball over the top may have still worked, but Damian McKenzie (15) is pushing out there. Lolesio (10) reads McKenzie’s body language, holds the ball up to square Jordie Barrett (23) and attempts to play Matt To’omua (22) into the ‘sliding doors’ gap with McKenzie pushing out.
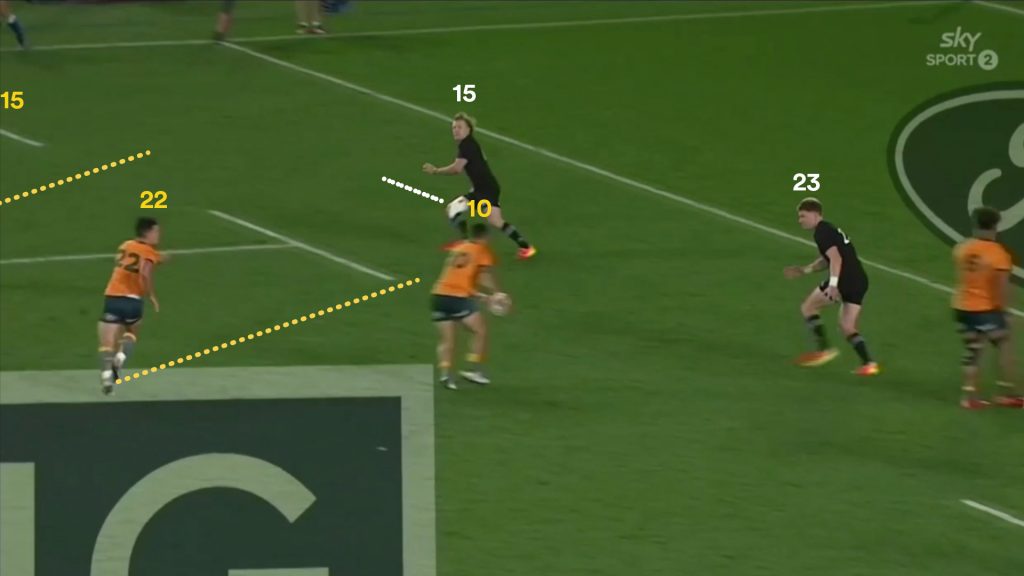
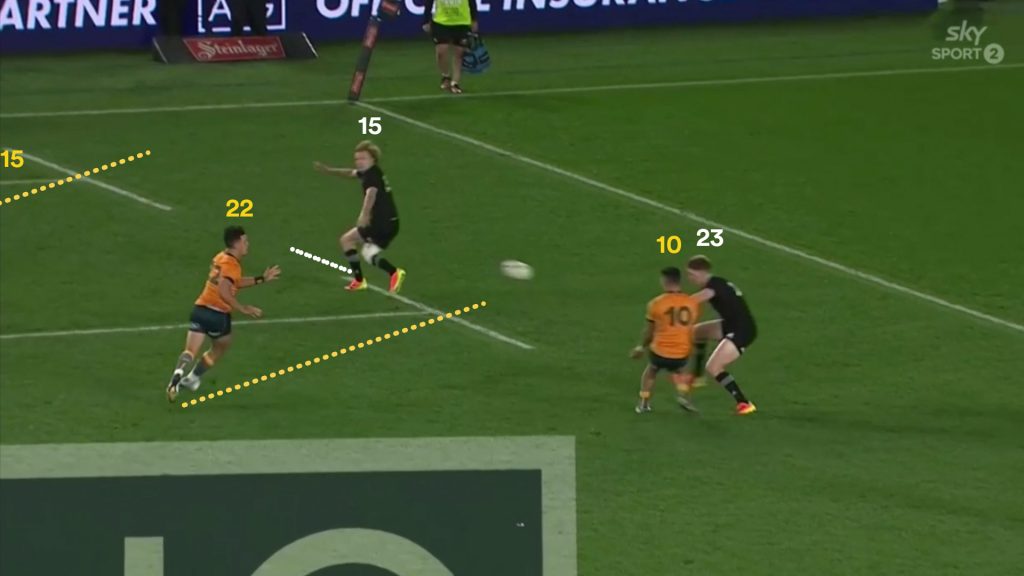
Again, utilising each man in the backline doesn’t give the All Blacks an easy out and forces the defence to wait for the attack to unfold.
McKenzie (15) decides he needed to double back and Toomua has an easy pass to Tom Banks (15) for a simple, yet effective, movement through the hands that results in another backs try.
Under Cheika, the Wallabies were a side that could never utilise the numbers advantages they created, resorting to the cutout pass all too frequently. Their ball-players couldn’t play square enough and could never trust the next man to do his job.
In the first two tests against the All Blacks, Lolesio proved that is changing under Rennie and it paid off in a big way. They were able to construct tries with short passing that preserved outside space.
When they did fall back on the methods of old, it completely fell apart, as we saw with the intercepts.
The difference this time is the Wallabies have found some success, scoring three tries in the last two tests which greatly increases their chances of beating the All Blacks should they be able to fix the defensive issues on the other side of the ball and minimise the intercepts.
The Wallabies’ two most established flyhalves over the last decade have been Quade Cooper and Bernard Foley. While Matt Giteau, Kurtley Beale, Matt Toomua and James O’Connor have had various tests against the All Blacks, it has been Cooper and Foley who have had regular competition against New Zealand.
Considering those pivots and only their starts against the All Blacks, Foley’s Wallabies under Cheika have scored the most points per game at 19.2, but Lolesio’s sides under Rennie in three tests edges them out in terms of the number of tries per game with 2.33.

When you consider that during Foley’s years at 10, the Wallabies had a number of world-class outside backs like Israel Folau, Kurtley Beale, and Adam Ashley-Cooper who would produce tries on their own, these stats on the surface don’t highlight the impact of the flyhalf on the team’s scoring output.
When considering the direct involvement of the flyhalf in manufacturing tries, Lolesio has produced on a per-game basis more for the Wallabies against the All Blacks across his first three starts than Foley and Cooper were able to average across their respective starting careers.
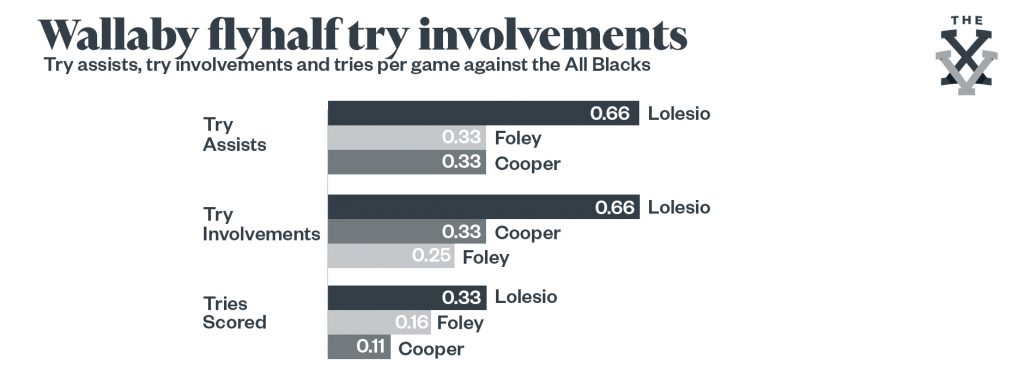
A try assist is considered the last action to create the try, while a try involvement is not directly an assist but where the player was heavily involved in the same passage leading to a try.
In both those areas, Lolesio’s per-game average is double that of Cooper and Foley, while in tries scored he leads both of them as well.
Again, it is a small sample size of three games but two of those matches have been at Eden Park where the Wallabies have historically really struggled to put anything together. The 21-year-old flyhalf was influential in getting the Wallabies over 20 points in both of those games.
Given that Lolesio’s test career is in its infancy, there has been more than enough to suggest that the flyhalf is capable of delivering more in attack than his predecessors and getting to the point where his side can score enough to beat the All Blacks.
The red zone efficiency from the Wallabies was one of the stronger aspects of their game across the first two Bledisloe Cup tests, scoring seven tries from 16 visits into the All Blacks’ 22 at a rate of 0.44 per visit.
Lolesio’s goal kicking was an issue, landing only two from seven in the first test and three from four in the second. The missed opportunities from the tee in the first test really hurt in the final wash-up and a few more goals would have improved the points per 22 visit which ended at 2.93, less than a penalty goal.
Given that Lolesio’s test career is in its infancy, there has been more than enough to suggest that the flyhalf is capable of delivering more in attack than his predecessors and getting to the point where his side can score enough to beat the All Blacks.
After the 43-5 thrashing in Sydney, the only place Lolesio could go was up. Not much went right for him as the All Blacks picked apart the Wallabies on the back of a dominant showing from his opposite number, Richie Mo’unga.
In just one season, we have already seen a big leap for Noah Lolesio since that night in Sydney. It is worth continue to invest in the young 10 and nurturing him into mature into a playmaker that can deliver the upside attacking return while minimising the errors on the other hand.

Comments
Join free and tell us what you really think!
Sign up for free