


1
Analysis: The blueprint Gatland provided that shows how to expose the Springboks defence
“There is no innovation and creativity without failure. Period” – Brene Brown
“No matter how organised a defence is, there will always be space on a rugby field”. Any young player, would have at some point, heard these words from their coach, from U12’s through to 1st XV level. Identifying space, and attacking it at a moment’s notice, is what the entire game of rugby is about.
ADVERTISEMENT
However, doing this often requires a wide variety of skill sets that are so often outside of the box.
Defences nowadays are geared towards the modern game, designed to work against structure and patterns in play, whereas fluidity and the freedom to move away from this, maybe harder to combat.
This gives rise to the term that with the increasing efficacy of defences, that playing it safe, maybe the worst thing you can do.
The South African defence is designed to eliminate the likely options that structure provides. Whereas a change in thinking and a willingness to embrace the risky option may yield better results against this defence.
Set-Piece
Of all teams to play Rassie Erasmus’ South Africa, the team that showed an unusually wise tactical acuity of them was Wales.
New Zealand beat them, but when South Africa’s defence was on point and full-on in its intensity, the team that outsmarted them using established sequences off set-piece was Wales.
ADVERTISEMENT
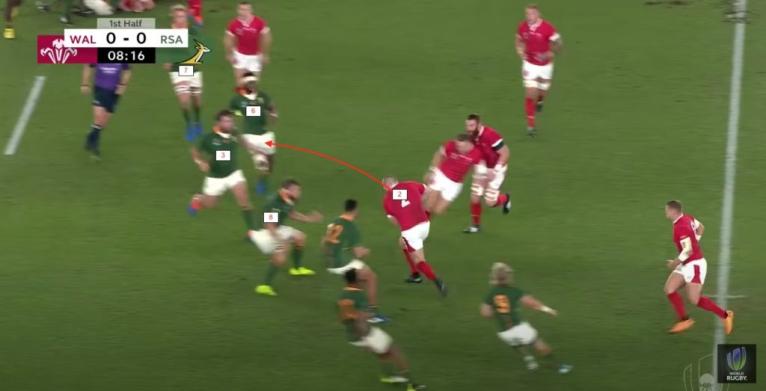
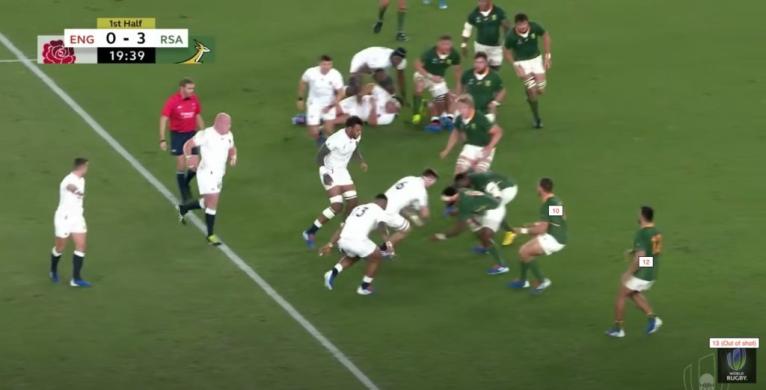
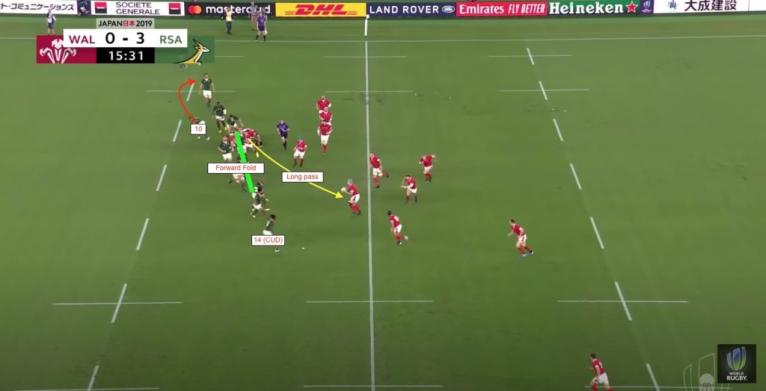
They were able to get on the outside using set three-phase sequence plays that allowed them the ability to put the ‘catch-up defender’ (CUD) in two minds, achieved, with the miss-pass or commonly known as M1.
Wales run George North on a short pass to target the No. 9, followed by a forward pod up the guts into the midfield.
This forward pod is very important to the success of this move. It is designed to hold the fold-over of the Bok forwards and result in Welsh backs exclusively targeting Springbok backs.
ADVERTISEMENT
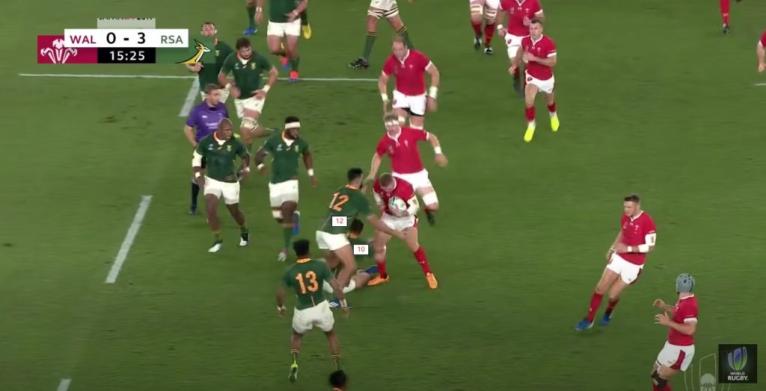
This is where the genius of this play comes in. Having established a backline against a backline, Wales throw a miss pass from the first receiver, directly to the third receiver, executed by Gareth Anscombe to Liam Williams above.
This circumvents the South African defence’s standard operating procedure of cutting off the second receiver, who was Jonathan Davies.
Because the last defender, Cheslin Kolbe above, has to remain in line with the CUD until the pass is given from the second receiver, he has too much ground to make up.
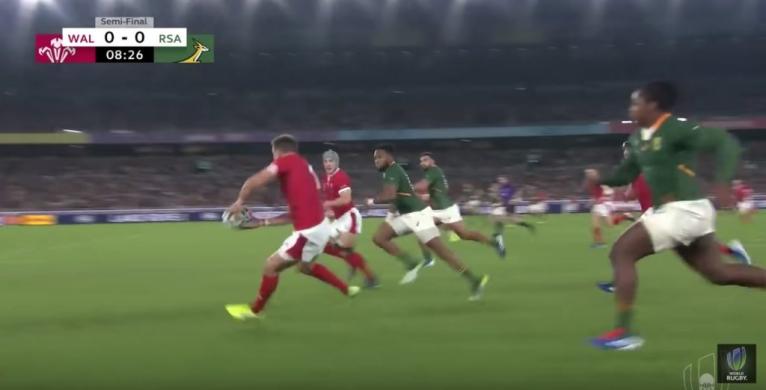
This allows the third receiver, Liam Williams, time to get the pass away to Josh Adams, who makes a significant break.
Going forward the third receiver must remain at depth, and the pass given early so the CUD can’t block the passing lane.
It has to be a pass given in front of the second receiver, so he can act as the bait for the CUD role to tackle him.
This is not the only occasion that this three-phase framework worked for Wales. The ‘first receiver M1’ play is key to beating this edge defence, as it allows the third receiver time and space to pass to the wing and get around the defence.
Wales were keen to set into this pattern a year later, in one of their most important ever games.
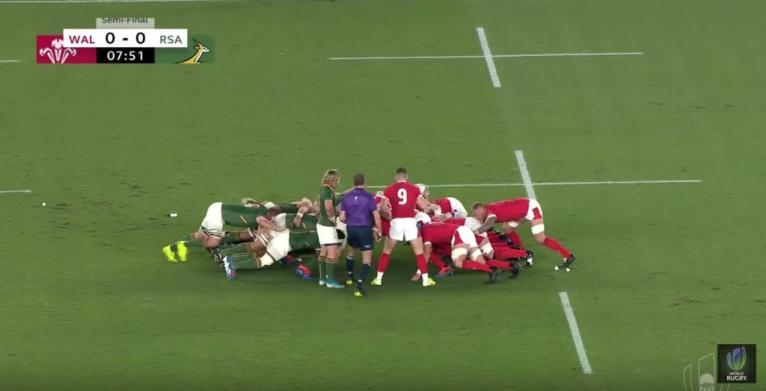
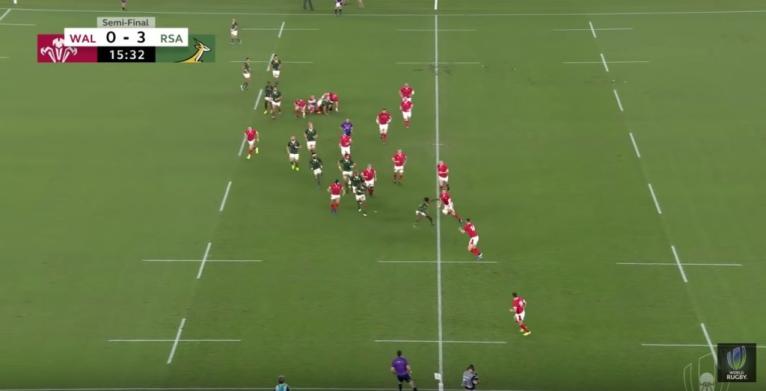
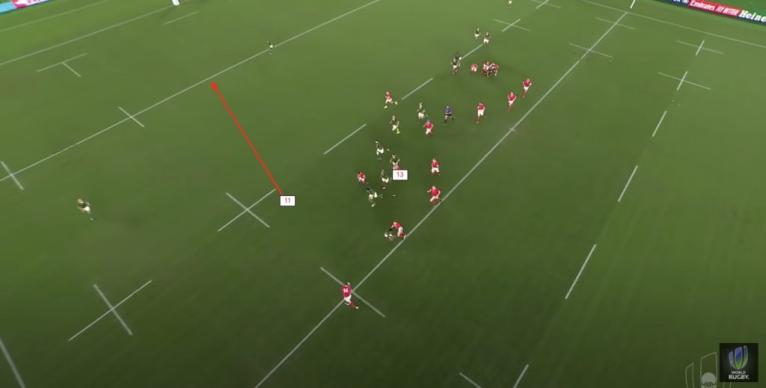
Here, we see Wales packing down for a scrum near just inside the 15m line. Due to the benefits, Gareth Davies picks from the base and runs a blindside scoot, releasing George North.
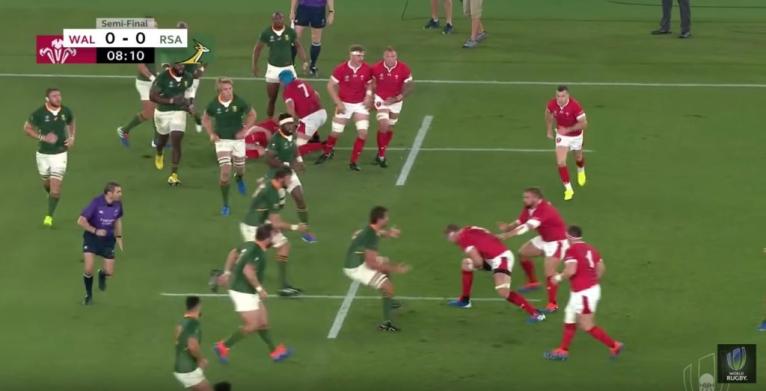
Significant ground is made, and they start their three-phase movement. The 3-pod carries as above as the first phase, the objective being to generate quick ball.
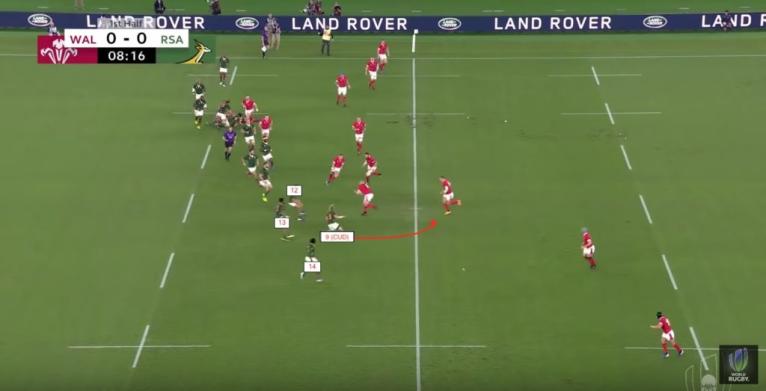
In the second phase, we see the CUD move forward to cut off the expected second receiver option, but instead, Dan Biggar plays the key move to isolate the backline.
Biggar passes to Ken Owens, who runs an out-in line to target the ‘forward’ portion, restricting the fold over and isolating the backline for the third phase.
This is crucial. The 10/12, as a general rule, will only move over to the blind during the first three phases off lineout in particular, if the ball goes past them, or hits them.
If the attack keeps it tight and only targets the folding forwards, the backs won’t switch which means by the third phase, they’re strictly targeting the backline.
This means they’ve thinned the line, prevented the Boks from numbering up and created the overlap, with a single back in the scrumhalf on the blindside, whom we should keep a note of for later.

The inside angle of Owens has stopped the ‘fold over’ of the forwards, with most of them in the ruck, isolating the backline for the third phase attack and creating the overlap where Lukhanyo Am is seen calling for help.
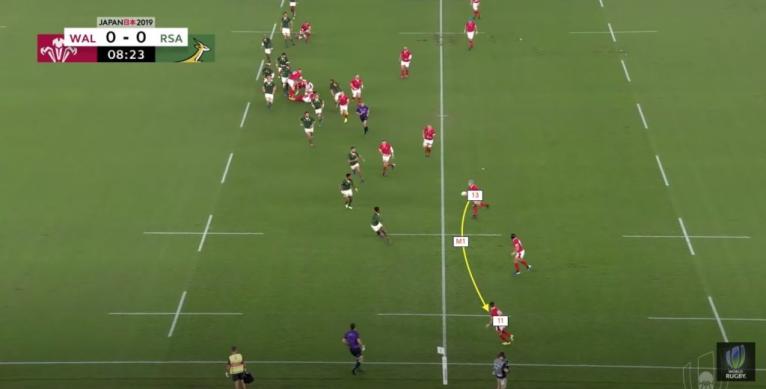
Because of this, the Springbok backs set into a drift, whilst maintaining their pressure on the second receiver. It must be noted, that whilst a very good player, Sbu Nkosi (14) was targeted by Wales, as he is more likely to be indecisive in this system than his replacement; Cheslin Kolbe.
As we will show later, Wales’ second receiver was given time and space to pass, that they may not have had with Kolbe. This is one reason Kolbe started the final.
Because of the drift, Jonathan Davies as second receiver has the time to make the M1 pass, putting Adams into space, and gaining considerable ground.
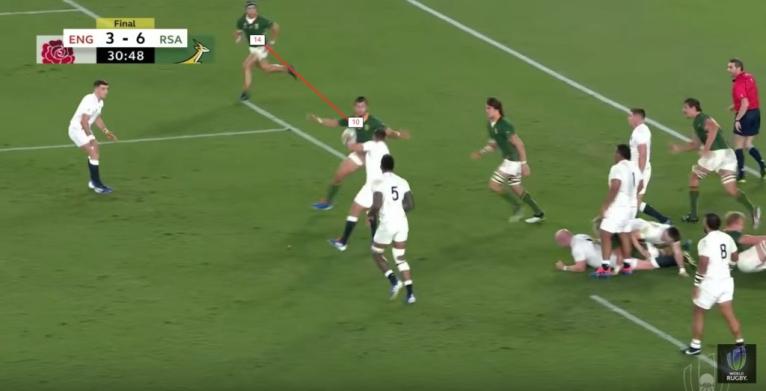
England made use of the 10/12 reload dynamic themselves in the Rugby World Cup final.
Off the first phase, they use Jonny May to target Faf de Klerk on the scissors.
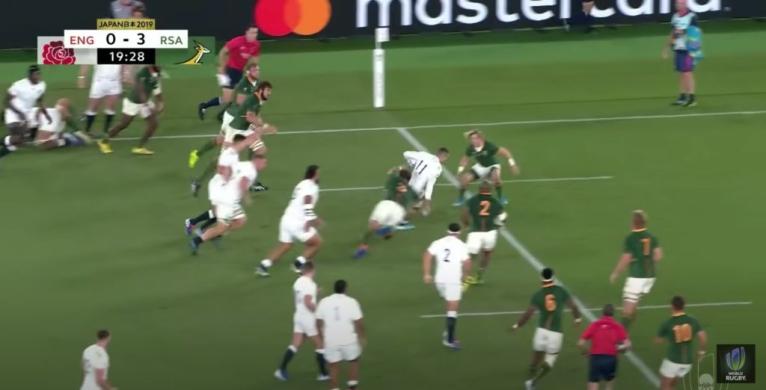
Then run two phases off No. 9 to the right, making sure to target only forwards and leaving Pollard and de Allende alone.
This ensures the ‘1-set’ of backs is maintained on the blind, with the ‘4-set’ to the open.
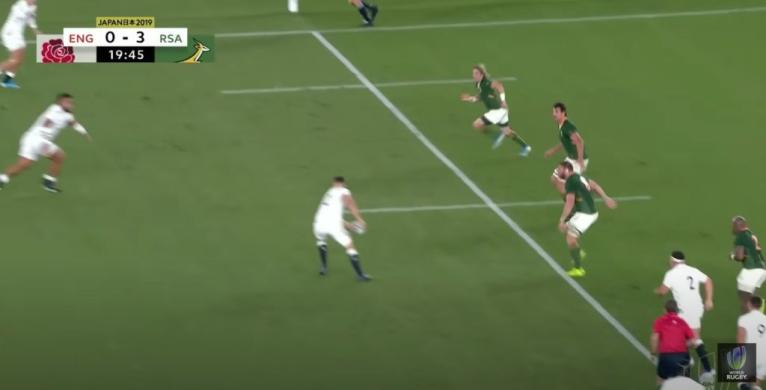
England attempt to exploit this by switching play but were shut down by de Klerk. The ‘M1’ pass is not used by England squandering the opportunity.
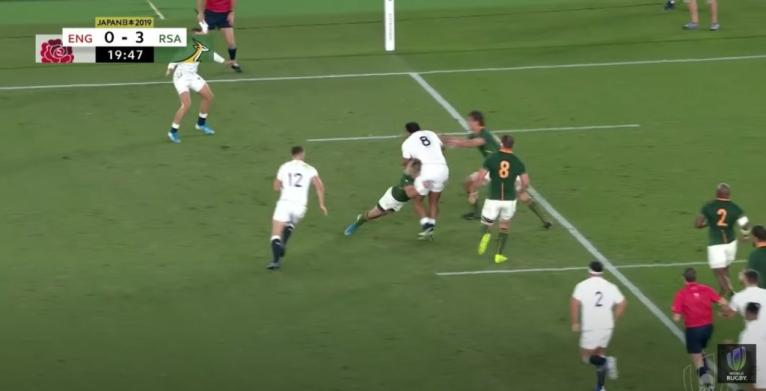
If England was able to ghost Elliot Daly into support May, this is a run-in try.
Exploiting the scrumhalf
The change that could prove fruitful against the Springboks is for a winger to come into the midfield channel off the third receiver, where a lock switches with them on the wing.
This is the first example, of where structural innovation and particular skill sets could prove useful, and it makes use of the scrum-half position off lineout and scrums within the 15m line outside of the 22.
Within the 22, Malcolm Marx is assigned at the front of the lineout, to prevent any trick plays involving the hooker and to assist in the maul.
In any other position on the pitch, the scrumhalf stands at the front of the lineout, a staple of Jacques Nienaber’s system.
But first, it requires getting outside of the ‘catch-up’ within the first three phases. This is required to commit the Bok back-three.
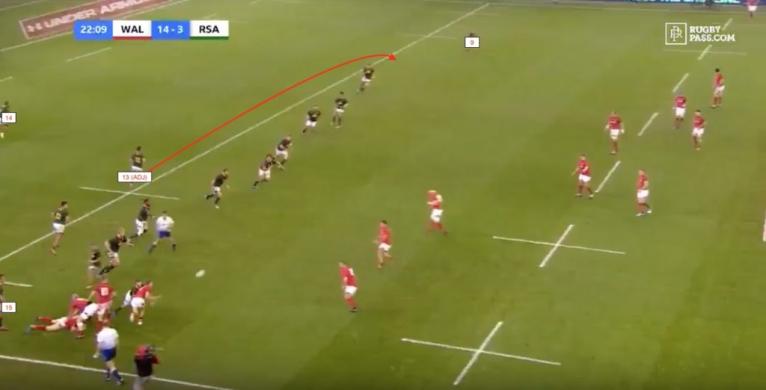
As shown below, Wales have played a two-phase sequence from the right touchline, specifically targeting Nkosi’s indecision as the CUD. In doing so, they get around the CUD, drawing in both wingers and fullback.
This position sets up the cross-kick option back towards where the lineout originated, where the No. 9 is isolated after defending at the front.

Whilst a 3-set out wide, the result shows why the most athletic, tallest lock should be opposite the No. 9. The backfield doesn’t have time to move over, hence the immediate cross-field kick is the right option.
De Klerk and Herschel Jantjjes are beasts in the tackle but can’t out-leap a 6’5 plus lock.
This option takes away the initiative the Boks want and puts the tallest man, very skilled at fielding balls from restarts, in a mismatch any scrumhalf wouldn’t want.
We saw the break earlier, with an exquisite M1 pass made from the first to third receiver by Wales.
On this occasion below, Pollard and Damian de Allende did not reload on the blindside with the No. 9 as the carriers never hit or passed them on second phase.
This left the scrumhalf alone and Kriel having to urgently fulfil the ADJ role.
The result is worse, with the backfield cover not present and the No. 9 even more isolated.
If a team can employ the ‘three-phase’ framework and target the forwards on first and second phase, an ‘All Blacks special’ in the low hanging cross-field kick could play dividends with the No. 9 isolated against a lock.
The mismatch between the tall man and the short one has been used before, for some players in their most important ever game.
Rather than sticking to the structure on the fourth phase, doing the expected and sending the ‘3-pod’ in, teams can identify and create real mismatches, if they have the daring to do it.
Going forward, teams could look to use this as an alternative to targeting the scrumhalf.
South African scrumhalves are machines in the tackle. Hence, they need to be targeted a smarter way.
“Lil” Floater
The outcome of success in the floated pass, depends on two inputs, the first is the delivery of the pass, and the actions of the receiver.
A floated pass can allow a lot of outcomes. Done incorrectly it can result in an intercept. Done well, it can result in a massive gain.
The problem is that many receivers (often the winger) take the ball while static, allowing the incredible work rate and natural agility of the Springbok outside backs to catch him.
If a player can run onto it, though, they may be able to get around this drift before it catches up.
Again, we look at Wales. In contrast to their three-phase framework, they were able to use a two-phase framework designed to target Nkosi in defence.
Wales send Parkes up the No. 10 channel, automatically setting in stone the forwards fold and Pollard/De Allende’s reload to the short side.
The long pass is given to Jonathan Davies, which skips the forwards and pits the Welsh backline against the “2-set” rather than “4” of the South African edge, forcing Nkosi to make the CUD decision, their objective.
This allows the Welsh attack to get on the outside.
While effective, the time taken for the link passing and depth means the Bok defence has the time to close down the outside backs and prevent any try-scoring opportunity.
An alternative that may work is the floated pass, with the winger taking it on the run
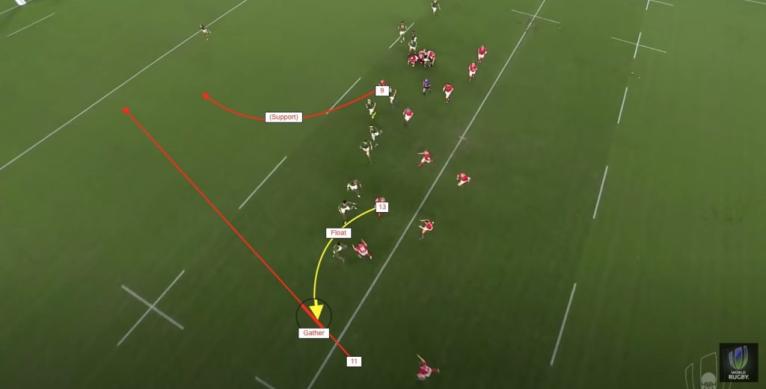
International rugby is a game of fine margins. If Davies is able to “double-pump”, to bring Nkosi up on Biggar but instead execute the floated pass, it would lead to the winger accelerating onto the ball.
The No. 9 can operate as support on the inside, and the No. 13 can operate on the outside.
The winger has to run onto the ball for this, but this would circumvent the link passing and allow him to catch at a much flatter alignment, allowing him the time and space to get around the inside drift of the Boks and engage the backfield.
Similar dynamics have been seen before. In 2003, the willingness to do this existed, whereas current adherences to pattern can quell these moments of endeavour when they are exactly what defensive patterns aren’t designed to contain.
This dynamic will be further explored in the next article in the series.
Doing this requires a new way of thinking and the openness to embrace skill sets that have in some ways been lost. It’s not easy to do, but there is no easy way to beat a team like South Africa. Embracing new ideas could be the way.

Comments on RugbyPass
Bold headline considering the Canes and Blues are 1 and 2 and the Brumbies were soundly beaten by the Chiefs and Blues. Biggest surprise is Rebels 4 Crusaders 12 - no one saw that coming. If Aus are improving that’s great 👍
1 Go to commentsAnna, You are right, we need to have patience whilst the others catch up to England and France. Also it is the PWR that has been the game changer for England. the RFU put money into that initially at the expense of the Red Roses. I was sceptical at first but it has paid off in spades.
1 Go to commentsI think Matt Proctor became a 1 test AB in the same fixture. Cameron is quality and has been great this season, can’t believe’s he only 27. Realistically how would he not be selected for ABs squad this year. Only Dmac is ahead of him as a specialist 10. With Jordan out, it will come down to where and when Beauden Barrett slots back in, and where they want to play Ruben Love. Cameron seems an absolute lock in for the wider squad though. Added benefit of TJ-Cameron-Jordie combination at 9, 10, 11 too.
1 Go to commentsFarcical, to what end would someone want to pay to keep this thing going.
1 Go to commentsHavili, our best 12 by a mile, will be in the squad, if he stays fit. JB is the most overrated AB in the last 50 years.
61 Go to commentsWe had during the week twilight footy, twilight cricket, tw golf plus there was the athletics club. Then the weekend was rugby 15s plus the net ball, really busy club scene back then but so much has changed and rugby has suffered. And it was all about changing lifestyles.
6 Go to commentsIn the 70s and 80s my club ran 5 Senior sides plus a Vets. Now it is 2 sides with an occasional 3rd team. Players have difficulty getting to training now, not sure why and the commitment is not there. It seems to me more a problem of people applying themselves and not expecting to turn up and play whenever they want to.
6 Go to commentsROG’s contract is until 2027. The conversation about a successor to Galthie after RWC 2027 may be starting now. We can infer that Galthie’s reign stops then. He is throwing the Irish Coaching Job angle in because he is Irish. The next Irish coach MUST be Leo Cullen. As well as being the best coach available, coaching the vast majority of Irish Internationals week in week out, he has shown incredible skill at recruiting the best coaching staff for the job in hand. That was a failing in France. Cullen is a shrewd guy and if there is a need for foreign coaches underneath him he won’t hesitate. Rightly so. Ireland does need to start to bring Irish coaches through. Not just at the professional level but we need to train coaches to man new pathways for developing kids from schools/clubs up through the divisions.
8 Go to commentsNo Islam says it must rule where it stands Thus it is to be deleted from this planet Earth
18 Go to commentsThis team probably does not beat the ABs sadly Not sure if BPA will be available given his signing for Force but has to enter consideration. Very strong possibility of getting schooled by the AB props. Advantage AB. Rodda/Skelton would be a tasty locking combination - would love to see how they get on. Advantage Wallabies. Backrow a risk of getting out hustled and outmuscled by ABs. Will be interesting to see if the Blues feast on the Reds this weekend the way they did the Brumbies we are in big trouble at the breakdown. Great energy, running and defence but goalkicking/general kicking/passing quality in the halves bothers me enormously. SA may have won the World Cup for a lot of the tournament without a recognised goalkicker but Pollard in the final made a difference IMO. Injuries and retirements leave AB stocks a bit lighter but still stronger. 12 and 13 ABs shade it (Barret > Paisami, Ione = Ikitau, arguably) Interesting clash of styles on the wings - Corey Toole running around Caleb Clark and Caleb running over the top of Toole. Reece vs Koro probably the reverse. Pretty even IMO. 15s Kelleway = Love See advantage to ABs man for man, but we are not obviously getting slaughtered anywhere which makes a nice change. Think talent wise we are pretty even and if our cohesion and teamwork is better than the ABs then its just about doable.
11 Go to commentsCompletely agree. More friday night games would be a hit. RFU to make sure every club has a floodlit pitch. Club opens again Saturday to welcome touch / tag. Minis and youths on Sunday
6 Go to comments1.97m and 105Kg? Proportionately, probably skinnier than me at 1.82 and 82kilos. He won’t survive against the big guys at that weight.
55 Go to commentsThe value he brought to the crusaders as an assistant was equal to what he got out of being there. He reflected not only on the team culture but also the credit he attributed to the rugby community. Such experience shouldn’t be overlooked.
8 Go to commentsGood luck Aussie
11 Go to commentssmith at 9 / mounga 10 / laumape 12 / fainganuku 14
61 Go to commentsBar the injuries, it’s pretty much their top team …
2 Go to commentsDon’t disagree with much of this but it appears you forgot Rodda and Beale, who started at the Force on the weekend.
11 Go to commentsExcept for the injured Zach Gallagher this would be Saders best forward pack for the season. Blackadder needs to stay at 7, for all of Christies tackling he is not dominant and offers very little else. McNicholfullback is maybe a good option, Fihaki not really upto it, there was a reason Burke played there last year. Maybe Havilli to 2nd five McLeod to wing. Need a strong winger on 1 side to compliment Reece
1 Go to commentsTo me TJ is clearly the best 9 in the competition right now but he's also a proven player off the bench, there's few playmaking players who can come off the bench as calm and settled as he is, Beauden can, TJ can and I doubt any of the scrumhalves in contention can, if they want to experiment with new 9s I want him on the bench ready to step in if they crumble under the pressure. The Boks put their best front row on the bench, I'd like to see us take a similar approach, the Hurricanes have been doing similar things with players like Kirifi.
61 Go to commentsROG has better chance to win a WC if he starts training and make himself eligible as a player. He won’t make the Ireland squad but I reckon he may get close with Namibia (needs to improve his Afrikaans) or Portugal. Both sides had 1000:1 odds to win the RWC in 2023 which is an improvement on ROG’s odds of winning a RWC as a coach. Unlike Top 14 teams, national teams can’t go shopping and buy the best players - you work with the available talent pool and turn them into world beaters.
8 Go to comments